Repurposed Bath Towel Blanket

When I was in high school, with my first car, okay a small truck, I had an “always prepared” bag behind the seat. The bag contained a coat, snow gloves, a blanket, a bathing suit, sun block, and a towel. Not exactly the same “always prepared” that I would think of today, but at the time you never knew what plans might arise for after school (especially if I had a day off work). It might be a trip to the mountains to play in the snow, or it could be a day at the river…really depends on the season and the weather, but I was prepared.

Well, several years have gone by since then, but I still attempt to keep “prepared” kit in my vehicle…no longer my cute little truck that I would take 4 wheeling, but my much more practical Subaru Outback…I still refuse to admit it might be a station wagon. My kit now has some granola bars, napkins and wet wipes, a flashlight, and I still have a blanket. I find that this blanket has many good uses, and can even still fit in some spontaneity, like a quick picnic in the park, or what is more likely a fast food dinner during archery practice. The blanket also helps when the kids are tired, or someone is cold. It covers the seats when the dog goes to the vet, or is rolled into a ball to give the driver some more support for resting their arm on the console.

Repurposed bath towel blanket. Www.lindadeancrochet.com

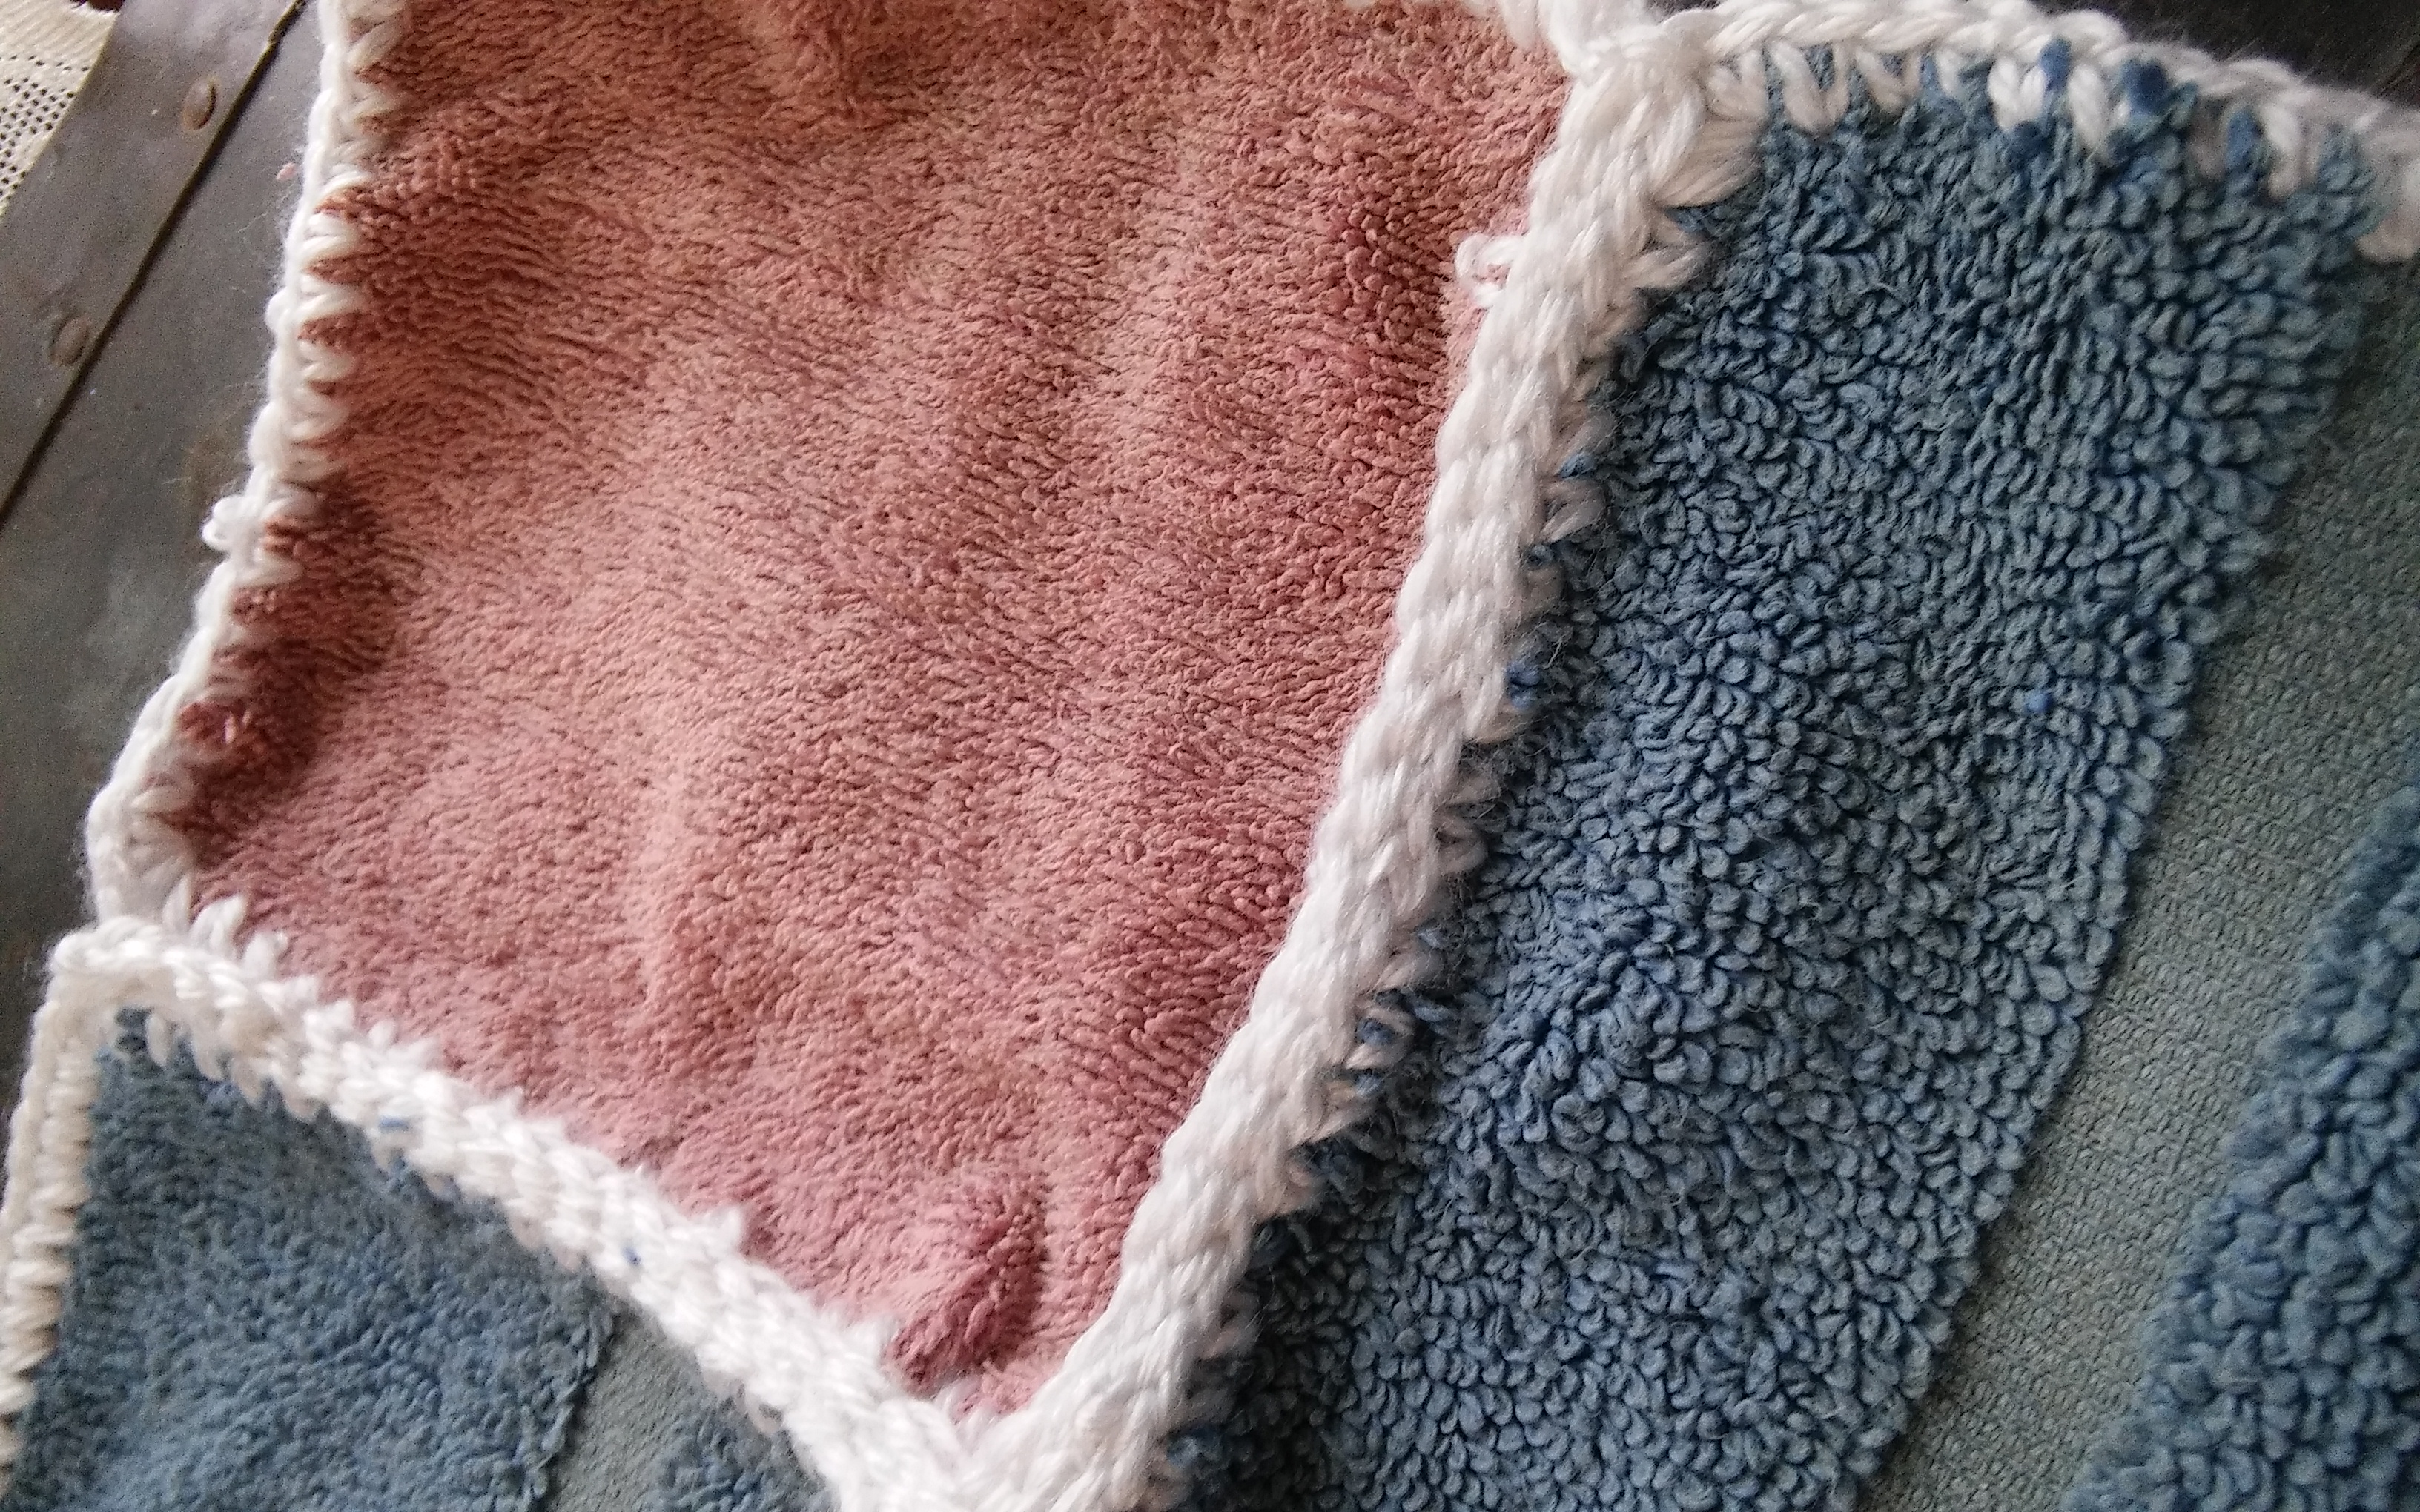
Repurposed Bath Towel blanket

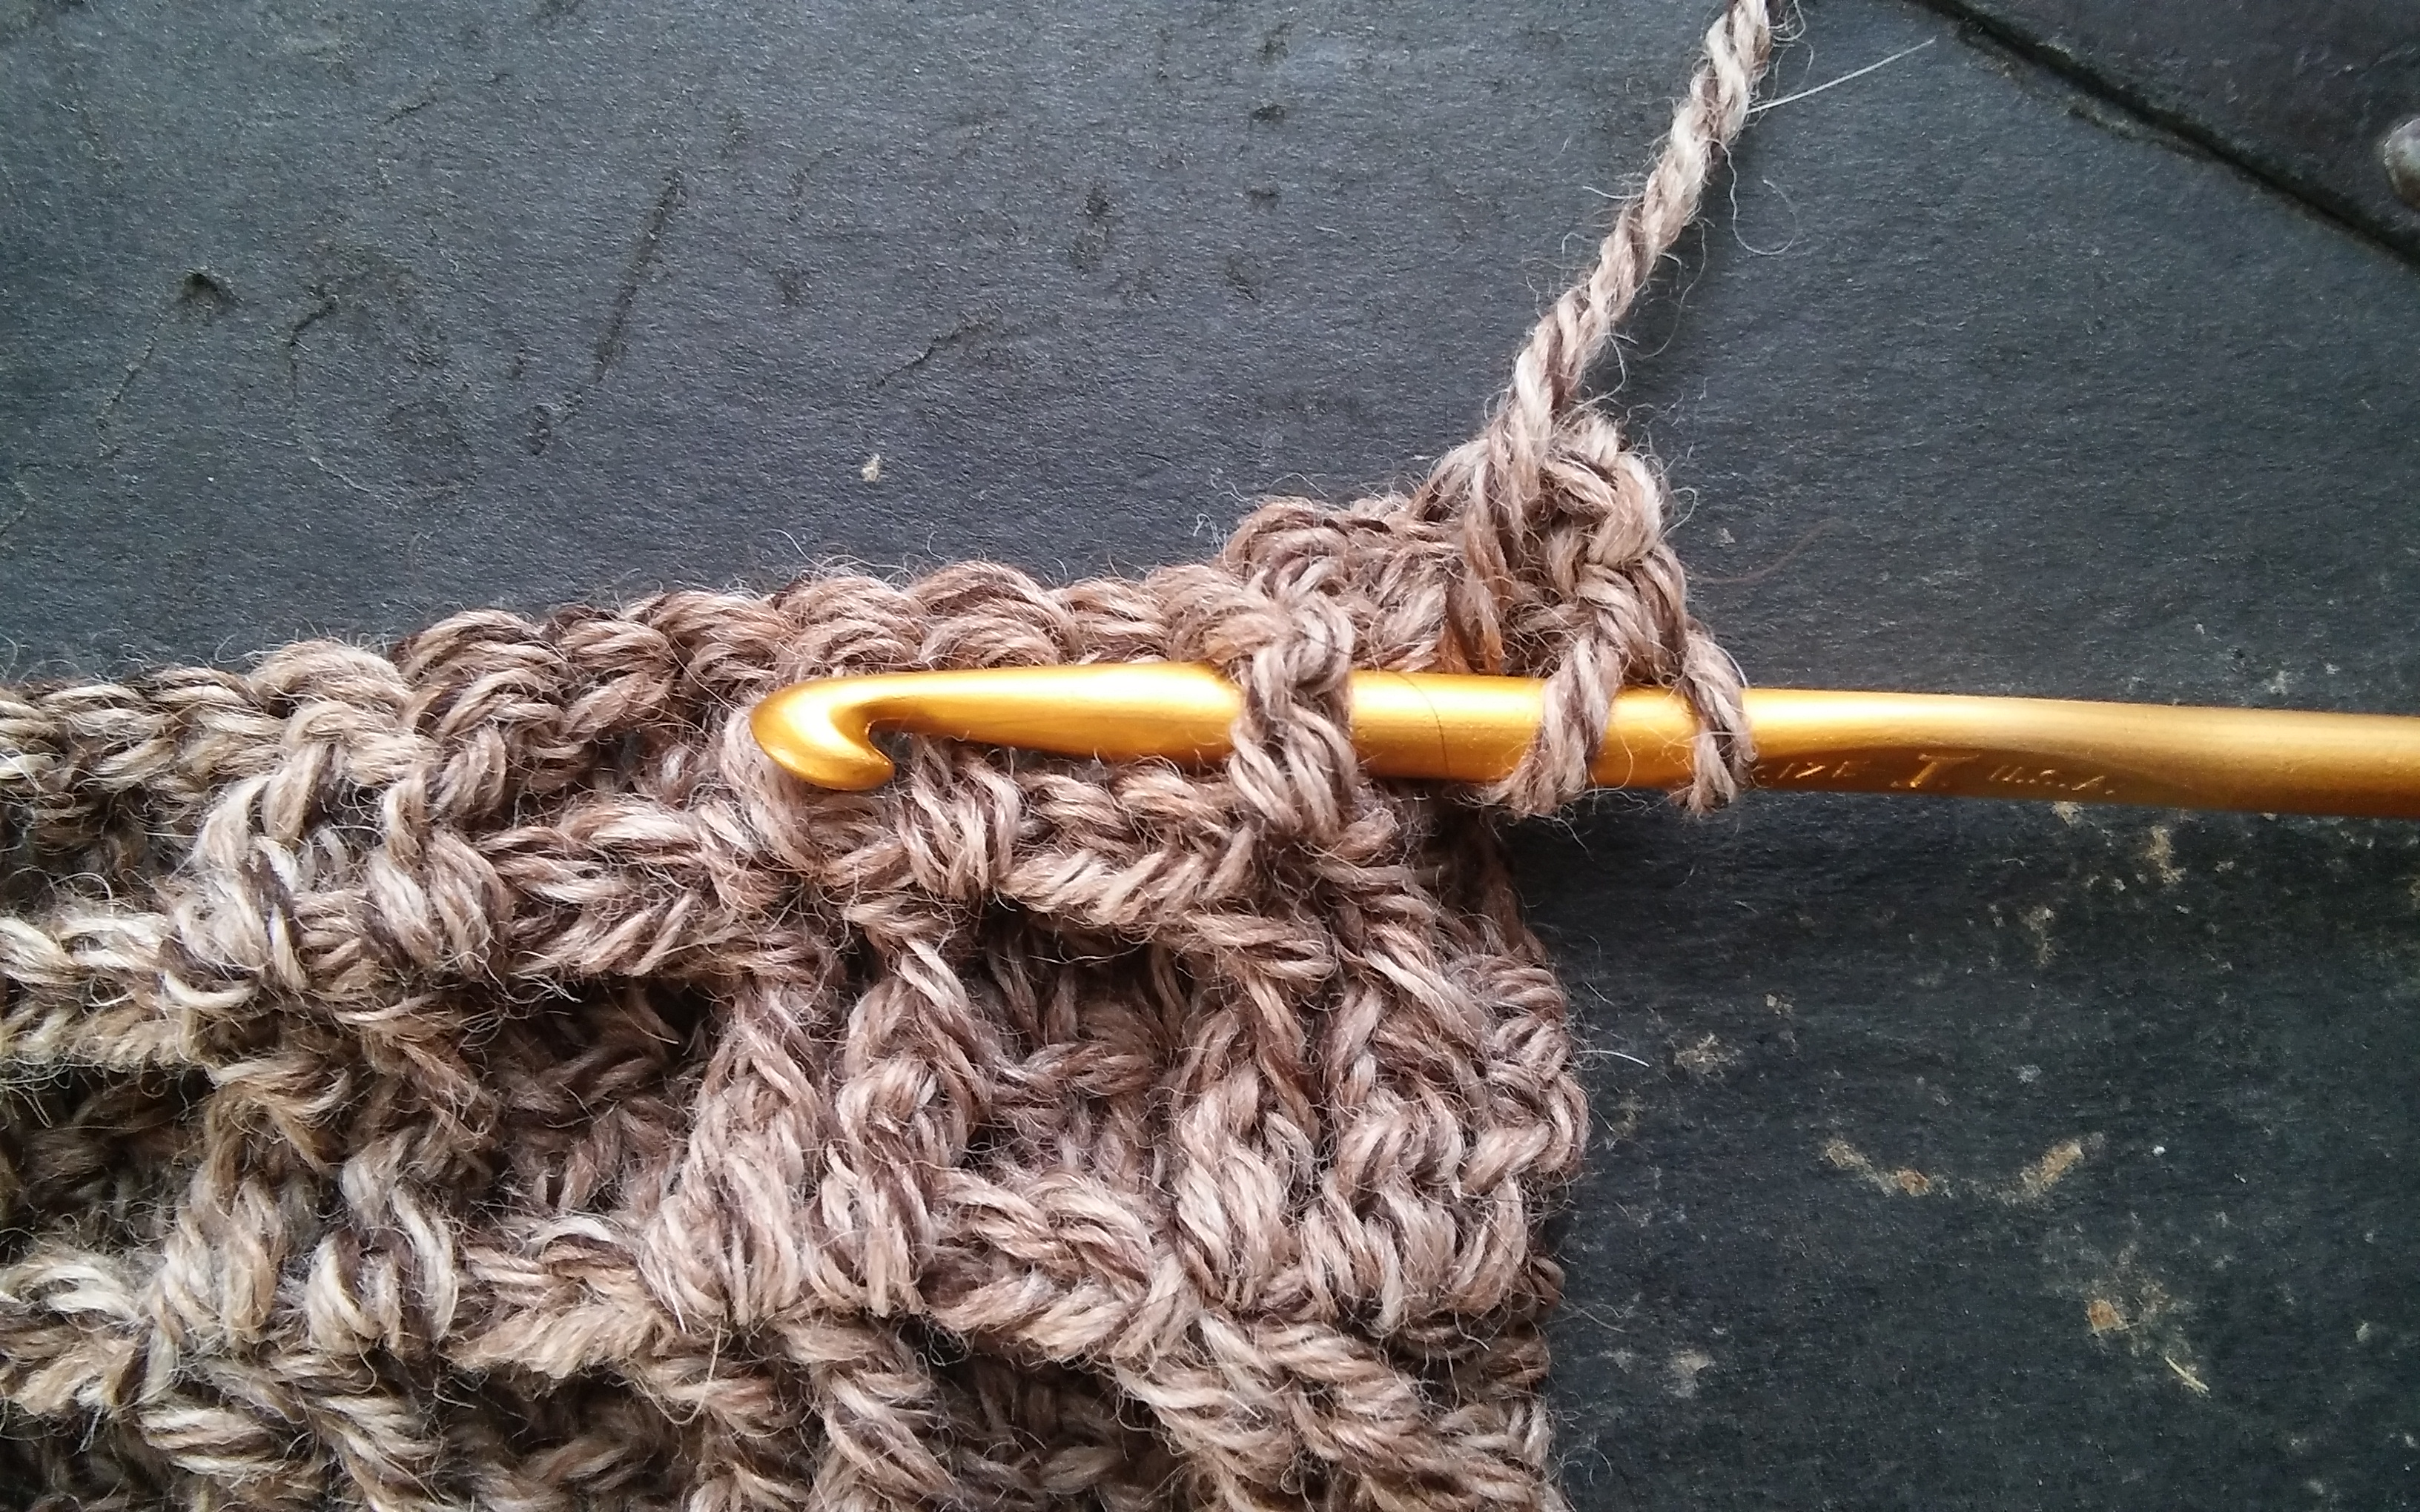
This blanket has been replaced over the years, and one way I like to feel that I have a blanket that is really a second life is to make one. When bath towels wear out, become a bit thread barren, or simply have too many holes, I cut them into squares. As long as the squares are the same size, that is all that matters. I then crochet an edge around the squares. I then join all the squares together, I could sew or seem them, but I prefer to crochet them together. I find that the terry cloth a nice fabric for a blanket of the necessity, but just be mindful of ensuring that you slightly roll the edge of the fabric when crocheting the edge around it, this helps to reduce the initial fraying.

Give it a try next time you have a towel that has seen better days, and create your own blanket to be prepared with.

A Really Fun Technique- Planned Pooling Argyle Wristers

Sometimes you have a design where the yarn does all the work, this means that the stitches may be fairly easy, but since the yarn has character the item really looks more difficult than it is. This is true with color pooling projects, like my latest design Planned Pooling Argyle Wristers from Red Heart Yarns.

Planned Pooling Argyle Wristers www.lindadeancrochet.com

Planned Pooling Argyle Wristers Photo courtesy, Red Heart

Planned Pooling is when you plan your stitches to have the colors of variegated yarns stack up in a desired way. I might be exaggerating slightly about it being completely easy, you do have to pay attention to your tension so that you place the correct color in the correct stitch (Marly Bird has a great video about it here).

So these wristers look great and keep your arms warm, and only take two skeins (one for the argyle, one for the trim). The argyle is worked in what is referred to as a “Moss” or “Linen” stitch, which is simply a single crochet and a chain 1, worked into a chain-1 space. This stitch has a benefit to planned pooling as it is very forgiving with a change in tension. It is necessary to change your tension (either make a stitch tighter or looser) to ensure that the correct color is worked in the correct location.

Planned Pooling Argyle Wristers www.lindadeancrochet.com

Planned Pooling Argyle Wristers Photo courtesy Red Heart Yarn

It may take a little practice to get the hang of this technique, but then you might become addicted…I have talked to several people that once they finally discovered how to make the planned pooling work, had to try it with every color variegated yarn they could find, just to see if they could get that yarn to pool too.

The wristers are worked as a rectangle then seemed, then the trim is added. If you need the wristers to fit a wider arm you simply work the rectangle longer, if you want the wristers to fit your arm longer then you work the trim wider. Making it an easy to customize pattern. The added bonus to this pattern, besides it being free, is that it is available in a free e-book with 9 planned pooling patterns….and did you notice that my design is gracing the cover? Yes, I think that is kind of cool.

Vermont- A Nice Yarn

It seems like I am always saying that not all yarn is created equal….there is really so much that subtly goes into making yarn that it creates a large difference in how it works up in your final project. Tahki Yarns Vermont is a yarn that has some great quality that easily adds a little luxury to your project.

It is comprised of 50% Merino Wool and 50% Superfine Alpaca, since both of these fibers are have a small micron count (the diameter measurement of the individual fiber) this is a really soft yarn. The property of both of these fibers is one of working well to retain heat, so this yarn is warm. It also has a nice soft loft to it, allowing it to trap air, resulting in warmth as well. Even listed as a worsted weight, this yarn seems to be on the light side, but does work up well with 5-6mm hooks and needles.

Vermont by Tahki yarn www.lindadeancrochet.com

Tahki yarns, Vermont

This is an eight ply yarn, meaning it has eight individual strands that are spun together. This creates a nice and round yarn. That might sound odd, but when you ply strands of yarn together the actually shape is not perfectly round. Imagine twisting two ropes together, there are spaces where the ropes touch that prevent it from being a complete circle. So the higher the number of ropes the more of this gap that is filled in, making a more round yarn.

Typically the rounder a yarn the better it can highlight a stitches definition, that is true with Vermont. This yarn has a nice definition, the only distraction from the stitch itself is the marbled color of the yarn. All color options for this yarn look like natural colors, and are worked together in a manner that is reminiscent of tweed, but a bit more consistent. This makes for a very gender neutral color scheme, allowing it to be perfect for an item accepted my many.

Vermont by Tahki Yarn www.lindadeancrochet.com

Vermont by Tahki yarn

The ball size is not that generous, on 93 yrds/85m per 1.75oz/50g, so one ball could probably complete a hat, but any other project would need to have a few more. Overall though, a very nice yarn, that will create a very treasured item. Due to the size I feel that this is a yarn best suited for accessories, a nice hat, gloves (fingerless or otherwise), or maybe a scarf. I could make a nice sweater, but the yardage needed would require many balls and might be price prohibitive.

Simple Basket- Crochet for A Difference

There are various ways that crochet impacts organizations and individuals every day. I have always tried to use my crochet ability to make a local impact, so I want to share a crochet stitch and inspire you to Crochet For A Difference.

I have stated it in past posts, that crochet specialty stitch pattern names really are not known universally, but in order to make it clear about the stitch I am discussing I have to give it a name, so I want to share the Simple Basket Stitch Pattern with you.

Front post double crochet www.lindadeancrochet.com

Where to work a Front Post Double Crochet, insert the hook around the post.

This stitch pattern is worked in double crochet with the only variation being the Front Post Double Crochet. This Front Post stitch can seem intimidating, but essentially it is the same double crochet that you have always worked it is just in a different location. To work this stitch you begin with a yarn over and insert the hook around the body or post of the next stitch from the front to the back and then to the front again, and then work it as a regular double crochet by working a yarn over then pulling it through, then yarn over again and pull through two loops, twice.

To work the Simple Basket you need to create chain that is a multiple of 4, then add 2 more chains.

Row 1: Work a double crochet in each chain across, turn.

Row 2: Chain 3, [front post double crochet in the next 2 stitches, double crochet in the next 2 stitches] repeating across until 1 stitch remains, double crochet in the last stitch, turn.

Simple Basket Stitch www.lindadeancrochet.com

Simple Basket Stitch

Repeat Row 2 until you have reached the desired length.

To help visually understand where each stitch goes so that you do not have to worry about counting, essentially if the stitch you are working into appears to be pushed forward then work a front post double crochet, if the stitch you are working into appears to be pushed away from you work it as a double crochet stitch.

The texture created gives a great visual as well as esthetic feel. It has a nice loft to it that really helps the stitch feel like it is harder than it is. This can create a great blanket that you may consider to donate to a homeless shelter. It is estimated that any given night in the United States that over 600,000 people were experiencing homelessness only 17% of those are consider chronically homeless (source greendoors.org). Meaning that a great percentage of those experiencing homeless on any given night, are in a short term housing situation and a simple blanket can make a difficult time a little more bearable. Find one in your community here.

The More I Teach, the More I Learn

Teaching crochet might sound like an interesting way to make a little extra money, but there is more to it than what you might think.

I have been teaching crochet for almost a decade, in a variety of venues with a variety of approaches. I began teaching consistently at a coffee shop, I set up a regular hour a week and had people drop in for lessons at their leisure. I also hosted my own workshops at a local winery, I taught workshops at local guild gatherings. I worked this approach for quite some time.

 The drop in lessons at the coffee shop always kept me on my toes. I never knew student may arrive or what they may want to learn. It kept me flexible, and always expanding my own education to keep up with the requests and needs of those seeking my service. This approach did have its down side however, as I never had any idea if anyone would even show up during these set hours. I had many a day that I would just sip my tea and people watch instead of having any students.

Hosting my own workshops way an interesting experience. I was responsible for everything, the location set up, the advertising, the accounts receivable/payable, as well as all the regular workshop expectations for handouts and material, I even made the refreshments. This helped me to recognize my own strengths and weaknesses, as well as a better appreciation for all the work and undertaking that goes into larger teaching/learning venues.

Teaching at the guild workshops had their own challenges, as I personally knew most of the students. I seemed surreal to me that people I knew actually wanted to pay to take a class from me. It was a safe place, but I had to ensure not to “let my guard down” in a sense. I want to keep things professional and this can be difficult when the room is filled with people that you share a different kind of relationship with. Thus, this experience helped me to understand some of my short comings as an instructor.

From these 3 teaching venues I grew into teaching at my local yarn store, as well as at national conferences. The local yarn store helped me to expand my student following, and introduce me to new people. It allowed me to focus on actual education without having to worry about the advertising, the enrollment, the location. I feel like I have a more formal footing on my class structure and can focus on various ways to explain various crochet approaches. I can better understand different learning styles and different personalities. This has helped me to better structure my classes for national conferences.

The difference from workshops at the local yarn store and those at conferences, is really the students. The local yarn store has a wide base of students, with varying needs and learning desires, those at conferences often are very focused on the topic at hand, and as a result the classes need to be geared to a more advanced student.

That might be the most challenging thing to putting a workshop together, ensuring that you have enough material to keep everyone engaged. It can be a delicate balance, and until you have the students in the room you never really know what the event will look like. You need to have enough material so that the advanced students are kept busy, while not have so much that you overwhelm students that may need more guidance.

The one underlying affect that teaching has, is seeing the joy and excitement your students have when it all clicks into place and they “get it”. I have heard this said by teachers of all sorts, it is a very unique experience that can become addicting. It is really the students that keep me coming back to teaching, they keep challenging me…something that I have always enjoyed.

I guess I can safely say that teaching has given me more than I would have imagined, every time I teach I learn something new. It might be from a question a student asks that causes me to look at the subject matter from a completely different vantage point, or it could be learning a better way to share my ideas and concepts with someone else. If teaching crochet is something you have considered, be prepared to grow.