Help me help local communities by creating blocks for Warm Up America, by making a block for yourself and one
for a community project with this free pattern. I will be creating a new block
every few weeks and sharing it with you, I just ask that make one for donation.
Warm Up America is
a nationwide organization that encourages local donations, but will also except
donations to be sent to their office so that blocks can be assembled and then
blankets can be donated through the United States.
Mixed Blocks Block
Even if you do not want to participate with Warm Up America, please consider creating blocks, or
blankets for your local community. There are various places in every community
that accept donations.
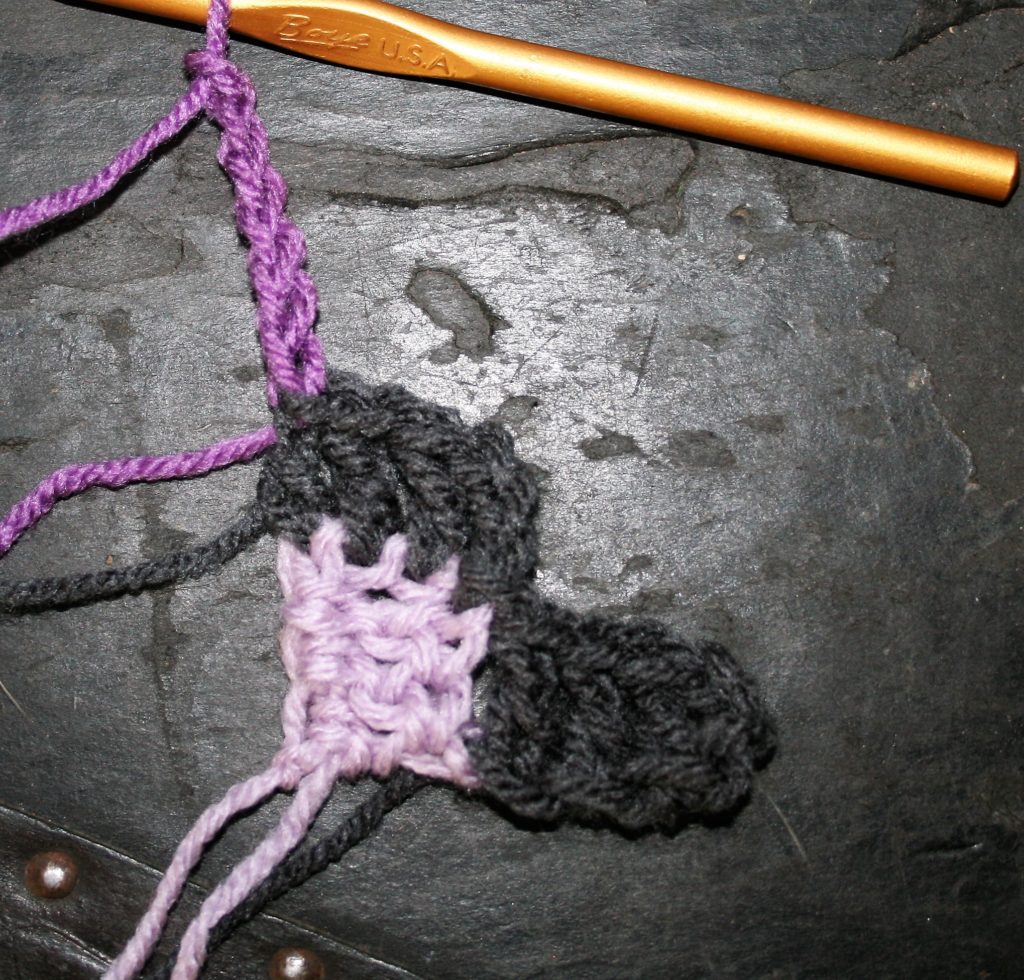
Corner to Corner
This is a popular technique
that while a bit of a challenge to get started is quite addicting once you get
it. This technique really allows you to customize the size of any project you
want to work it with, you just need to refer to the “increase both side”, “increase
one side, decrease one side”, and “decrease both sides” portions and work them
until you have a desired size.
Gauge: 7”x9” rectangle
Materials
Medium weight yarn, in
3 colors MC (main color), CC1, CC2
K/10 ½/ 6.5mm hook
Notes
The “blocks” within this block are made up of a chain 3, and 3
double crochet stitches.
Each row creates new blocks, and work in the sides of the adjacent blocks of the previous row.
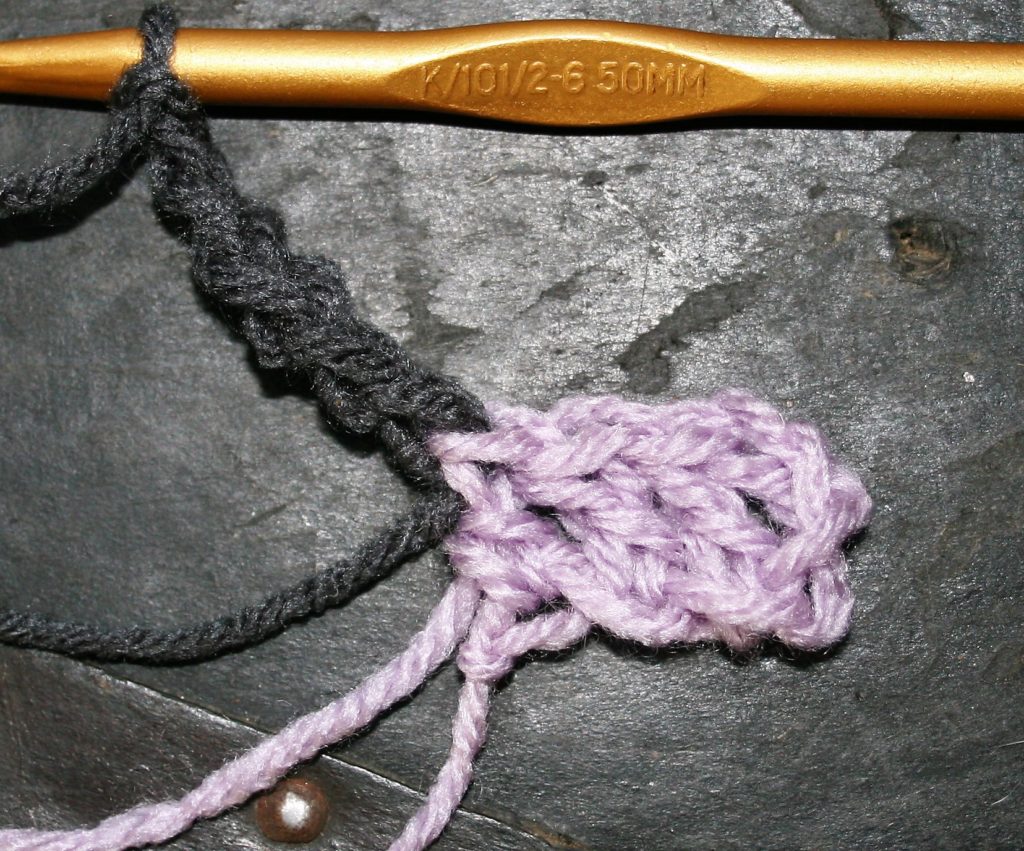
Row 1: Dc in 4th ch from hook, dc in
each ch across, turn. – 4 dc (1 block)
Beginning of Row 2, change color and chain 6
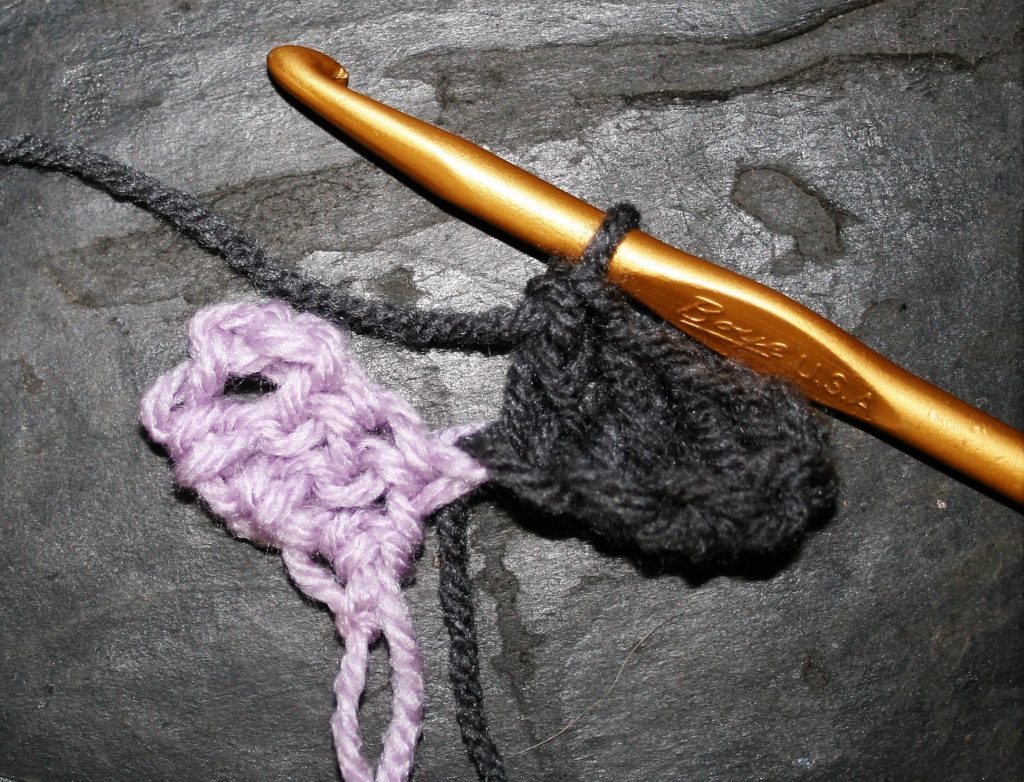
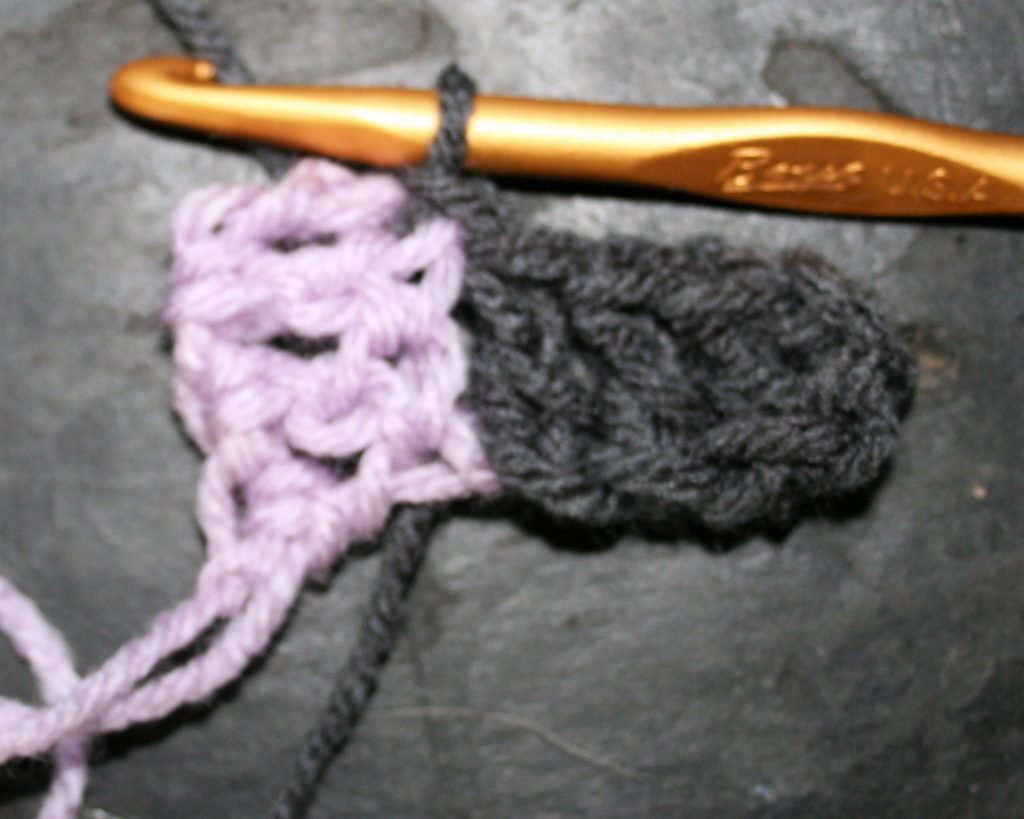
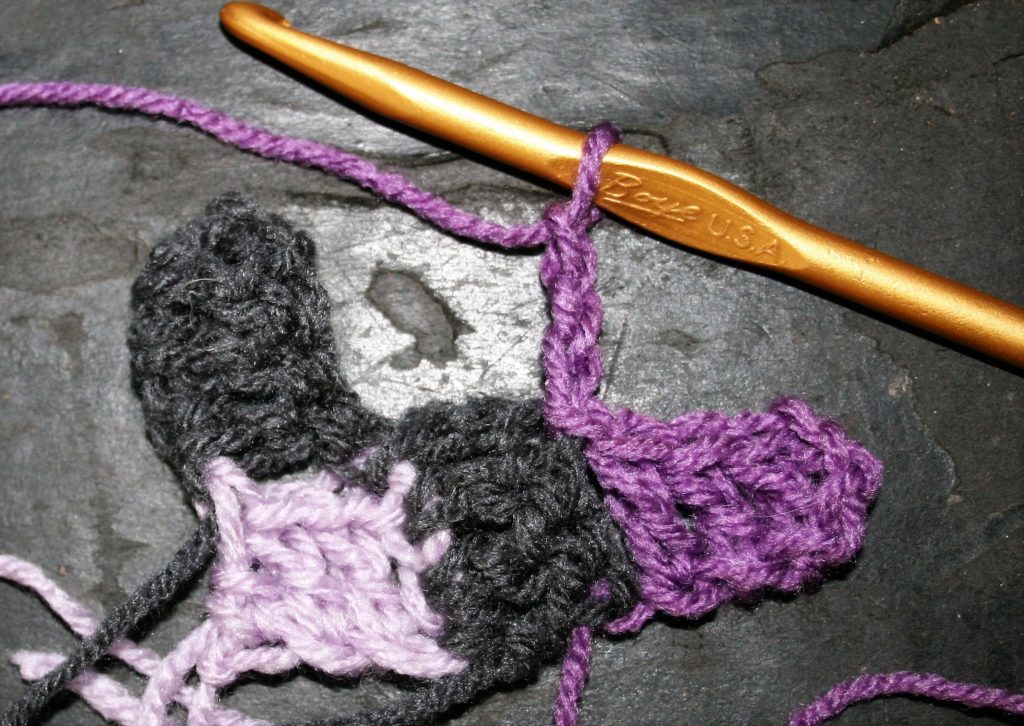
Row 2: Change to CC1, ch 6, dc in 4th
ch from hook, dc in next 2 chs, sl st to the top of the turning chain of the adjacent
dc block, ch 3, working down side of dc stitch of adjacent block work 3 dc,
turn. -2 blocks
Row 2, dc in 4th ch from hook, and in next 2 chains.Slip Stitch to the top of the adjacent blockWork in the side of the adjacent block, change color and chain 6
Row 3: Change to CC2, ch 6, dc in 4th
ch from hook, dc in next 2 chs, sl st to the top of the adjacent dc block, [ch
3, working down side of dc stitch of adjacent block work 3 dc, sl st to the top
of the adjacent dc block] repeat across, turn. -3 blocks
Working second block of Row 3
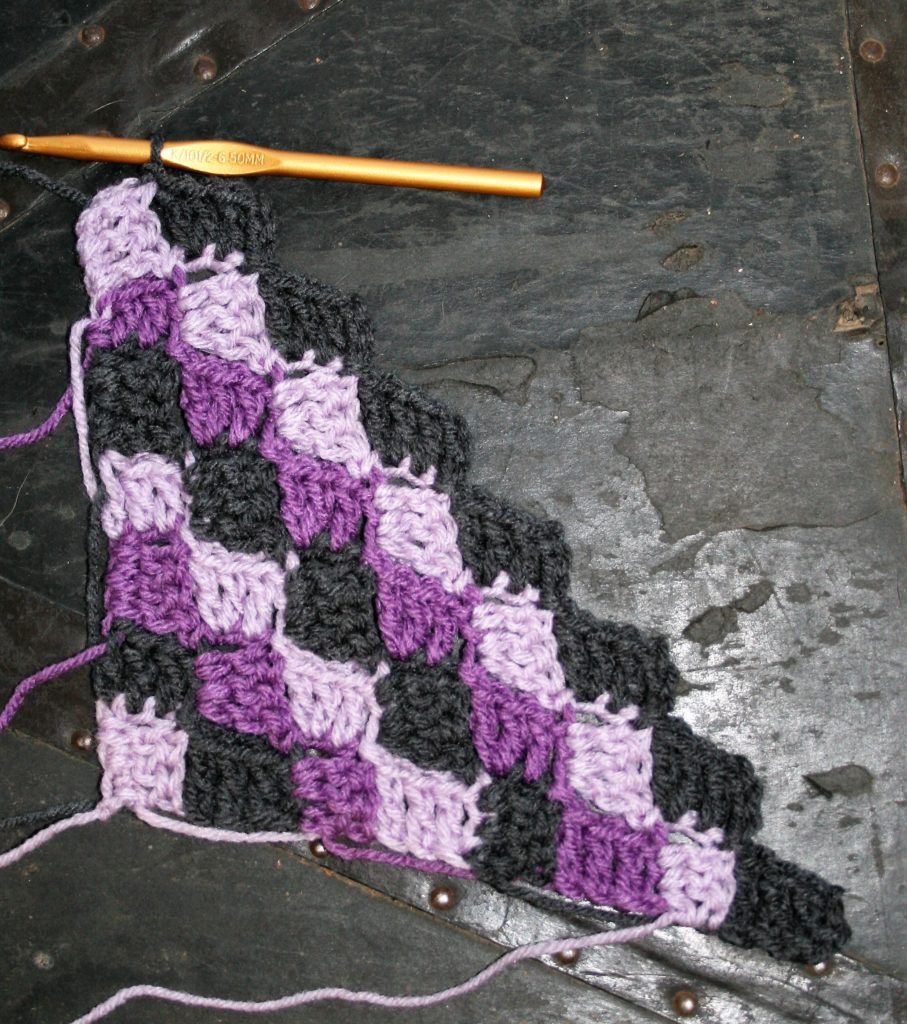
Row 4-7: Rep Row 3, changing color every row in the pattern of MC, CC1, CC2, MC. – 7 blocks
Increase One Side, Decrease One Side
Row 8: Change to CC1, ch 6, dc in 4th ch
from hook, dc in next 2 chs, sl st to the top of the adjacent dc block, [ch 3,
working down side of dc stitch of adjacent block work 3 dc, sl st to the top of
the adjacent dc block] repeat across until 1 block remains, leave side of last
block unworked, turn. -7 blocks
End of Row 8, do not work in the side of the last block.
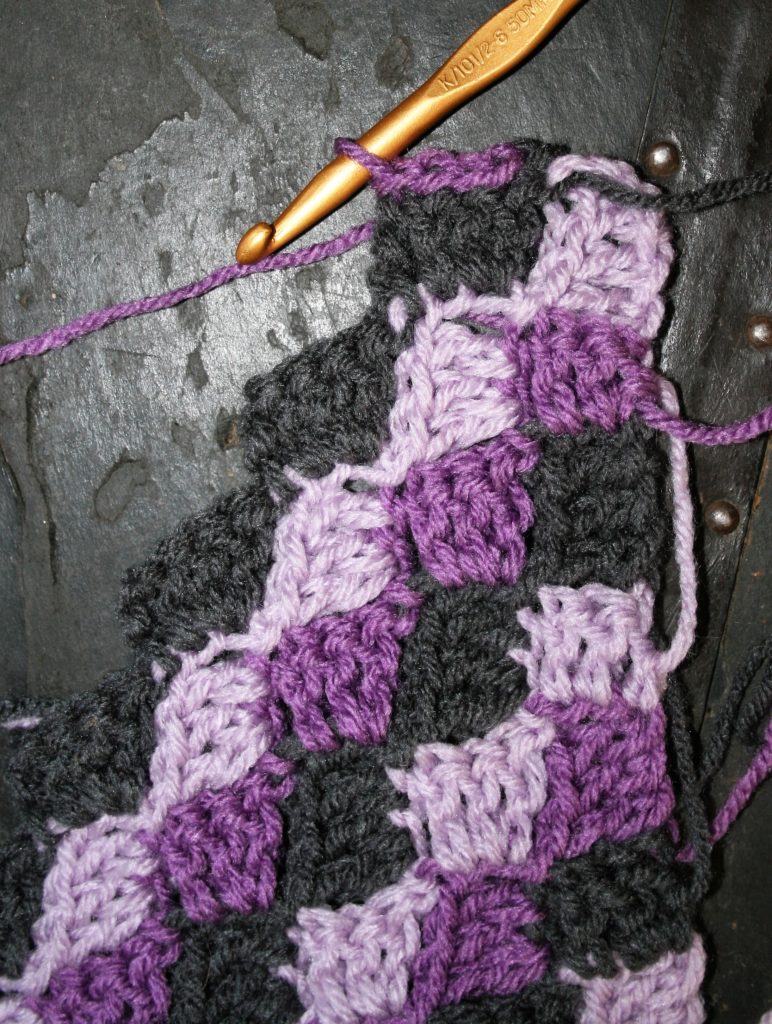
Row 9: Change to CC2, sl st across the top of the
last 3 dc, sl st to the top of the ch on block, [ch 3, working down side of dc
stitch of adjacent block work 3 dc, sl st to the top of the adjacent dc block]
repeat across, turn. -7 blocks
Beginning of Row 9, Sl st across the block to begin row, and decrease the side.
Decrease Both Sides
Row 10: Change to MC, sl st across the top of the
last 3 dc, sl st to the top of the ch on block, [ch 3, working down side of dc
stitch of adjacent block work 3 dc, sl st to the top of the adjacent dc block]
repeat across until 1 block remains, leave side of last block unworked, turn. -6
blocks
Beginning of Row 10, sl st across to begin decreasing on both sidesEnd of Row 10, decreased on both sides.
Rows 11-15: Rep Row 10. -1 block
Fasten off.
End of Row 15. Note the stitch ends at the end of the block, not the corner of the overall Block.
Edge
Rnd 1: Ch 1, sc in sc in same st, sc in each st
across until 1 st remains, 3 sc in last st, working over row ends evenly sc
across to beg ch, 3 sc in last st, working in unused loops of beg ch, sc in
each chain across, 3 sc in last st, working over row end evenly sc across, 2 sc
in last st, sl st to beg sc, fasten off.
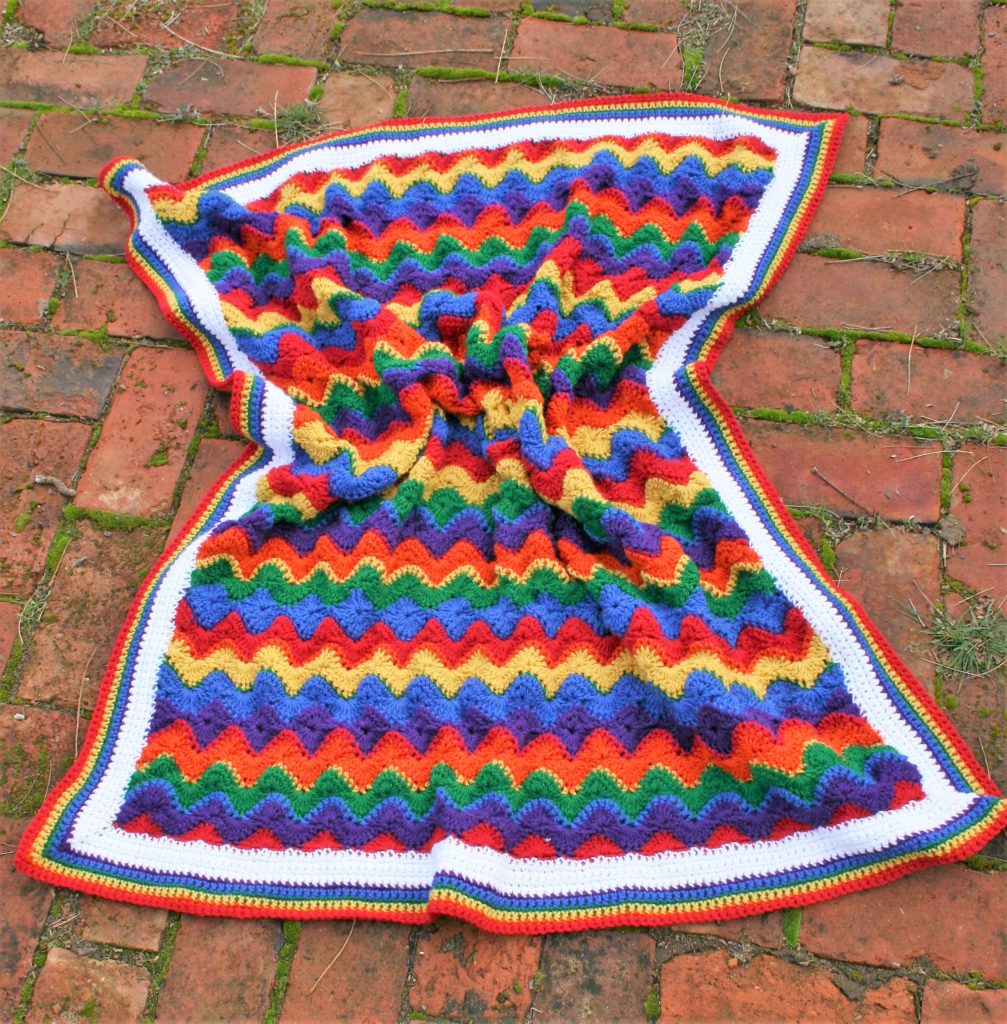
Every baby deserves something special, and I was asked to create something that unique, and it is a free pattern to you. The Energizing Rainbow is my creation inspired by a local Apple Orchard, Rainbow Orchards.
Energizing Rainbow Baby Blanket
It is created using the Catherine Wheel technique of one row of shells, followed by another row of large decreases. In this approach, I offset the colors in some of the rows to create waves instead of circles. I then alter it back to circles periodically to create a shift in the direction of the wave.
If you want to explore more about the Catherine Wheel, I explain more here, while I explain working decreases here. I also framed the waves with a row of single crochet, so that there is a break in the color blocking.
Double Crochet 4 Together (dc4tog): [Yo, insert hook into indicated stitch, yo, pull up a loop, yo pull through 2 loops] 4 times, yo, pull through all 5 loops on hook
Double Crochet 9 Together (dc9tog): [Yo, insert hook into indicated stitch, yo, pull up a loop, yo pull through 2 loops] 9 times, yo, pull through all 10 loops on hook
Beginning to Make Waves
Row 1: With X ch 114, sc in 2nd ch from hook, [sk 3 chs, 9 dc in next ch, sk 3 chs, sc in next ch] across, change to X1, turn. – (14) 9 dc groups, 15sc
Row 2: Ch 1, sc
in each st across, change to X2, turn.
Row 3: Ch 3,
dc4tog, [ch 3, sc in next st, ch 3, dc9tog] 13 times, ch 3, sc in next st, ch
3, dc5tog, turn.
Row 4: Ch 1, sc
in same st, [9 dc in next sc, sc in center of dc9tog] 13 times, 9 dc in next
sc, sc in turning ch, change to X3, turn.
Row 5: Ch 1, sc
in each st across, change to X4, turn.
Rows 6 & 7:
Rep Rows 3 & 4, changing to X5 at the end of Row 7.
Making a Full Circle
Row 8: Rep Row 3.
Row 9: Ch 3, 4 dc
in same st, [sc in next sc, 9 dc in center of dc9tog] 13 times, sc in next sc,
5 dc in top of turning ch, change to X, turn.
Row 10: Ch 1, sc
in each st across, change to X1.
Back to Waves
Row 11: Ch 1, sc in
same st, [ch 3, dc9tog, ch 3, sc in next st] 14 times, turn.
Row 12: Ch 3, 4
dc in same st, [sc in center of dc9tog, 9 dc in sc] 13 times, sc in center of
dc9tog, 5 dc in last sc, change to X2, turn.
Row 13: Ch 1, sc
in each st across, change to X3, turn.
Rows 14 & 15:
Rep Rows 11 & 12, changing to X4 at the end of Row 15.
Row 16: Ch 1, sc
in each st across, change to X5, turn.
Rows 17 & 18:
Rep Rows 11 & 12, changing to X at the end of Row 18.
Another Circle
Row 19: Rep Row
11.
Row 20: Ch 1, sc
in same st, [9 dc in center of dc9tog, sc in next sc] 14 times, change to X1,
turn.
Row 21: Ch 1, scv
in each st across, change to X2, turn.
Back to Waves
Row 22: Ch 3,
dc4tog, ch 3, [sc in next st, ch 3, dc9tog, ch 3] 13 times, sc in next st,
dc5tog, turn.
Row 23: Ch 1, sc
in same st, [9 dc in sc, sc in center of dc9tog] 13 times, 9 dc in next sc, sc
in top of turning ch, change to X3, turn.
Row 24: Ch 1, sc
in each st across, change to X4, turn.
Rows 25 & 26:
Rep Rows 22 & 23, changing to X5 at end of Row 26, turn.
Row 27: Ch 1, sc
in each st across, change to X, turn.
Rows 28 & 29:
Rep Rows 22 & 23 changing to X1 at end of 29, turn.
Going Around Again
Row 30: Rep Row
22.
Row 31: Ch 3, 4
dc in same st, [sc in next sc, 9 dc in center of dc9tog] 13 times, sc in next
sc, 5 dc in top of turning ch, change to X2, turn.
Row 32: Ch 1, sc
in each st across, change to X3, turn.
Energizing Rainbow
Making it Wavy
Row 33: Ch 1, sc
in same st, [ch 3, dc9tog, ch 3, sc in next st] 14 times, turn.
Row 34: Ch 3, 4
dc in same st, [sc in center of dc9tog, 9 dc in sc] 13 times, sc in center of dc9tog,
5 dc in last sc, change to X4, turn.
Row 35: Ch 1, sc
in each st across, change to X5, turn.
Rows 36 & 37:
Rep Rows 33 & 34 changing to X at the end of Row 37, turn.
Row 38: Ch 1, sc
in each st across, change to X1, turn.
Rows 39 & 40:
Rep Rows 33 & 34 changing to X2 at the end of Row 40, turn.
Circles, Circles, Circles
Row 41: Rep Row
33.
Row 42: Ch 1, sc
in same st, [9 dc in center of dc9tog, sc in next sc] 14 times, change to X3,
turn.
Row 43: Ch 1, sc
in each st across, change to X4, turn.
Love Some More Waves
Row 44: Ch 4,
dc4tog, ch 3, [sc in next st, ch 3, dc9tog, ch 3] 13 times, sc in next st, ch
3, dc5tog, turn.
Row 45: Ch 1, sc
in same st, [9 dc in sc, sc in center of dc9tog] 13 times, 9 dc in sc, sc in
turning ch, change to X5, turn.
Row 46: Ch 1, sc
in each st across, change to X, turn.
Rows 47 & 48:
Rep Rows 44 & 45, changing to X1 at the end of Row 48.
Row 49: Ch 1, sc
in each st across, change to X2, turn.
Rows 50 & 51:
Rep Rows 44 & 45, changing to X3 at the end of Row 51.
Around Again
Row 52: Rep Row
44.
Row 53: Ch 3, 4
dc in same st, [sc in sc, 9 dc in center of dc9tog] 13 times, sc in sc, 5 dc in
turning ch, change to X4, turn.
Row 54: Ch 1, sc
in each st across, change to X5, turn.
Lets make it Ripple
Row 55: Ch 1, sc
in same st, [ch 3, dc9tog, ch 3, sc in next st] 14 times, turn.
Row 56: Ch 3, 4
dc in same st, [sc in center of dc9tog, 9 dc in sc] 13 times, sc in center of
dc9tog, 5 dc in last st, change to X, turn.
Row 57: Ch 1, sc
in each st across, change to X1, turn.
Rows 58 & 59:
Rep Rows 55 & 56 changing to X2 at the end of Row 59, turn.
Row 60: Ch 1, sc
in each st across, change to X3, turn.
Rows 61 & 62:
Rep Rows 55 & 56 changing to X4 at the end of Row 62, turn.
Another Going Around
Row 63: Rep Row
55.
Row 64: Ch 1, sc
in same st, [9 dc in center of dc9tog, sc in next sc] 14 times, change to X5,
turn.
Row 65: Ch 1, sc
in each st across, change to X, turn.
And Back to Up and Down
Row 66: Ch 3,
dc4tog, ch 3, [sc in next st, ch 3, dc9tog, ch 3] 13 times, sc in next st, ch
3, dc5tog, turn.
Row 67: Ch 1, sc
in same st, [9 dc in sc, sc in center of dc9tog] 13 times, 9 dc in sc, sc in
last st, changing to X1, turn.
Row 68: Ch 1, sc
in each st across, change to X2, turn.
Rows 69 & 70:
Rep Rows 66 & 67 changing to X3 at the end of Row 70.
Row 71: Ch 1, sc
in each st across, change to X4, turn.
Rows 72 & 73:
Rep Rows 66 & 67 changing to X5 at the end of Row 73.
Getting Dizzy Yet…More circles
Row 74: Rep Row
66.
Row 75: Ch 3, 4
dc in same st, [sc in sc, 9 dc in center of dc9tog] 13 times, sc in sc, 5 dc in
turning ch, change to X, turn.
Row 76: Ch 1, sc
in each st across, change to X1, turn.
Up & Dow, Up & Down
Row 77: Ch 1, sc
in same st, [ch 3, dc9tog, ch 3, sc in next st] 14 times, turn.
Row 78: Ch 3, 4
dc in same st, [sc in center of dc9tog, 9 dc in sc ] 13 times, sc in center of
dc9tog, 5 dc last sc, change to X2, turn.
Row 79: Ch 1, sc
in each st across, change to X3, turn.
Rows 80 & 81:
Rep Rows 77 & 78 changing to X4 at the end of Row 81.
Row 82: Ch 1, sc
in each st across, change to X5, turn.
Rows 83 & 84:
Rep Rows 77 & 78, change to X at the end of Row 84.
Even Out to Finish
Row 85: Rep Row
77, fasten off.
Edging
Rnd 1: With X6, join to any corner, ch 1, 3 sc in in same corner, sc evenly on side of afghan working 3 sc in each corner, sl st to join to first sc, turn.
Rnds 2-5: Ch 1, sc in same st, work sc in each stitch across to corner (the center sc of 3sc), working 3 sc in corner, sl st to join, turn. Fasten off.
Rnd 3: With X5, join to any corner, ch 1, 3sc in same corner, sc in each stitch across working 3 sc in corner, sl st to join, turn. Fasten off.
Rnd 4: With X4, join to any corner, ch 1, 3sc in same corner, sc in each stitch across working 3 sc in corner, sl st to join, turn. Fasten off.
Rnd 5: With X3, join to any corner, ch 1, 3sc in same corner, sc in each stitch across working 3 sc in corner, sl st to join, turn. Fasten off.
Rnd 6: With X2, join to any corner, ch 1, 3sc in same corner, sc in each stitch across working 3 sc in corner, sl st to join, turn. Fasten off.
Rnd 7: With X1, join to any corner, ch 1, 3sc in same corner, sc in each stitch across working 3 sc in corner, sl st to join, turn. Fasten off.
Rnd 8: With X,
join to any corner, ch 1, 3sc in same corner, sc in each stitch across working
3 sc in corner, sl st to join. Fasten off.
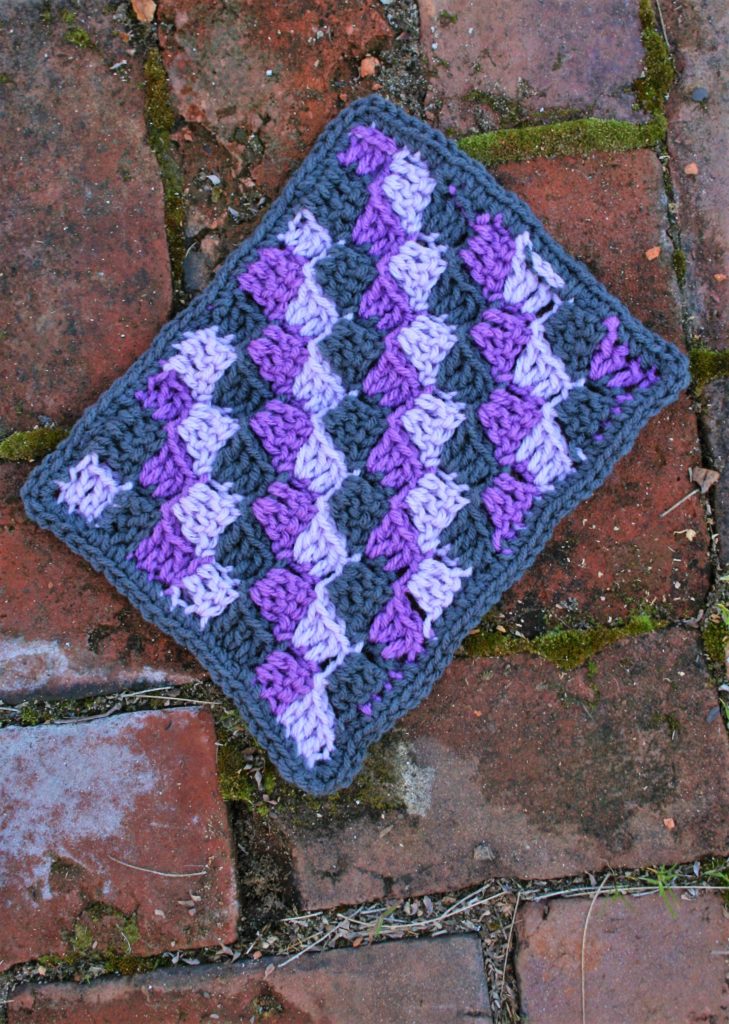
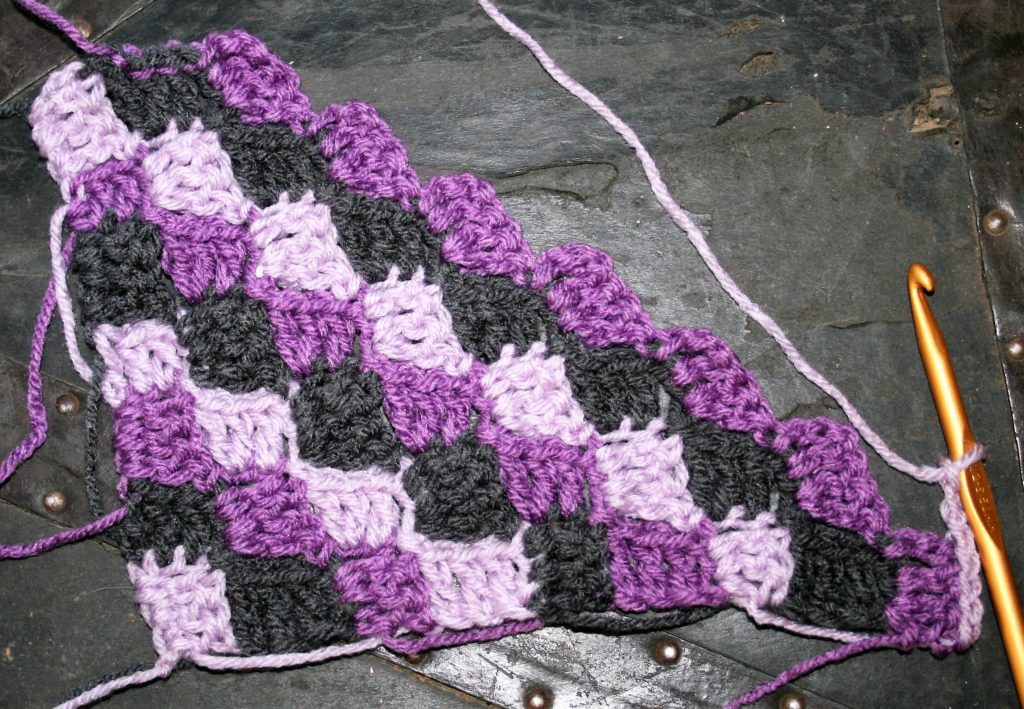
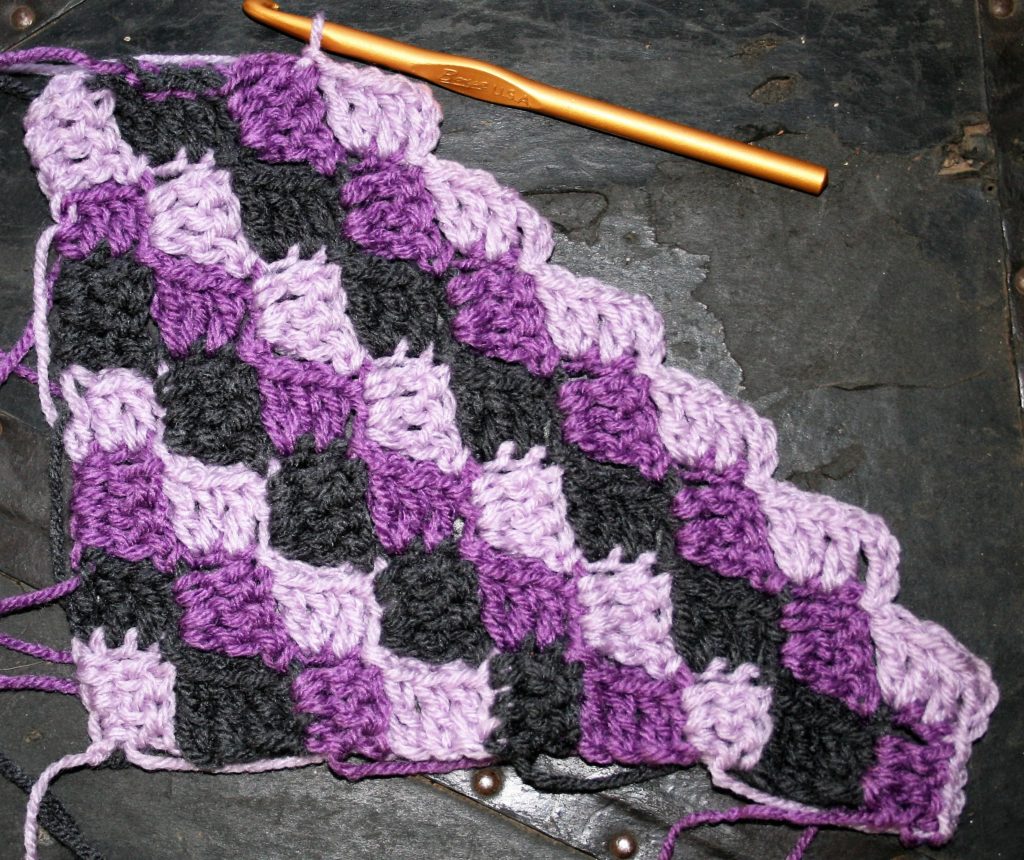
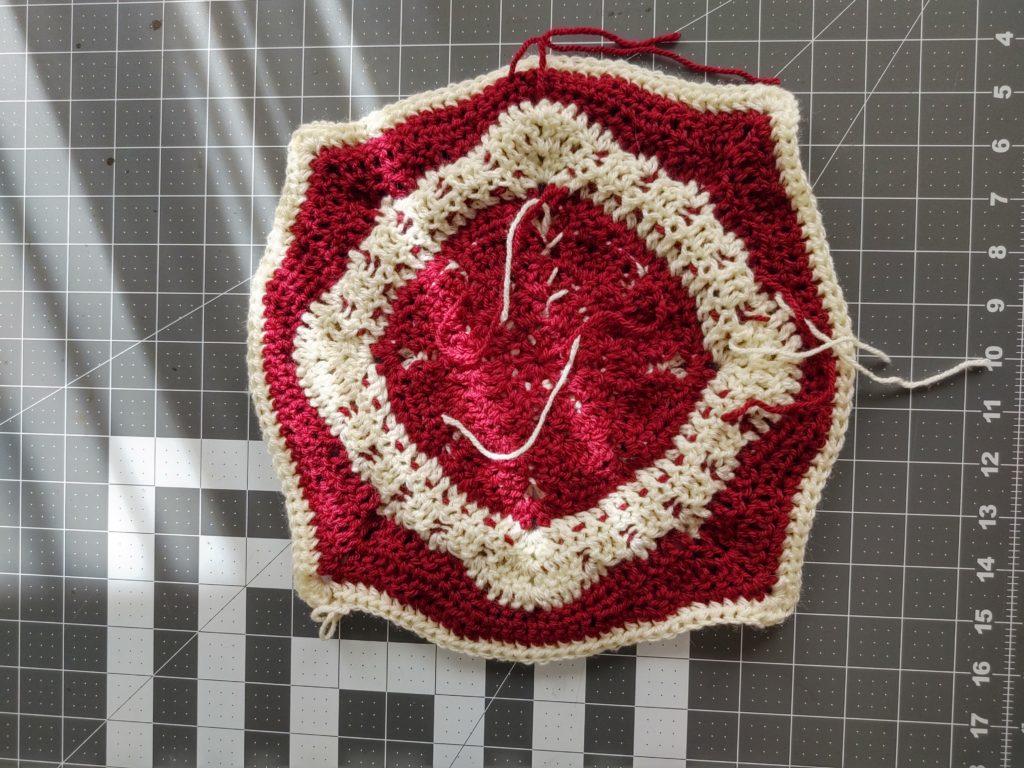
For my part I worked a square that utilizes carrying your throughout the project, crocheting over the color you are not working. This allows for some specialized color changes without having to weave in a bunch of ends.
After you complete the smaller 6″ square, you then really put this square on its head, by moving the corners to the sides. This causes the square to rest on its point.
Square measures 12” x 12” (at end of Round 6, square
measures 6” x 6”)
Materials
J/10/6.00mm crochet hook
Lion Brand Basic Stitch Premium medium weight 100% premium acrylic yarn (3.5 oz/100g/219yrds/200m) 1 skein each color #141 Plum (MC), #98 Cream (CC)
Abbreviations:
Beg: Beginning
Bpdc: back post double crochet
Bphdc: back post half double crochet
Bpsc: back post single crochet
CC: contrasting color
Ch: chain
Dc: double crochet
Fpdc: front post double crochet
Fphdc: front post half double crochet
Hdc: half double crochet
MC: main color
Rnd: round
Sc: single crochet
Sl st: slip stitch
Sp: space
St(s): Stitch(es)
Special Stitches
Front Post Double Crochet Two Together (Fpdc2tog): Yarn over, insert hook from front to back and then to front again around post of stitch last worked into (or around st indicated) on previous row, yarn over and pull up a loop, yarn over and draw through 2 loops on hook, skip next st on rnds 2 and yarn over, insert hook from front to back and then to front again around post of next stitch (or around st indicated), yarn over and pull up a loop, yarn over and draw through 2 loops on hook, yarn over and draw through all 3 loops on hook.
Front Post Treble Crochet Two Together (Fptr2tog): Yarn over twice, insert hook from front to back and then to front again around post of indicated stitch, yarn over and pull up a loop, [yarn over and draw through 2 loops on hook] twice, yarn over twice, insert hook from front to back and then to front again around post of indicated stitch, yarn over and pull up a loop, [yarn over and draw through 2 loops on hook] twice, yarn over and draw through all 3 loops on hook.
Notes
Leave unused color behind your work and work over unused
color when possible.
The Smaller Block
Rnd 1: With MC, ch
4 (last 3 chains count as dc), 15 dc
in 4th ch from hook, join to top of beg ch. -16 dc
Rnd 2: Ch 3 (counts
as tr here and throughout), dc in same st, dc in next st, change color to
CC, fpdc2tog, change color to MC, [2 dc in next st (behind fpdc2tog), 1 dc
in next st (used for 2nd leg of fpdc2tog), change color to
CC, fpdc2tog, change color to MC] repeat around, slip stitch in top of beg ch-3
to join. – 8 fpdc2tog, 24 dc
Working stitch location of “legs” of fpdc2togCompleted Round 2
Rnd 3: Ch 3, dc
in same st, change color to CC, fpdc2tog over last and first fpdc2tog, change
color to MC, skip next st, 2 dc in next st, dc in next fpdc2tog, [2 dc in next
st, change color to CC, fpdc2tog over last-used and next fpdc2tog, change color
to MC, sk next st, 2 dc in next st, dc in next fpdc2tog] repeat around, sl st in
top of beg ch-3 to join. -8 fpdc2tog, 40
dc
Completed Round 3
Rnd 4: Ch 3, dc
in same st, dc in next 3 sts, 2 dc in next st, change color to CC, fptr2tog
over last and first fpdc2tog of previous row, change color to MC, [skip next
st, 2 dc in next st, dc in next 3 sts, 2 dc in next st, change color to CC,
fptr2tog over last-used and next fpdc2tog, change color to MC] repeat around,
sl st in top of beg ch-3 to join. -8
fptr2tog, 56 dc
Working stitch location for “legs” of fptr2togCompleted Round 4
We start making corners
Rnd 5: Ch 3, dc
in next st, hdc in next 2 sts, sc in next 3 sts, change color to CC, fphdc
around fptr2tog, change color to MC, sc in next 3 sts, hdc in next 2 sts, dc in
next 2 sts, change color to CC, (fpdc, ch 1, fpdc) around fptr2tog (corner made), change color to MC, [dc
in next 2 sts, hdc in next 2 sts, sc in next 3 sts, change color to CC, fphdc
around fptr2tog, change color to MC, sc in next 3 sts, hdc in next 2 sts, dc in
next 2 sts, change color to CC, (fpdc, ch 1, fpdc) around fptr2tog, change
color to MC] repeat around, sl st in top of beg ch-3 to join. Fasten off CC. -4 fphdc, 4 (fpdc, ch 1, fpdc) corners, 16
dc, 16 hdc, 24 sc
Rnd 6: Ch 2 (counts as hdc), [hdc in each st across
to ch-1 sp, (dc, ch 1, dc) in ch-1 sp] repeat around, hdc in last st, sl st in
top of beg ch-2 to join. Fasten off. – 68
hdc, 4 (dc, ch 1, dc) corners, (19 sts on each side of square)
Making the Bigger Square
Rnd 7: With CC,
join to any ch-1 corner sp, ch 3, (dc, ch 1, 2 dc) in same sp as join, bpdc around
each st to next ch-1 sp, [(2dc, ch 1, 2 dc) in ch-1 sp, bpdc around each st to next
ch-1 sp] repeat around, sl st in top of beg ch-3 to join. -76 bpdc, 4 (2 dc, ch 1, 2 dc) corners
Rnd 8: Ch 3, dc
in next st, (dc, ch 1, dc) in ch-1 sp, [dc in next 3 sts, change color to MC,
fpdc2tog, change color to CC] five times, {dc in next 3 sts, (dc, ch 1, dc) in
ch-1 sp, [dc in next 3 sts, change color to MC, fpdc2tog, change color to CC] five
times} repeat around, dc in last st, sl st in top of beg ch-3 to join. -20 fpdc2tog, 72 dc, 4 (dc, ch 1, dc)
corners
Rnd 9: Ch 3, dc
in next 2 sts, {(dc, ch 1, dc) in ch-1 sp, dc in next 6 sts, [change color to
MC, fpdc2tog over previous and next fpdc2tog, change color to CC, sk next st, dc
in next 3 sts] 4 times, dc in next 3 sts} repeat around omitting last 3 dc on
last repeat, sl st in top of beg ch-3 to join. Fasten off both colors. -16 fpdc2tog, 84 dc, 4 (dc, ch 1, dc)
corners
We are moving the corner…
Rnd 10:Note corner location will shift in this round. With MC, join to any ch-1 sp, ch 1, sc in same sp, bpsc around next 4 sts, bphdc around next 4 sts, bpdc around next 5 sts, (dc, ch 1, dc) in next st, bpdc around next 5 sts, bphdc around next 4 sts, bpsc around next 4 sts, [sc in ch-1 sp, bpsc around next 4 sts, bphdc around next 4 sts, bpdc around next 5 sts, (dc, ch 1, dc) in next st, bpdc around next 5 sts, bphdc around next 4 sts, bpsc around next 4 sts] repeat around, sl st in first sc to join. –32 bpsc, 32 bphdc, 40bpdc, 4 sc, 4 (dc, ch 1, dc) corners
Rnd 11: Ch 1, sc
in same st, sc in next 4 sts, [hdc in next 5 sts, dc in next 5 sts, (dc, ch 1,
dc) in ch-1 sp, dc in next 5 sts, hdc in next 5 sts, sc in next 9 sts] 3 times,
hdc in next 5 sts, dc in next 5 sts, (dc, ch 1, dc) in ch-1 sp, dc in next 5
sts, hdc in next 5 sts, sc in last 4 sts, sl st in first sc to join. -36 sc, 40 hdc, 40 dc, 4 (dc, ch 1, dc)
corners
Rnd 12: Ch 1, sc
in same st, sc in next 10 sts, [hdc in next 5 sts, (dc, ch 1, dc) in ch-1 sp,
hdc in next 5 sts, sc in next 21 sts] 3 times, hdc in next 5 sts, (dc, ch 1,
dc) in ch-1 sp, hdc in next 5 sts, sc in next 10 sts, sl st in first sc to
join. Fasten off. -84 sc, 40 hdc, 4 (dc,
ch 1, dc) corners
Rnd 13: With CC,
join to any ch-1 sp, ch 2 (counts as hdc),
(hdc, ch 1, 2 hdc) in same sp as join, bphdc in each st across to next ch-sp,
[(2 hdc, ch 1, 2 hdc) in ch-1 sp, bphdc in each st across to next ch-sp] repeat
around, sl st to join. Fasten off. Block. –132
bphdc, 4 (2 hdc, ch 1, 2 hdc) corners (37 stitches on each side of square)
I was asked a couple of week ago to share how to attach
fabric to crochet. It was a little bit of perfect timing as I was working up a
scrap yarn handbag, and it could really benefit from a lining.
There are actually a few ways to attach fabric to crochet.
Hand Sewing
The first method is tried and true, hand sewing. If I am
creating a lining for a bag, I cut my fabric the same size as my project. Then
I seem the side (this is definitely true for handbags). Now I am ready to add
it to my crochet.
Since I cut the fabric the same size and then seemed it, you
will notice that it is now slightly smaller than the project….this is perfect. I
insert the lining, and now I fold the raw edge of the top of the fabric over. I
pull out the hand sewing needle and whip stitch the top edge of the folded fabric
to the crochet.
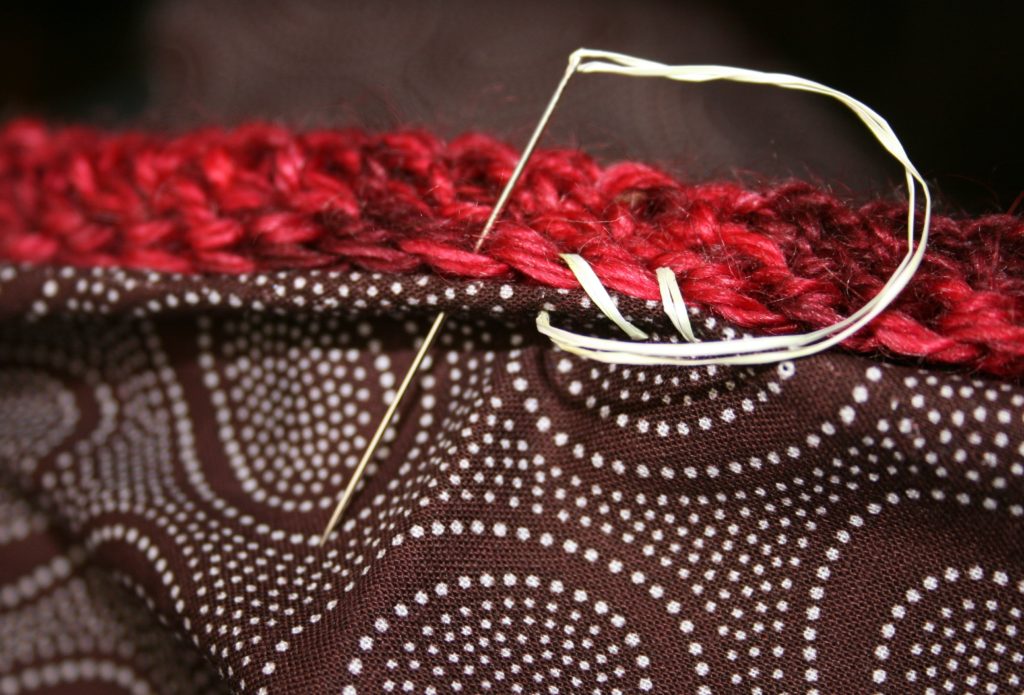
Whip stitching is simply entering the needle from the same
side of the fabric. Essentially it is making a loop of thread through both
pieces of fabric.
Whip stitch is worked by inserting the needle in the same place and looping through the fabrics
Machine Sewing
Another way to add fabric to crochet is machine sewing.
Honestly I do not pull out my sewing machine for what I would view as a small
project, but once I did work a bunch of crochet squares to a bunch of fabric
squares to make a blanket, and in this case I definitely pulled out the machine.
You do need to use a bit of caution and know the machine you are using, but I
basically used the fabric and crochet just as I would other machine sewing
projects.
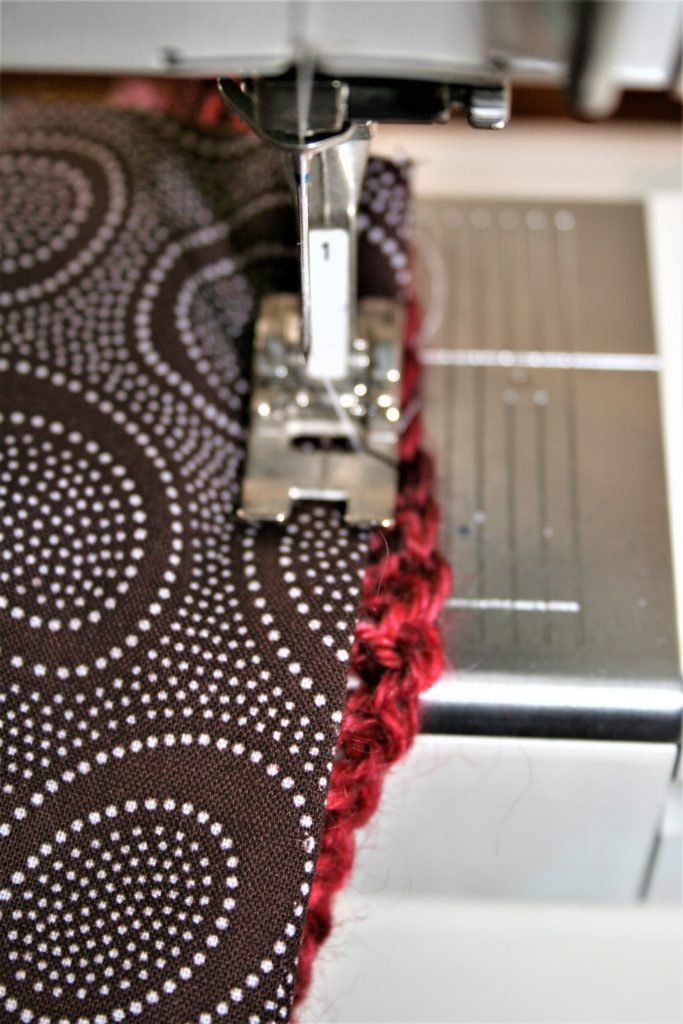
Place the fabric on the crochet, if you are turning under a
crochet edge (as in typical machine sewing), then just lay the fabrics together
and stitch. If the fabric is more like a lining fold under the raw edge of the
fabric and stitch to the crochet.
I have found that I prefer the crochet fabric to be the
bottom fabric. I lower the feed dogs (the little textured metal tracks that
help pull the fabric through the machine), and thus have to help the fabric
through with a little gentle pulling. I prefer this approach to having the
crochet on top, as I have found the crochet can get a bit hung up on the
presser foot or snag on the needle.
Sew crochet on a machine by lowering the feed dogs, and help gently pull the fabric through the machine
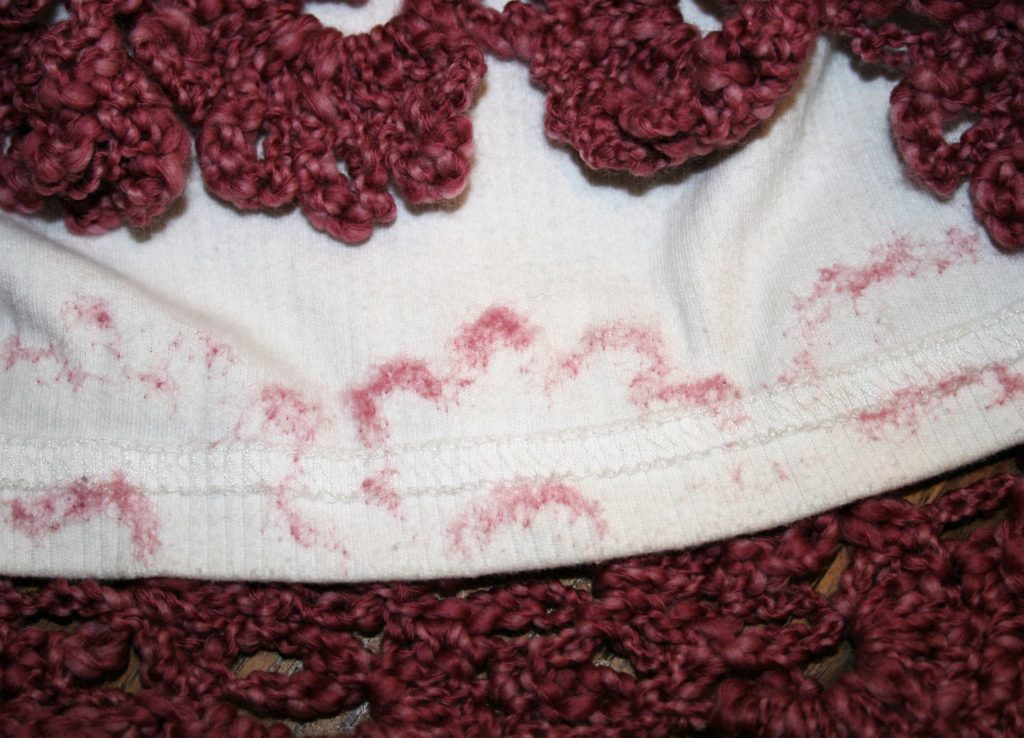
As machine sewing will create a tighter stitch then hand
stitching, it can, and most likely will create a line across your crochet. If
hand sewing this can be easily avoided as you do not have to sew all the way
through the fabric, you can sew through half of a crochet stitch instead.
Fusible Interfacing
Another way to adhere fabric to crochet to using a double
sided fusible interface. This is a product that works a bit like magic and can
be found most places you find fabric. You follow the package direction, using
an iron and basically glue the fabric to the crochet. I really have done very
little of this, and even then I only worked it in small areas that I wanted to
add crochet to large pieces of fabric. It will stiffen the crochet, and depending
on the yarn used, it may not appreciate the iron, so beware. Test your fabric
and your yarn before going down this rabbit hole.
Needle Felting
In addition you can add crochet to fabric by needle felting.
To needle felt crochet to fabric you need to be mindful of the materials you
are using. First your yarn, it tend to work best with wool, preferably not
superwash. The fabric should be one that can take a bit of abuse, as it is
going to be punched repeatedly with a needle. I prefer working with denim,
linen or canvas, but have worked on cottons. You need a needle felting needle (it
is a needle that actually has small barbs on it that you can feel running you
finger up from the needle from the point), and a piece of foam (a pillow can
work too).
You place your crochet where you want it on the fabric. Place
the foam behind the fabric, and push the needle through the crochet and fabric,
into the foam. You repeat this process until the crochet is adhered. You will
notice that on the back of the fabric that yarn is being pushed through. Times
will vary greatly, and some fabrics/yarns are not suitable and will not stay in
place no matter how long you work it.
Needle felting pushes the yarn through the fabric
Crochet Joins
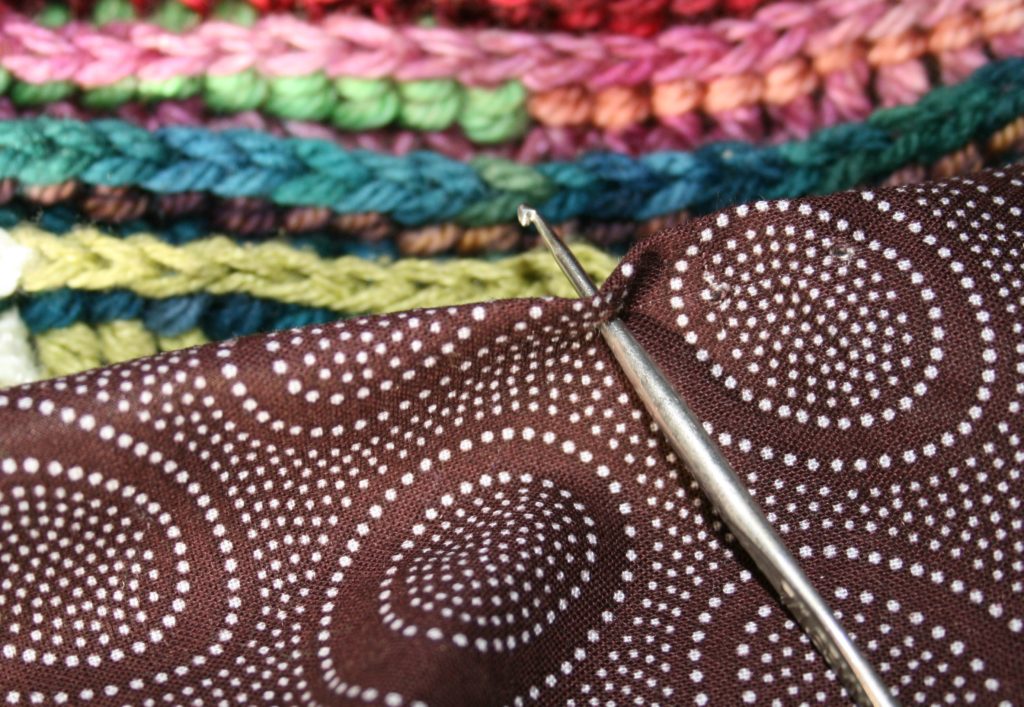
Finally one additional way to add fabric to crochet, simply
crocheting it on. There is a little prep work to make you project easier, but
it is completely doable. I fold the raw edge of the fabric over, and find a small
crochet hook, a steel crochet hook usually works fine, and then I evenly push
it through the edge of the folded fabric creating small holes. I then continue
working with the small hook and crochet through these holes into the crochet
fabric.
Push a small crochet hook through the folded fabric to create holes to help when crocheting the fabrics together.Working through the holes in the fabric crochet to the crochet. Stitch shown is slip stitch
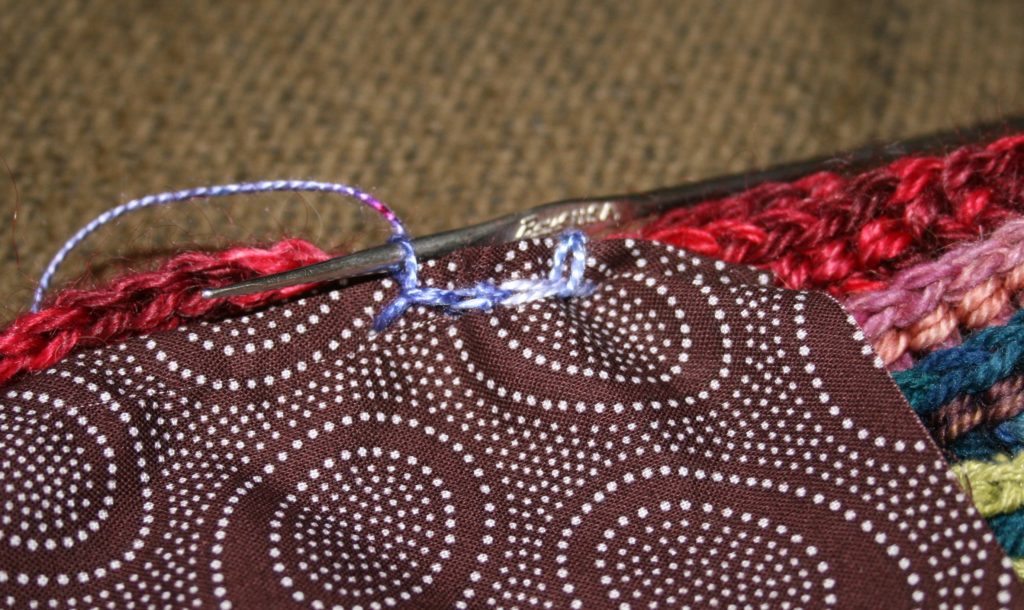
To make crocheting the fabric on a bit easier, you can take
a yarn needle and work a blanket stitch (inserting the needle in the same side
of the fabric in a similar movement as a whip stitch, but before the loop pulls
closed you insert you needle in the loop, this makes an edge of thread/yarn at
the top of the fabric) around the fold fabric in a yarn of your choice. You
then crochet in the loop created.
Blanket Stitch, insert needle from front to back of fabric, loop over edge to reinsert into fabric while slipping needle through the loop created. This does not allow the stitch to be pulled tight without completely distorting the edgeThe top edging of the blanket stitch creates a place to crochet into, and thus you can crochet through these loops onto the crochet fabric to be joined to.
A Little Extra Padding
To add a little bit of stiffness to the project, or a bit of body to it over all, consider adding a bit of quilt batting between the fabric and crochet.
Some of these techniques are more comfortable than others,
and much of that can be related to your comfort level with sewing in general.
Just remember like crochet, it can be forgiving, so give it a try.
I love starting off the year with the Moogly CAL! It is a great year long project that makes new squares every two weeks. By the end of the year, you have an afghan. It is always a fun project with many inspirational squares.
I have been playing with this stitch a bit lately. Taking a liking to working a contrasting color row between the “circles”, I have also found that by working slip stitches where this classic stitch works single crochets, creates a bit of a tighter fabric. This is beneficial, as sometimes this stitch technique can become a bit open and “gappy” at the edges of the circles.
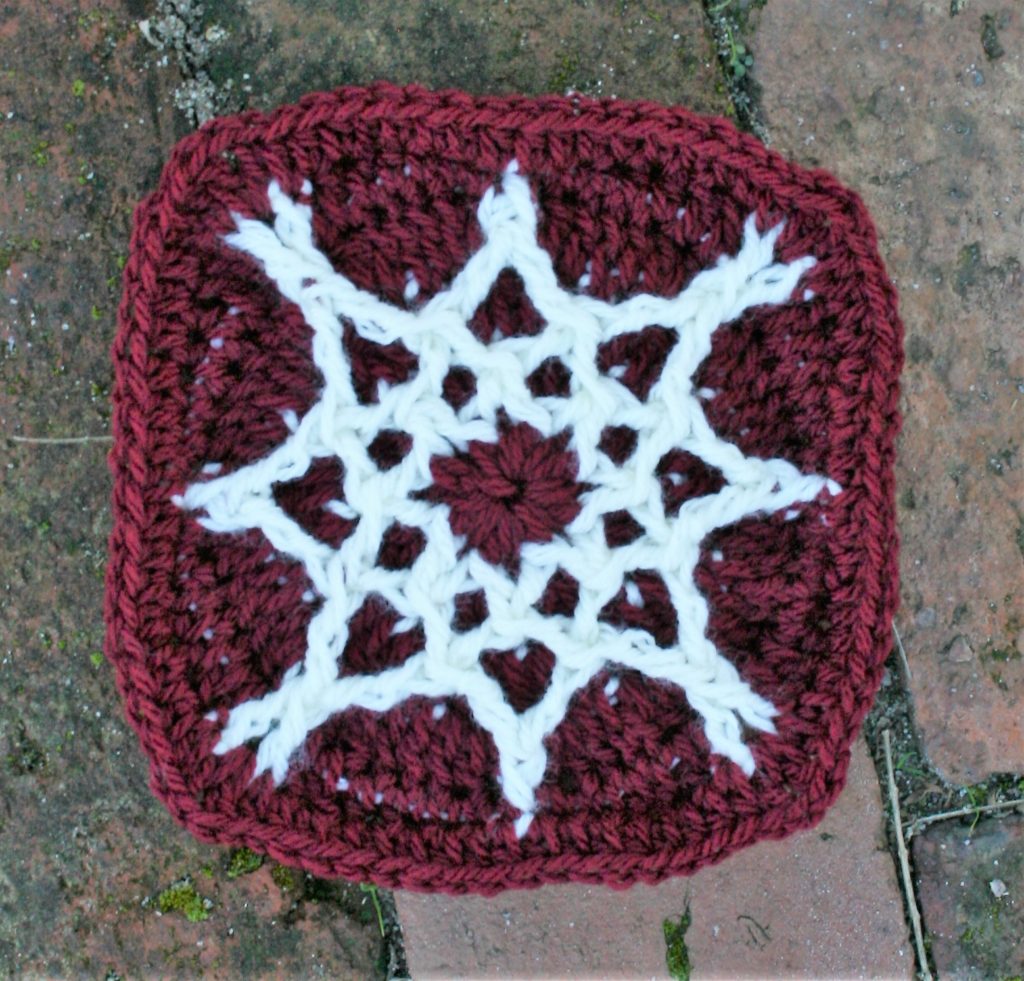
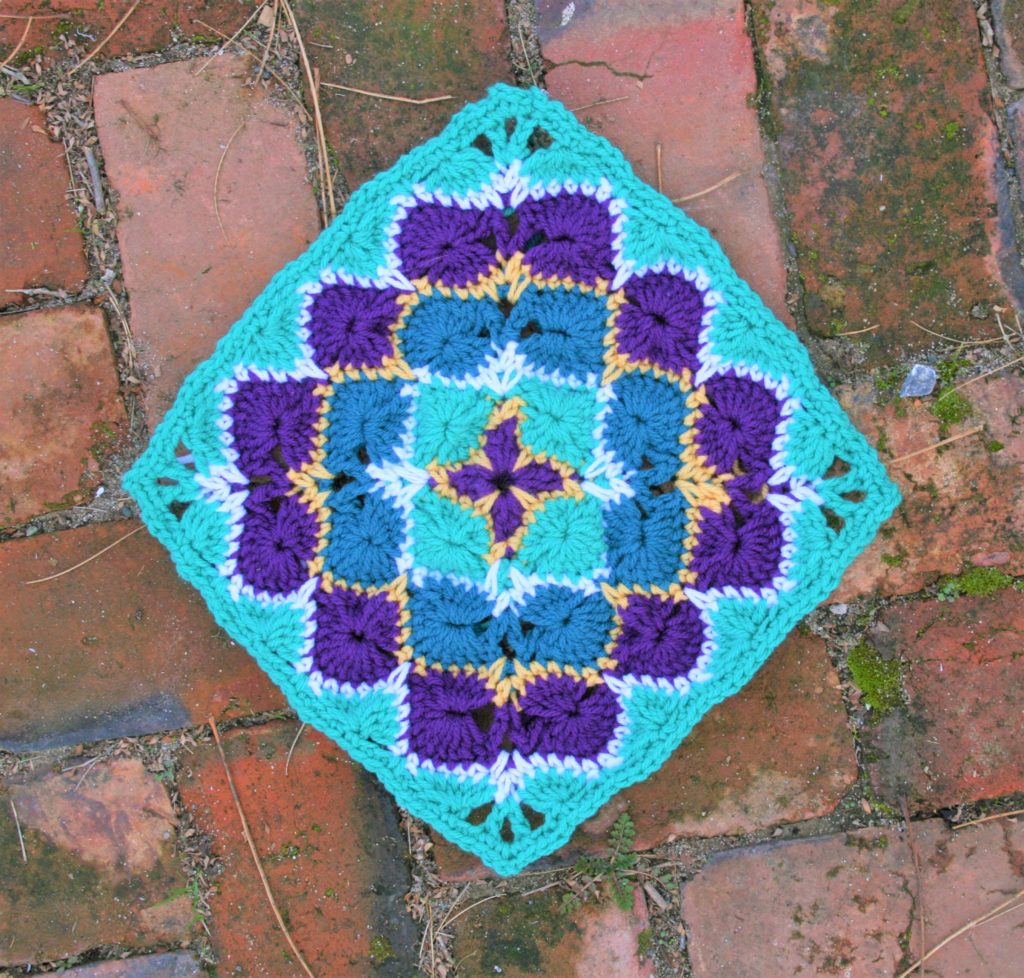
The name really came from how the design struck me. It has reminded me of the mosaics I have seen in art books, and inspires me to want to travel.
Moorish Tiles Square
Materials
*Red Heart With Love, #1542 Aubergine (A), #1207 Cornsilk
(B), #1562 Jadeite (C), #1001 White (D), #1623, Mallard (E)
*Hook J/10/ 6.00mm
Gauge
12”x 12” square (30.5 x 30.5cm)
Special Stitches
Double Crochet 6 Together (dc6tog): Working over the next 6 sts, [yo, insert hook into next st, yo, pull up
a loop, yo, pull through 2 loops] six times, yo, pull through all 7 loops on
hook.
Double Crochet 7 Together (dc7tog): Working over the next 7 sts, [yo, insert hook into next st, yo, pull up a loop, yo, pull through 2 loops] seven times, yo, pull through all 8 loops on hook.
Double Crochet 9 Together (dc9tog): Working over the next 9 sts, [yo, insert hook into next st, yo, pull up a loop, yo, pull through 2 loops] nine times, yo, pull through all 10 loops on hook.
Notes/Tips
Single crochet
stitches are worked over slip stitches, this may be up to 3 rows, creating a
break in color.
When working the last round, work the single crochet stitches into the chain stitches and not the space (with the exception of the corners), so as not to create open gaps.
Rnd1: With A, ch 4, sl st to first ch to create ring, (ch 5 counts as dc + ch 2, [2 dc, sl st, 2 dc, ch 2] three times, 2 dc, sl st, dc, sl st to 3rd ch of beg ch) in the ring. Fasten off. -16 dc, 4 sl st, 4 ch-2 sps
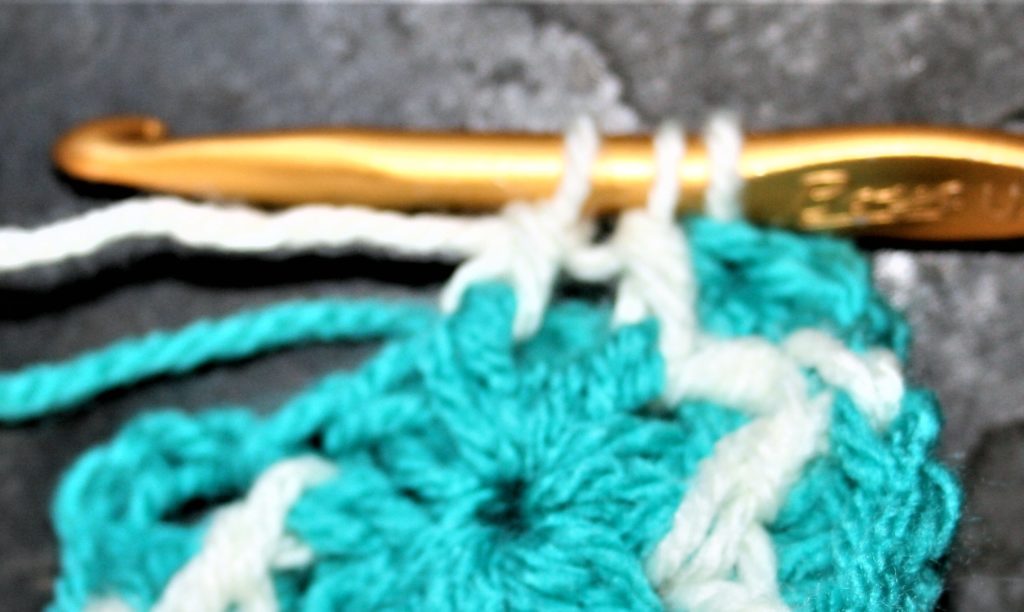
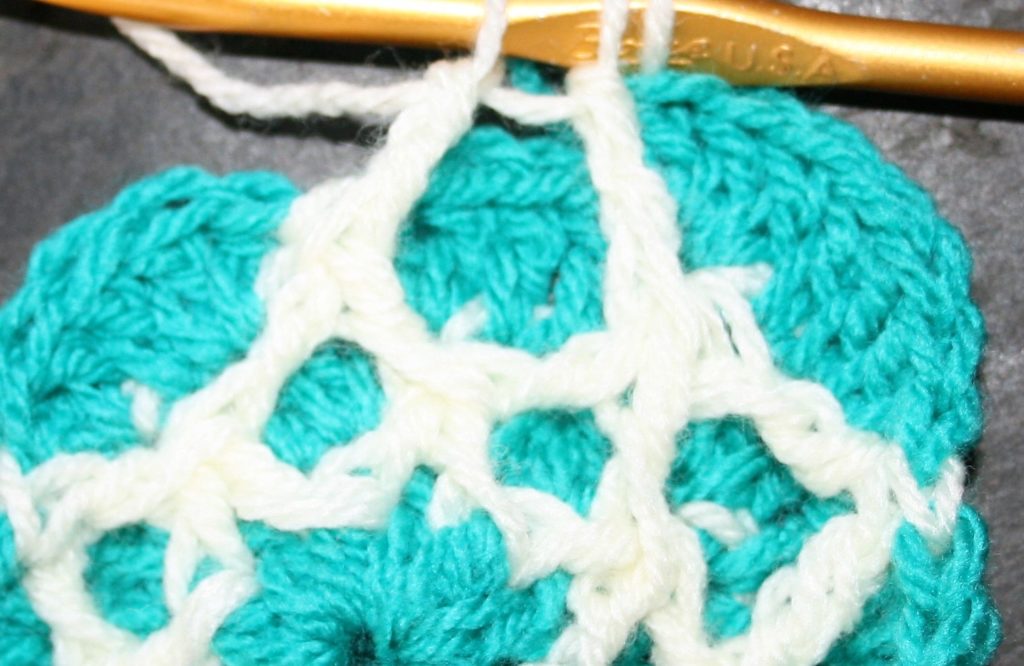
First Round with Single Crochet over Slip Stitches
Rnd 2: With B, join with a standing sc in any ch-2 sp see notes to work a Standing Single Crochet, ch 2, sc in same sp, [sc in next 2 dc, sc over sl st in ring, sc in next 2 dc, (sc, ch 2, sc) in ch-2 sp] three times, sc in next 2 dc, sc over sl st in ring, sc in next 2 dc, join. Fasten off. -28 sc, 4 ch-2 sps
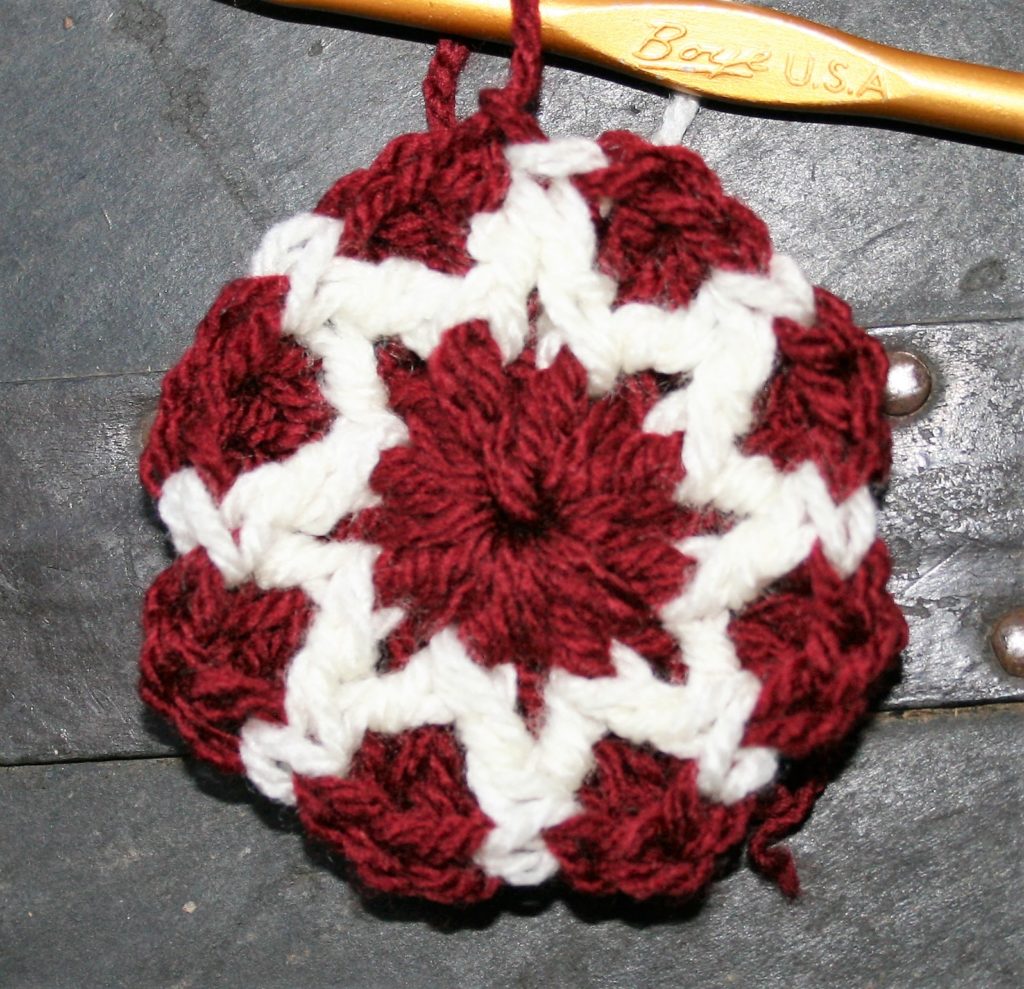
Rnd 3: With C, join with a sl st in any ch-2 sp, ch 2, sl st in same sp, [ch 3, dc7tog, ch 3, (sl st, ch 2, sl st) in ch-2 sp] three times, ch 3, dc7tog, ch 3, join in ch-2 sp. -4 dc7tog, 8 sl sts, 4 ch-2 sps
Rnd 4: ch 2, sl st in same sp, [9 dc in center dc7tog, (sl st, ch 2, sl st) in ch-2 sp] three times, 9 dc in center dc7tog, join. Fasten off. -36 dc, 8 sl st, 4 ch-2 sps
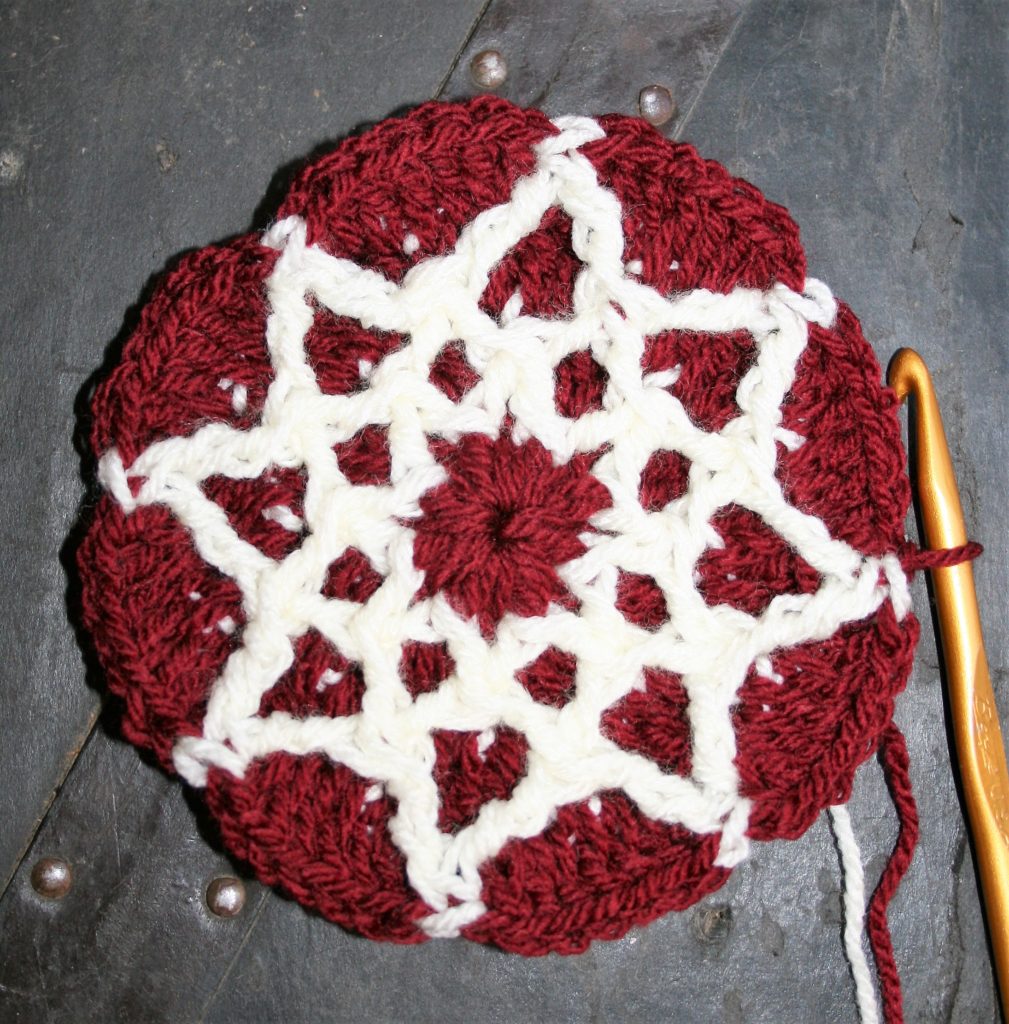
Second Round with Single Crochet over Slip Stitches
Rnd 5: With D, join with a standing sc in any ch-2 sp, ch 2, sc in same sp, sc over sl st into sp 3 rows below, [sc in each st to next sl st, sc over sl st into sp 3 rows below, (sc, ch 2, sc) in ch-2 sp, sc over sl st into sp 3 rows below] three times, sc in each st to next sl st, sc over sl st into sp 3 rows below, join. Fasten off. – 52 sc, 4 ch-2 sps
Rnd 6: With E, join to any ch-2 sp, ch 5 counts as dc + ch 2, dc in same sp, [ch 3, dc6tog, ch 3, sl st in next st, ch 3, dc6tog, ch 3, (dc, ch 2, dc) in ch-2 sp] three times, ch 3, dc6tog, ch 3, join to 3rd ch. – 8 dc6tog, 4 sl st, 4 (dc, ch 2, dc)
Rnd 7: Sl st in ch-2 sp, ch 2, sl st in same sp, [9 dc in dc6tog, sl st in next sl st, 9 dc in dc6tog, (sl st, ch 2, sl st) in next ch-2 sp] three times, 9 dc in dcs6tog, sl st in next sl st, 9 dc in dc6tog, join. Fasten off. -72 dc, 12 sl st, 4 ch-2 sps
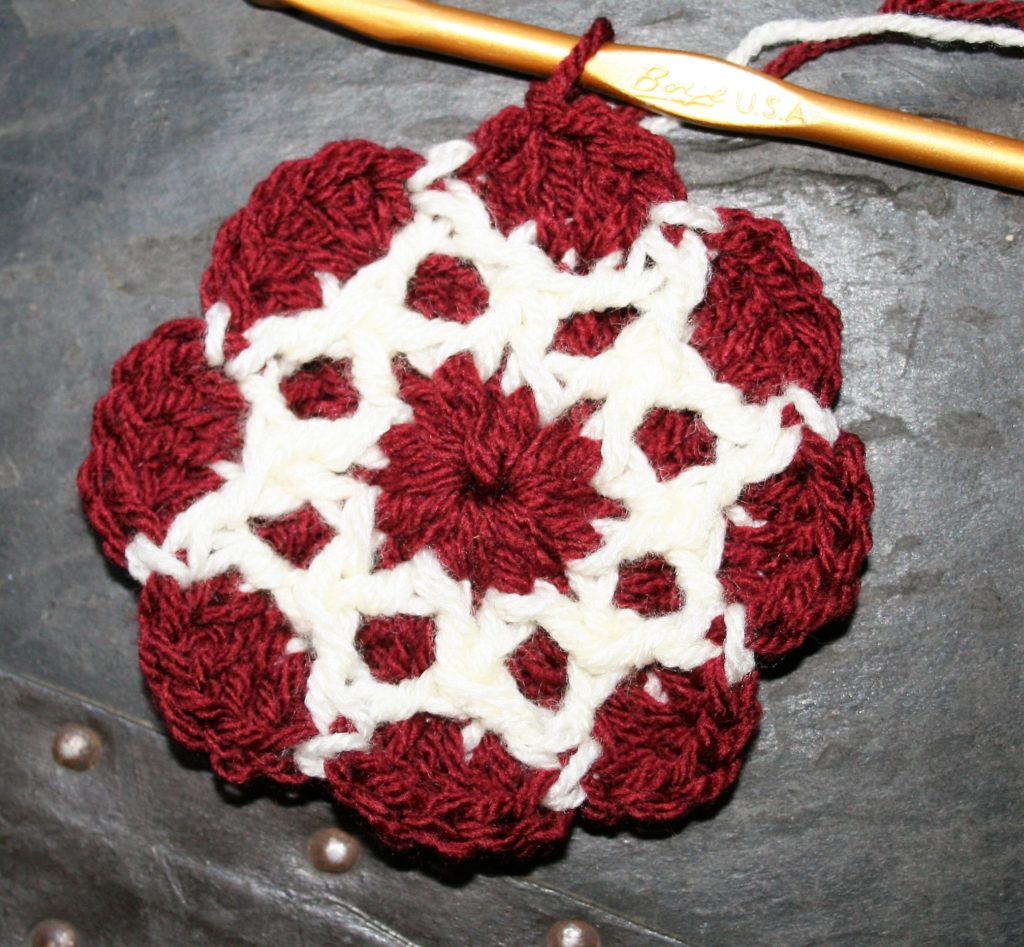
Third Round with Single Crochet over Slip Stitches
Rnd 8: With B, join with a standing sc in any ch-2 sp, ch 2, sc in same sp, [sc over sl st into sp 3 rows below, sc in each st to next sl st, sc over sl st into st 3 rows below, sc in each st to next sl st, sc over sl st into sp 3 rows below, (sc, ch 2, sc) in ch-2 sp] three times, sc over sl st into sp 3 rows below, sc in each st to next sl st, sc over sl st into st 3 rows below, sc in each st to next sl st, sc over sl st into sp 3 rows below, join. Fasten off. -92 sc, 4 ch-2 sps
Rnd 9: With A, join in any ch-2 sp, ch 5 counts as dc + ch 2, dc in same sp, [ch 3, dc6tog, ch 3, sl st in next st, ch 3, dc9tog, ch 3, sl st in next st, ch 3, dc6tog, ch 3, (dc, ch 2, dc) in ch-2 sp ] three times, ch 3, dc6tog, ch 3, sl st in next st, ch 3, dc9tog, ch 3, sl st in next st, ch 3, dc6tog, ch 3, join to 3rd ch. – 4 dc9tog, 8 dc6tog, 8 sl sts, 4 (dc, ch 2, dc)
Rnd10: Sl st in ch-2 sp, ch 2, sl st in same st, [9 dc in dc6tog, sl st in next sl st, 9 dc in dc9tog, sl st in next sl st, 9 dc in dc6tog, (sl st, ch 2, sl st) in ch-2 sp] three times, 9 dc in dc6tog, sl st in next sl st, 9 dc in dc9tog, sl st in next sl st, 9 dc in dc6tog, join. Fasten off. – 108 dc, 16 sl sts, 4 ch-2 sps
Fourth Round with Single Crochet over Slip Stitches
Rnd 11: With D, join with a standing sc in any ch-2 sp, ch 2, sc in same sp, {sc over sl st into sp 3 rows below, [sc in each st to next sl st, sc over sl st into st 3 rows below] twice, sc in each st to next sl st, sc over sl st into sp 3 rows below, (sc, ch 2, sc) in ch-2 sp} three times, sc over sl st into sp 3 rows below [ sc in each st to next sl st, sc over sl st into st 3 rows below] twice, sc in each st to next sl st, sc over sl st into sp 3 rows below, join. Fasten off. -132 sc, 4 ch-2 sps
Row 12: With C, join to any ch-2 sp, ch 5 counts as dc + ch 2, dc in same sp, {ch 3, dc6tog, ch 3, sl st in next st, ch 3, dc9tog, ch 3, sl st in next st, ch 3, dc9tog, ch 3, sl st in next st, ch 3, dc6tog, ch 3, (dc, ch 2, dc) in ch-2 sp) three times, ch 3, dc6tog, ch 3, sl st in next st, ch 3, dc9tog, ch 3, sl st in next st, ch 3, dc9tog, ch 3, sl st in next st, ch 3, dc6tog, ch 3, join to 3rd ch. -8 dc9tog, 8 dc6tog, 12 sl sts, 4 (dc, ch 2, dc)
Last Round, Work in Chains, and Single Crochet over Slip Stitches
Row 13: See notes. Ch 1, sc in same st, [(sc, ch 2, sc) in ch-2 sp, sc in each st and ch across to next ch-2 sp] three times, (sc, ch 2, sc) in next ch-2 sp, sc in each st and ch across to last st, join. Fasten off. Weave in ends. Block. -140 sc, 4 ch-2 sps