Pechin is a New Classic- A Great Shawl

There are a couple of stitches that always seem to make their way into my work. I find that I create multiple projects using them, and still I never tire of working them. My latest design from Manos del Uruguay and Fairmount Fibers, Pechin, falls into this category.

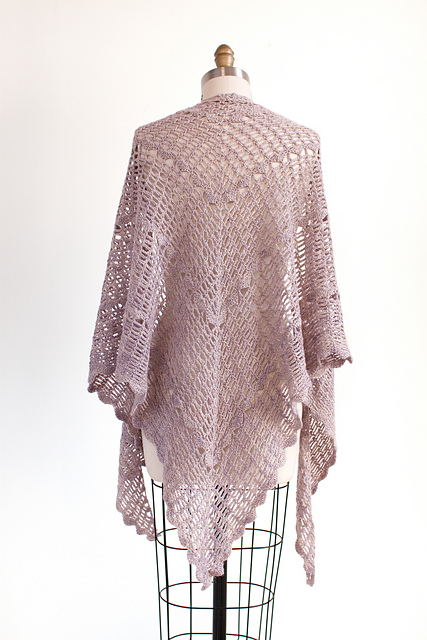
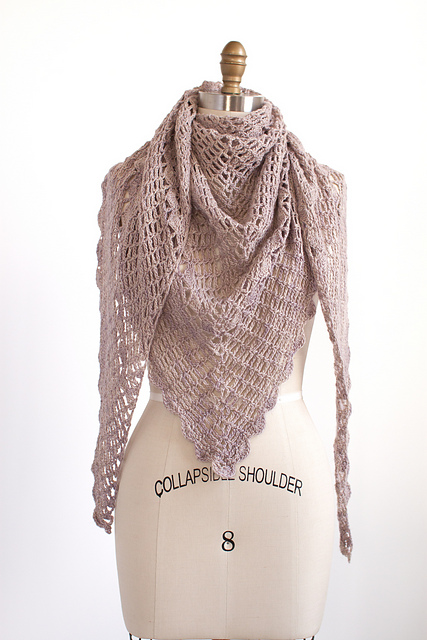
This shawl is worked from the center of the neck outward, utilizing a simple chain and single crochet combination. I find that this stitch allows that yarn to really be the feature. It creates a light, airy fabric that embodies the yarn to go as far as it can. By this I mean that you can go a long way with just one skein. As an example, Pechin is only a 2 skein shawl (using Manos del Uruguay Milo), and a really good sized shawl at that.

For Pechin, I broke up the chain stitch pattern with bands of shells. This creates a visual break as well as a bit of dimension. The bands gradually space further apart in this design to help keep the flow balanced, and I feel it helps give a really classic look.

I have to admit, I could work this shawl over and over again. The stitch pattern has a nice rhythm, and just enough details, at just the right time, to keep it from getting boring. I also feel that it really has a beautiful balance between the design and the yarn, they feel at harmony with one another as neither over powers the other.

Okay, that might seem a bit wordy or dramatic, but what I mean is that it is a pattern/design in which you can appreciate both the yarn and the design at the same time. I have spoken in the past about how you select a yarn or pattern to bet let one or the other be a highlight, like not using a variegated yarn in a design that is heavily textured, as the yarn will win over the design (read more here). Pechin however, has a balance that allows the yarn to shine as well as the design, and this is true even if the yarn is variegated.


Yarn Optical Illusions

Sometimes you need to have a couple of yarn tricks to ensure that your project turns out the best it possibly can. One of these tips or tricks is understanding dye lots.

These 3 balls are the same color, but the dye lot has some slight shifts, so this fabric uses a different ball every 2 rows.

Dye lots are the critical factor for several, but not all yarns, and essentially it is telling you a specific time period that a yarn was created. This can be important to ensure that the colors from one skein matches that of another. If you want to ensure that your project has the same consistent color then you have to ensure the dye lots of the yarns match. Well, that is the given rule, but I have found that not even this is consistent.

So then what do you do if the color between the yarn skeins happen to be just a couple of shades off? I have had this happen, even within the same dye lots. It is uncommon in most commercial yarns, but it can become apparent in hand dyed or hand painted yarns, and how to fix it is to trick the eye.

The best practice is to work a couple of rows from one skein, and then a couple of rows from another and switch between at least 2 different skeins; sometimes I might even switch every couple of rows between 3 skeins. By making these changes in a consistent manner it creates an optical illusion to the eye and the subtle color differences will blend together when you look at it. This is much more beneficial than having a visually obvious line of exactly where your yarn changed in your project.

I would suggest that even if you suspect that there is a difference in the color shades that you use this alternating skeins in rows technique simply for the fact that when you are so close to your work the subtle details are not visible. When you step away and look at your work from afar and can see a visual line in your work, it feels like a punch in the gut, and unintended mistake. Some people find a way to live with it, others rip it all back. So, I error on the side of caution.

Yes, this will lead to more ends being woven in (I have some tips here). No one is really ever thrilled about that, however if I am going to spend the time to use a beautiful and unique yarn, I might was well take a couple of extra steps to ensure that my final project is the best that it can be.

The Classic Basics- Granny Square

The classics are classics for a reason. Crochet has some classic patterns and designs that always seem to draw people into wanting to learn the skill. A classic that I have had multiple students want to learn recently is the Granny Square.

The Granny Square is really a motif, and there are times when motifs in general are called Granny Square. At this discussion I am simply referring to the classic look of Double Crochet (treble crochet in UK terms) groups worked into chain spaces. This makes what almost appears to be checker board of “closed” and “open” squares.

The classic version has a different color on every round, and when the last round is worked entirely in single crochet (double crochet in UK terms) is worked in black. This is the way I was introduced to this classic, however today it is interesting to see it worked in all one color or worked extremely large.

To work your own Classic Granny Square (in US crochet terms)…

Chain 4, slip stitch to the first chain to form a ring.

Round 1: Chain 3 (counts as a double crochet now and throughout), working in ring, 2 double crochets, chain 3, [3 double crochets, chain 3] 3 times, slip stitch to the top of the beginning chain-3, finish off. -4 (3) double crochet groups, 4 chain-spaces

Round 2: With new color, slip stitch to any chain-3 space, chain 3, 2 double crochets in same space, chain 3, 3 double crochets in same space, chain 2, [3 double crochets in next chain-space, chain 3, 3 double crochets in same chain-space, chain 2] 3 times, slip stitch to the top of the beginning chain-3, finish off. -8 (3) double crochet groups, 4 chain-3 space, 4 chain-2 spaces

Round 3: With new color, slip stitch to any chain-3 space, chain 3, 2 double crochets in same space, chain 3, 3 double crochets in same space, chain 2, [3 double crochets in chain-2 space, chain 2, 3 double crochets in chain-3 space, chain 3, 3 double crochets in same chain-3 space, chain 2] 3 times, slip stitch to the top of the beginning chain-3 finish off. -12 (3) double crochet groups, 4 chain-3 spaces, 8 chain-2 space

Round 4: With black color, slip stitch to any chain-3 space, chain 1, 3 single crochets in same space, *[single crochet in each double crochet across to chain-2 space, 1 single crochet in chain 2 space] repeat across to chain-3 space, 3 single crochets in chain-3 space ; rep from * around, slip stitch to beginning single crochet, finish off. Weave in ends.

At this point the Granny Squares can be joined together to create any number of things.

To update this Classic pattern, it is relatively easy after you learn the basics of this design. Essentially the chain-3 spaces are the corners of the square, each time you come to a corner you work a group of 3 double crochets, chain 3, and another group of 3 double crochets in the chain-3 space. You then chain 2 to work along the “sides” of the square, this chain-2 is always worked over a group of 3 double crochets, creating an open space or square. In every chain-2 space 1 group of 3 double crochets are worked. So to bullet point it:

  • Work (3 dc, ch 3, 3 dc) in every ch-3 sp
  • Work ch 2 over groups of double crochets
  • Work 3 dc in every ch-2 sp

Following these simple rules you can create a Granny square of any size. Then for the classic edge you work a round of single crochets, with 3 single crochets in each ch-3 sp, a single crochet in each double crochet stitch, and 1 single crochet in each ch-2 sp.

If you do not want to change colors every round, then after joining, slip stitch in each double crochet across to the next chain-3 space, slip stitch in the chain- 3 space and begin the next round.

Check this classic out for yourself.


Perfect for the Chill- Shurs!

As winter is gripping part of North America and the arctic chill is setting in Manos del Uruguay released my latest pattern, which is perfect to keep warm! Shurs is a cowl that is just the right size, long enough to be wrapped twice for extra warmth and coverage, yet still short enough that wearing it unwrapped has a perfect amount of drape for a classic look.

It is worked in what I refer to as a “cross-hatch” pattern. So, cross-hatch is actually an artist term the is comprised of short strokes made usually by pencil or charcoal that then has short strokes crossing in the opposite direction to create the shading and depth of the drawing. Almost like little “x”s that create an image.

I have worked this cowl similarly, with each row crossing the opposite direction of the last. It allows for an interesting visual effect, as you can catch glimpses of the stitches behind each other, but it also adds in a nice amount of stretch.

In addition to the “crossed” appearance, the stitches begin to stack up and give a very diagonal look, without having any increasing or decreasing stitches being worked. Instead this is a simple 2 row repeat, so it is a design that you can work rather quickly and easily, even for a crocheter that may not be completely confident in their work.

It is worked in Manos del Uruguay Clara, a yarn that is 100% superwash merino (meaning that it is a wool that is treated so that it does not felt, or shrink, but has all the great properties of wool like warmth and durability). It is a hand dyed sport weight yarn, that has a nice amount of spring to it while still having a nice stable yarn.

So, consider a quick project to keep warm this cold season, Shurs I feel is a good choice for this project.

Photos courtesy Fairmount Fibers, Ltd.

Beyond Basic Hat- Free Pattern

Last week I shared a Basic Hat free pattern, I had an increased number of people wanting to make hats, and they really are great, quick projects, that can help those fighting cancer by the means of chemo therapy. I have designed both of these hats using baby weight yarn, as I find that it is both soft and hypo-allergenic.

The Beyond Basic Hat is worked holding 2 strands of baby yarn at one time (you could substitute 1 strand of medium weight yarn instead). To use 2 strands is not as difficult as it seems, you simply hold them together and treat them as if they were just 1 strand, so you yarn over using both strands together, you pull through loops using both strands together, they just get worked as one. I find it fun to use 2 different colors, like I did in this sample with teal and lemon yellow.

I find that this pattern tends to be my go to hat more often, as is really works up fairly fast, however if you want to learn how to customize the size of hat, check out my tutorial, Crochet Hat Formula, here.


Beyond Basic Hat

Materials:

2 skeins Lion Brand Soft Baby light weight yarn (60% acrylic, 40% nylon)

I/9/6mm crochet hook

Gauge: 5 rnds/ 8 dc=3”

This pattern is worked holding 2 strands of yarn throughout.

For directions for the Reverse Single Crochet (Revsc) check out my tutorial here.

Sizes: Baby (Kid, Woman, Man)

Rnd 1(1, 1, 1) Ch 4, 11 dc in 4th ch from the hook, sl st to join.

Rnd 2 (2, 2, 2): Ch 3, dc in same st, 2 dc in each st around, sl st to join.

Rnd 3 (3, 3, 3): Ch 3, dc in same st, dc in next st, [2 dc in next st, dc in next st] rep around, sl st to join.

Rnd – (4, 4, 4): Ch 3, dc in same st, dc in next 2 sts, [2 dc in next st, dc in next 2 sts] rep around, sl st to join.

Rnd – ( -, 5, 5): Ch 3, dc in same st, dc in next 3 sts, [2 dc in next st, dc in next 3 sts] rep around, sl st to join.

Rnd – (-, -, 6): Ch 3, dc in same st, dc in next 4 sts, [2 dc in next st, dc in next 3 sts] rep around, sl st to join.

Rnd 4-8 (5-11, 6-12, 7-13): Ch 3, dc in each st around, sl st to join.

Rnd 9 (12, 13, 14): Ch 1, Revsc around, sl st to join. Fasten off, weave in ends.