Decrease Stitches Like a Pro

Decreasing basic stitches in crochet is easier than you might expect.

The process may have always been relatively easy, but it has not always been written in a manner that was universal in understanding in patterns. The current term I see most is the type of stitch (single or double crochet) followed by a number, then followed by “tog”, and it is all just one little abbreviation; such as sc4tog.

Breaking it down a bit helps you to better understand it, so sc4tog, is essentially “single crochet 4 stitches together”. Patterns will usually list this process in its special stitches section, but with some further understanding you will not have to find this “Special Stitch” description. 

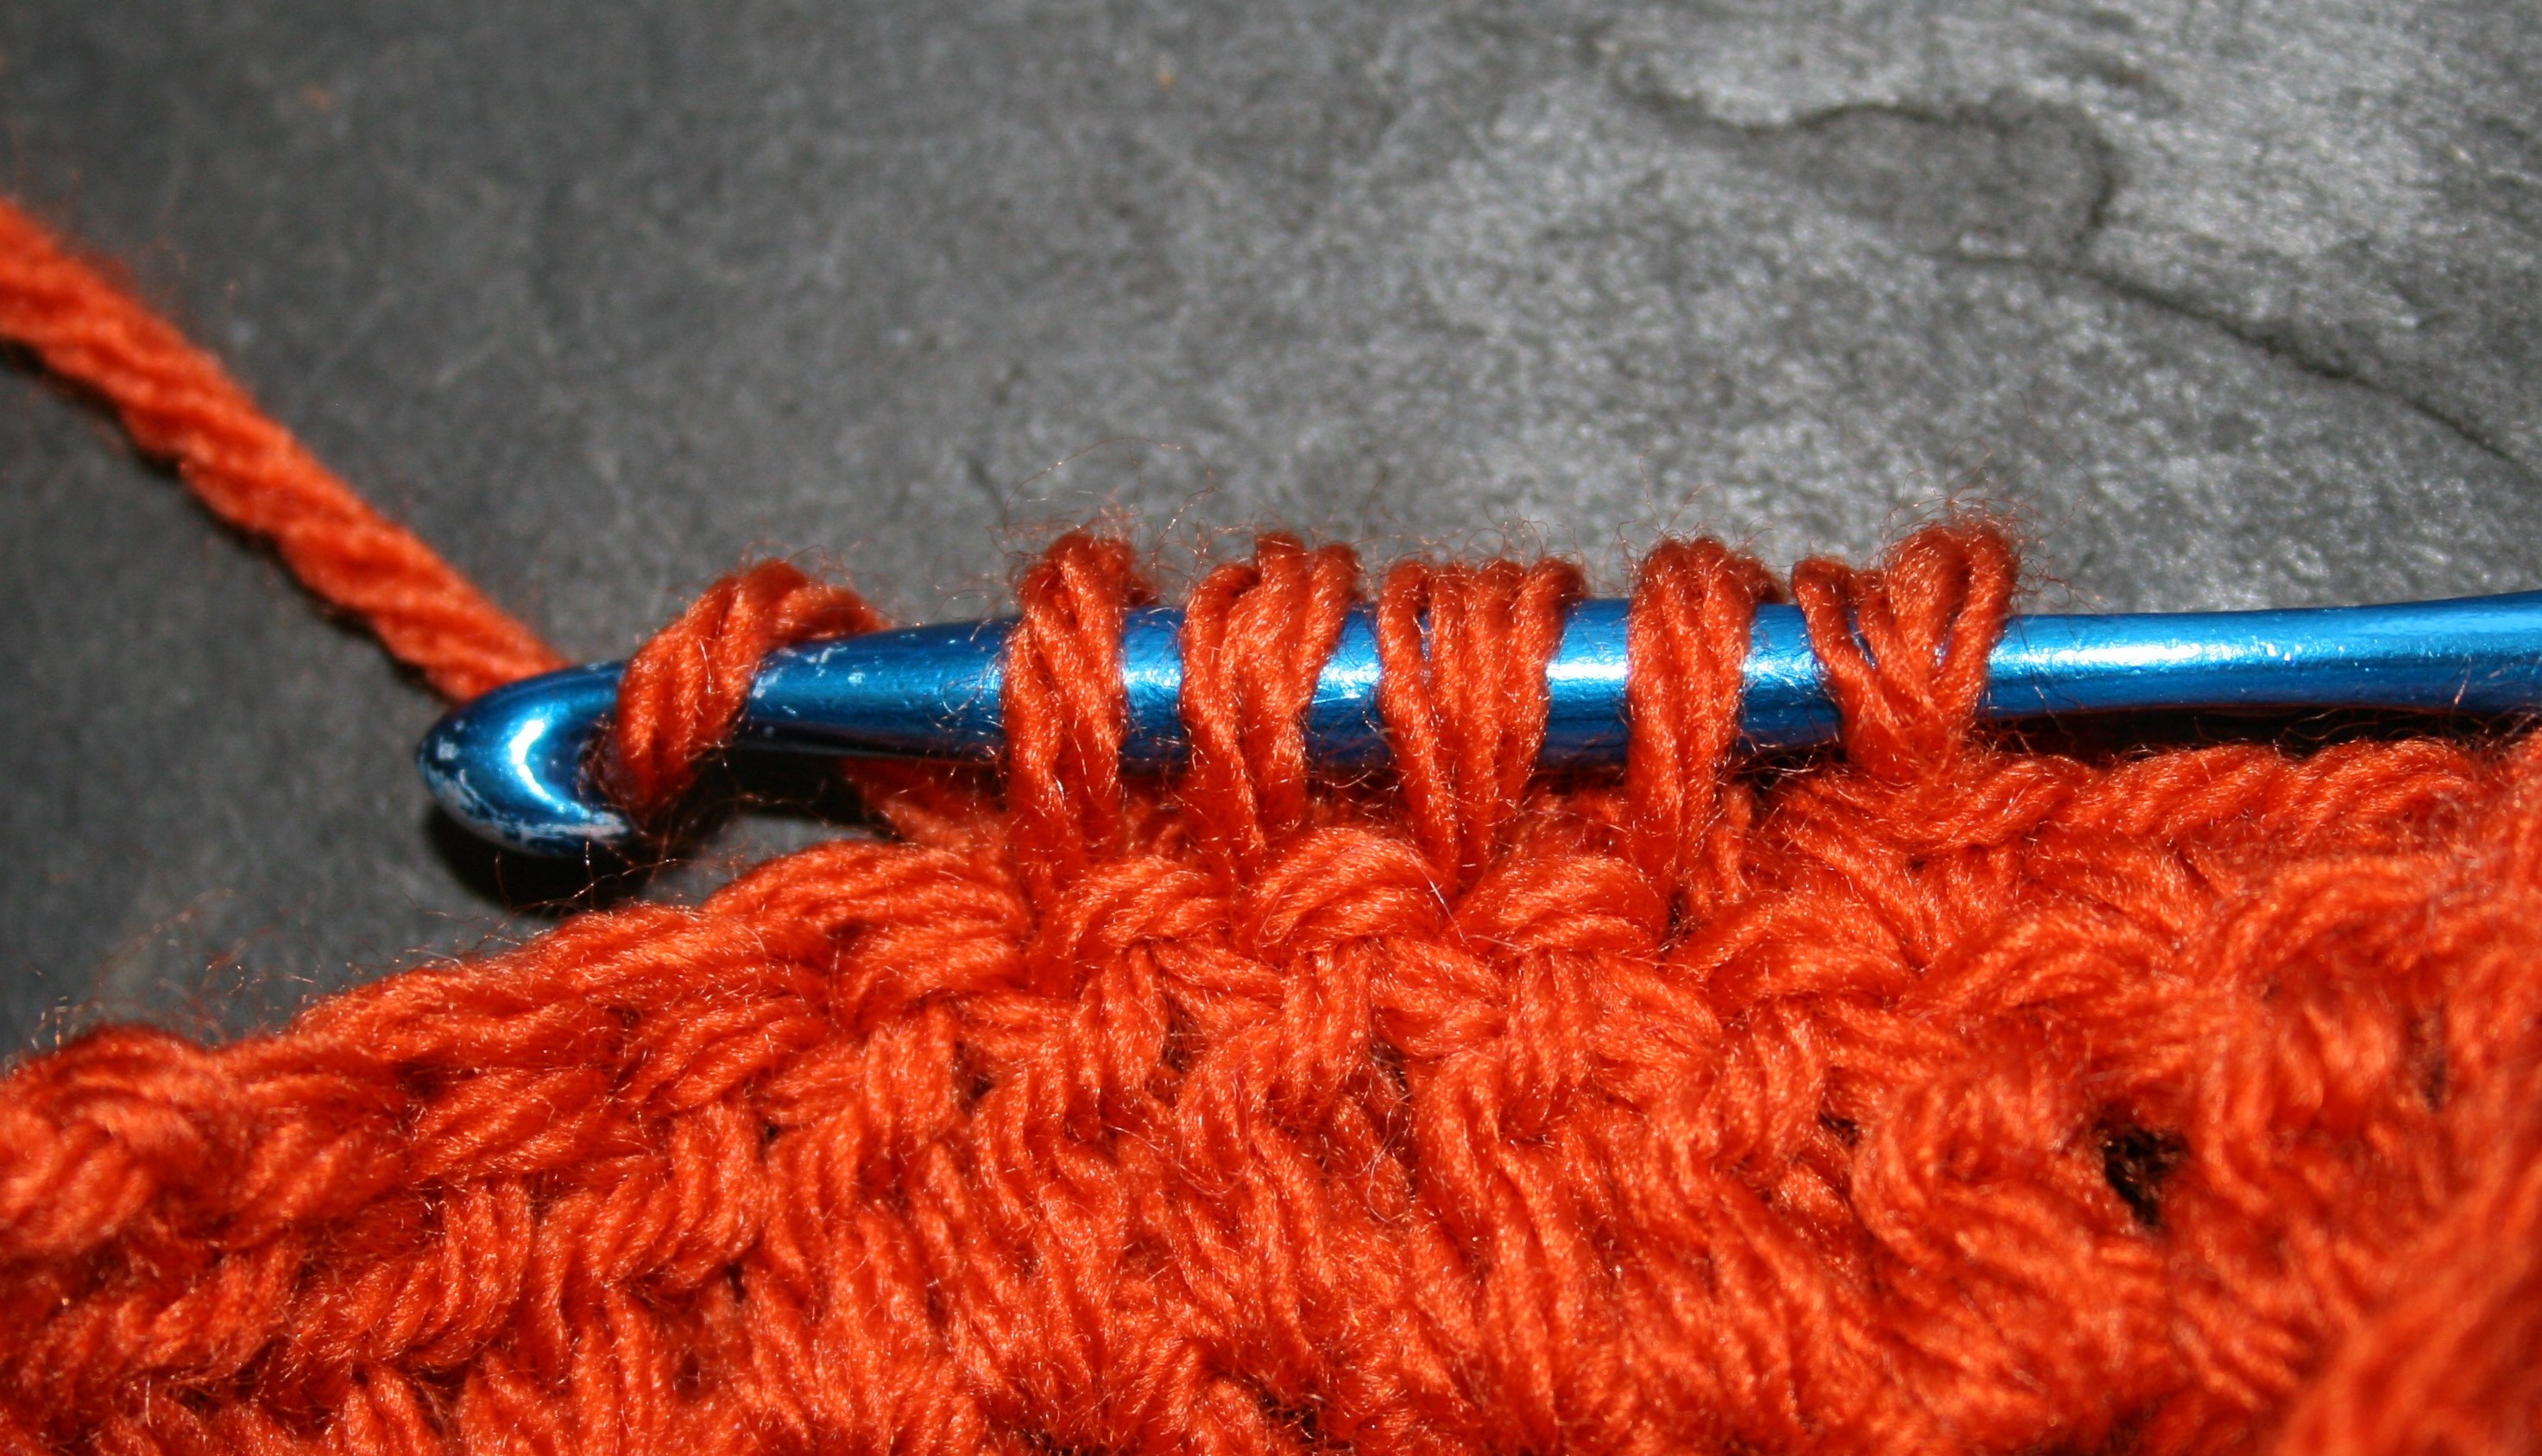
This stitch decrease process is one that I describe as a “monster with 1 head and multiple legs”, meaning when you are finished there will only be 1 stitch (the classic “V” top and back loop section of a stitch at the top) while working over multiple stitches. It makes a solid fabric, without any holes that can be created in other decrease methods that have you simply skip the next stitch.

If you keep in mind this simple rule, than you will be able to work this technique no matter what the notations. You work the indicated type of stitch until you are only 1 yarn over and pull through away from completing, then you start the next stitch.

So if you were working the sc4tog, you would insert your hook into the next stitch, yarn over, pull through a loop-STOP. You now have 2 loops on the hook, and one more yarn over and pull through will finish the stitch, so this is when you begin the next stitch. So you insert your hook into the next stitch, yarn over and pull through a loop- STOP. To finish a single crochet you would perform one more yarn over and pull through, but you are still decreasing. You currently have 3 loops on you hook (1 more than the number of stitch “parts” you have worked). Repeat the process of inserting your hook, yarning over, pulling through a loop until you have 1 more loop on your hook then the number indicated in the abbreviation, in this case, until you have 5 loops.

Now, you yarn over and pull through all 5 loops on your hook.

Basically you are working 4 stitches part way, and then completing them all together.

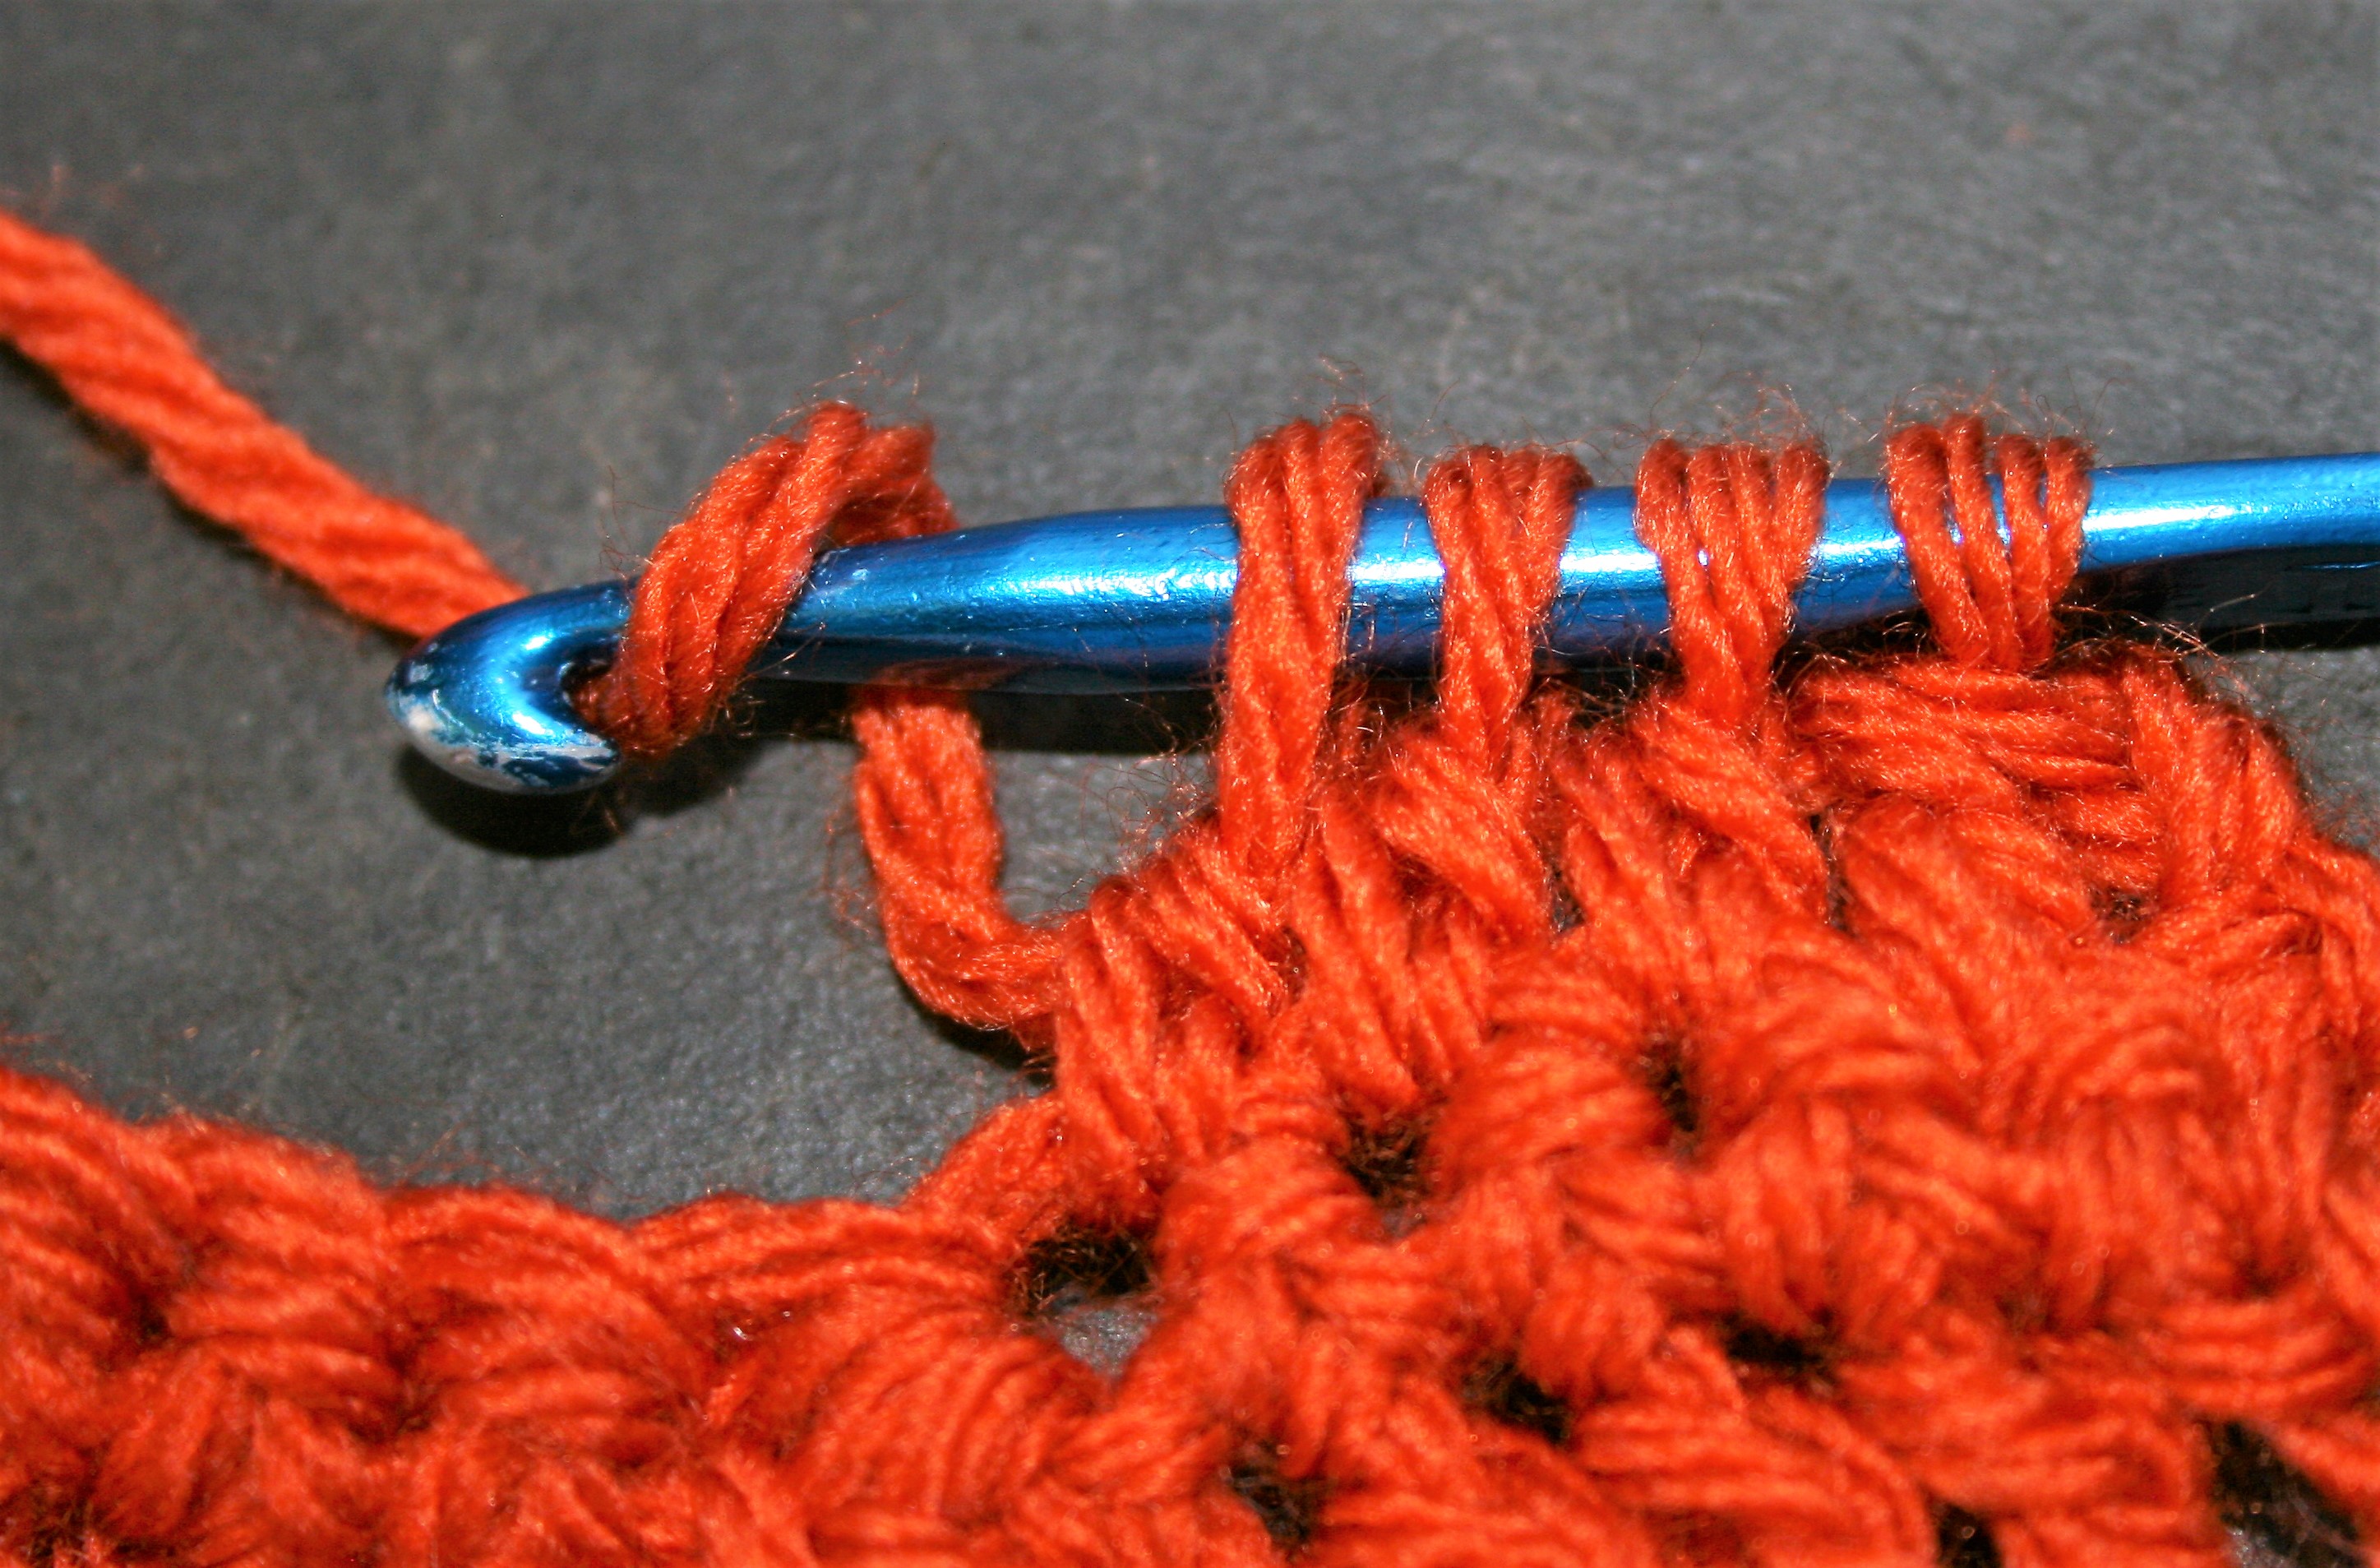
This same principal applies in you are working a decrease in double crochet, such as dc3tog. You would begin a double crochet in the next stitch, stopping when you only have one more yarn over and pull through to finish the stitch. You then begin the next stitch, and repeat the process.

By understanding the basic concept, it has helped me be more independent in work a pattern, I don’t feel like I need to work the explicit directions of the special stitch section, I am more free to enjoy the process. Other tips that help, are understanding and recognizing your stitches….find more information here.

Tips for the Mundane

There are some truths about crochet that no one ever seems to share, we all hit a period where we are bored. This could be a stitch pattern, the act of moving the hook, the feel of the yarn. Everyone I have ever met does put things down from time to time, but they never really admit it.

It does not matter if you crochet for a living or just as a hobby, sometimes we find a mundane point. However, I have found a couple of ways through this period.

Ask yourself why. Is it that the stitch is not exciting? Is pattern is taking too long to finish? Is my attention being pulled in another direction?

We have all been there, and there is no shame in it. I have found a couple of approaches to get through it and still actually end up loving crochet again.

First, take a break. This is not a bad word and it does not mean that you are done with the craft, it simply means that you need a point of rejuvenation. Usually when I put my hook down, I find that I still need something to keep my hands busy and fidgety in the evenings when sitting with the family in front of the television. For me I then pick up work puzzles, maybe some Sudoku or word searches, I don’t quite have the disposition for crosswords but there are plenty of different puzzles to keep me entertained.

However, sometimes you need to get a project finished, there is a deadline…maybe you need that gift for the baby shower in 3 days. In this case, I have to set small goals. It can be as simple as completing a set number of rows of the pattern every time I sit down with it in my hand. This really depends upon that stitch pattern, but maybe it is as simple as getting through one of the row pattern repeats. Maybe it is getting to the next color change, or the next color change in the yarn. I set myself a visual point and work toward it. I find that this helps even more if I have a small reward for myself at the end, maybe I get a cookie or such, maybe then I get a nice stretch. It does not have to be anything big, it just has to be something to break up the monotony.

Sometimes it is as simple as changing projects and putting one in “time out”. I find this happens most on projects that I was first intrigued by, but then quickly discovered that the design was a really rather simple stitch repeat, like an entire afghan worked in only double crochet rows. There is nothing wrong with it, it just is not very exciting, and frankly if I do not have a reason or deadline to actually complete it, I might not get it finished. In this case I just have to be honest with myself. There is no harm in using the yarn in another project.

I wish I could say that I never put down my hook, that I have endless creative energy, but alas that is not what works for me. There are times I need to find another focus to help but my love of crochet back in focus.

Crisscross Mesh- The Easy Top

I have long found that using a fine weight yarn and a large crochet hook can create some stunning effects, and my latest design is no exception. The Crisscross Mess Top can be found in the Spring 2018 Special issue of Crochet! Magazine Boutique Style Crochet and I think that you will really enjoy it.

photo courtesy Annie’s

The yarn used for this design, Juniper Moon Farm Zooey DK, is a cotton/linen blend at 60%/40% respectively. It has a slightly uneven texture, being that it is a bit thinner/thicker in some places then others, but not drastically. It is not necessarily the first yarn I would have thought to design with, but I am very happy with the results. Find a more in depth review and thoughts of this yarn from my post in June 2017, here.

The design for this top is really pretty simple. It is rates as easy, and honestly….it is. Basically the large hook and fine yarn do all the work. You simply work 2 different size rectangles, and sew them together, then add sleeves. It only utilizes one crochet stitch, so it is pretty straight forward, yet has a really nice effect. There is no need to worry about shaping, or anything of such, the sleeves use what is referred to as short rows. Short rows are basically the act of not finishing a row, leaving stitches unworked, then when returning to work a row in the same direction you then work the unstitched stitches. Basically if you have 10 stitches in row 1, you work 5 stitches in row 2, as a result there are 5 stitches in row 3, then in row 4 you work the 5 stitches of row 3, and the 5 unworked stitches in row 1, resulting in 10 stitches. Really this is the only technique in this design that is not “repeat Row 2”.

To help the fabric open up, I actually hung it up when I blocked it. The weight of the wet fiber helped pull the stitches open even more than the stitches themselves. This helps give it a casual chic look. However it is definitely not a “wear it alone” type of top. You want to have something underneath, so that effectively makes this a statement type piece.

So if you are looking for a bit of a current fashion statement, give this design a try.

Two at A Time- Double Up that Yarn

Thinking back I can remember it intimidating me the first time I tried it, but now it seems like nothing out of the ordinary. Using two strands of yarn, or more, at the same time now gives me no second thoughts.

This practice of crocheting with more than one strand of yarn yields some really nice results. I may not use it all that often, but I like the look it creates an almost speckled effect. In some cases it helps two bold colors blend together.

The best tip I can share is to simply treat the two (or multiple) strands as one. Hold them together as one, not worrying about if the colors twist together in your hand. This twist will lend to the effect. When you yarn over and pull your hook, use all the strands, really just treat them as one. After a short time it is easy to get into this rhythm, so don’t be afraid to treat it as such.

It does have some tendencies that can be a bit annoying, for instance keeping equal tension on two yarns can be challenging. This becomes a bit more obvious when I begin one yarn from a new center pull skein, and the other has been worked from a bit already. The new skein is tighter to pull from and this makes it a little awkward to ensure that I keep both strands under an equal tension. I personally correct this by pulling more yarn out of the new skein to more equally match the pull of the second skein.

If I am using two yarns that are wound into balls the challenge becomes keeping them from rolling all over the place and becoming tangled together. There are a couple of tips to deal with this annoyance, I use two different yarn bowls that “trap” the balls and prevents them from “free rolling”.

Another thing to keep in mind about using more than one strand of yarn is that the weight changes. It is not like adding the two weights together will double the weight or anything. By using two medium weight (number 4 weight) yarns does not create a super bulky or a number 8 weight yarn, but it does make a heavier weight, but more like a Bulky (number 6 weight) yarn. As a result you need to use a larger hook. Check out a Beyond Basics Hat, using two strands of baby yarn to create a fun hat here.

By ensuring that you have a proper size hook to accommodate both yarns you also ensure that the fabric has the drape you desire. Just as any project if you want a dense fabric use a smaller hook, if you want a more fluid fabric use a larger hook.

However I usually use yarns of differing weight together, I might accent a medium weight yarn with a light or even lace weight yarn. I might use a completely different fiber, might match a wool with a silk, an acrylic with a mohair, a cotton with an alpaca. The yarns provide a different texture, a different sheen, often a different color, but they always provide something amazing to look at.

The Classic Basics- Granny Square

The classics are classics for a reason. Crochet has some classic patterns and designs that always seem to draw people into wanting to learn the skill. A classic that I have had multiple students want to learn recently is the Granny Square.

The Granny Square is really a motif, and there are times when motifs in general are called Granny Square. At this discussion I am simply referring to the classic look of Double Crochet (treble crochet in UK terms) groups worked into chain spaces. This makes what almost appears to be checker board of “closed” and “open” squares.

The classic version has a different color on every round, and when the last round is worked entirely in single crochet (double crochet in UK terms) is worked in black. This is the way I was introduced to this classic, however today it is interesting to see it worked in all one color or worked extremely large.

To work your own Classic Granny Square (in US crochet terms)…

Chain 4, slip stitch to the first chain to form a ring.

Round 1: Chain 3 (counts as a double crochet now and throughout), working in ring, 2 double crochets, chain 3, [3 double crochets, chain 3] 3 times, slip stitch to the top of the beginning chain-3, finish off. -4 (3) double crochet groups, 4 chain-spaces

Round 2: With new color, slip stitch to any chain-3 space, chain 3, 2 double crochets in same space, chain 3, 3 double crochets in same space, chain 2, [3 double crochets in next chain-space, chain 3, 3 double crochets in same chain-space, chain 2] 3 times, slip stitch to the top of the beginning chain-3, finish off. -8 (3) double crochet groups, 4 chain-3 space, 4 chain-2 spaces

Round 3: With new color, slip stitch to any chain-3 space, chain 3, 2 double crochets in same space, chain 3, 3 double crochets in same space, chain 2, [3 double crochets in chain-2 space, chain 2, 3 double crochets in chain-3 space, chain 3, 3 double crochets in same chain-3 space, chain 2] 3 times, slip stitch to the top of the beginning chain-3 finish off. -12 (3) double crochet groups, 4 chain-3 spaces, 8 chain-2 space

Round 4: With black color, slip stitch to any chain-3 space, chain 1, 3 single crochets in same space, *[single crochet in each double crochet across to chain-2 space, 1 single crochet in chain 2 space] repeat across to chain-3 space, 3 single crochets in chain-3 space ; rep from * around, slip stitch to beginning single crochet, finish off. Weave in ends.

At this point the Granny Squares can be joined together to create any number of things.

To update this Classic pattern, it is relatively easy after you learn the basics of this design. Essentially the chain-3 spaces are the corners of the square, each time you come to a corner you work a group of 3 double crochets, chain 3, and another group of 3 double crochets in the chain-3 space. You then chain 2 to work along the “sides” of the square, this chain-2 is always worked over a group of 3 double crochets, creating an open space or square. In every chain-2 space 1 group of 3 double crochets are worked. So to bullet point it:

  • Work (3 dc, ch 3, 3 dc) in every ch-3 sp
  • Work ch 2 over groups of double crochets
  • Work 3 dc in every ch-2 sp

Following these simple rules you can create a Granny square of any size. Then for the classic edge you work a round of single crochets, with 3 single crochets in each ch-3 sp, a single crochet in each double crochet stitch, and 1 single crochet in each ch-2 sp.

If you do not want to change colors every round, then after joining, slip stitch in each double crochet across to the next chain-3 space, slip stitch in the chain- 3 space and begin the next round.

Check this classic out for yourself.