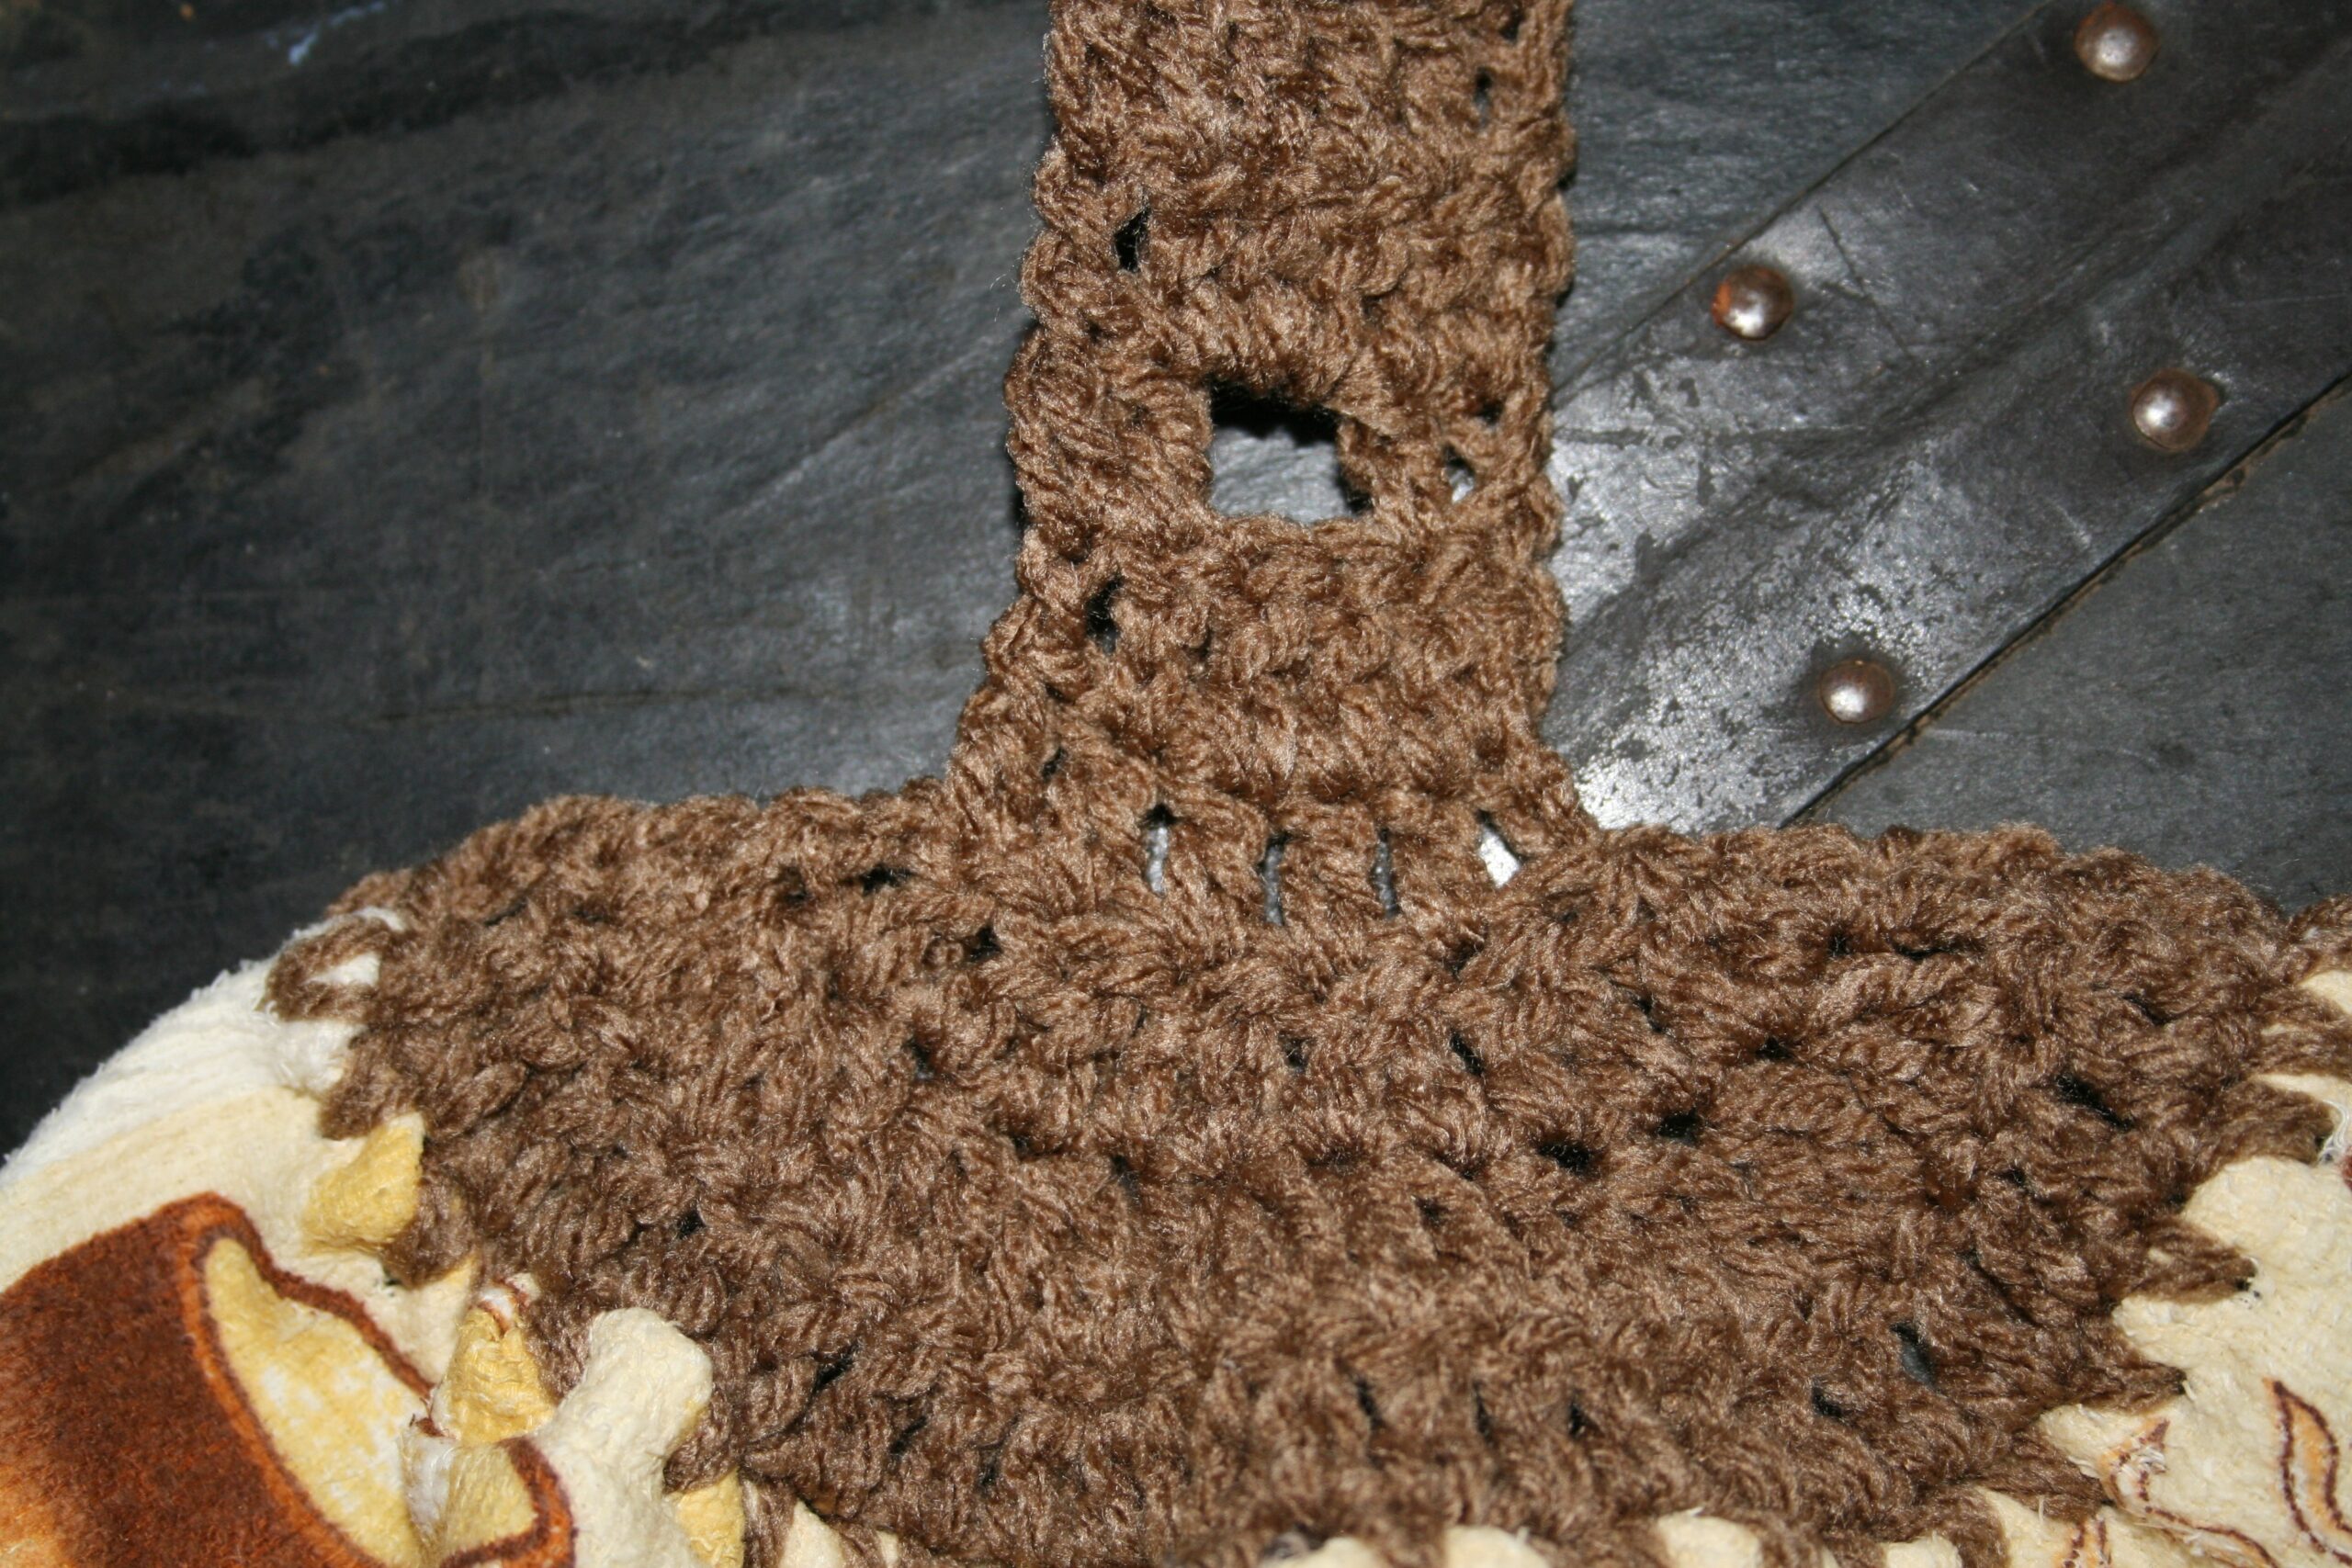
Braided Horizontal Cables are pretty straight forward to create if you have a couple of stitches in your tool box.
This type of cable is created by making arches, and “weaving” a subsequent arches through the original. The arches are created using Foundation stitches. The sample I am giving below will utilized Foundation Single Crochet Stitches, but after you understand the concept, you can utilize other foundation stitches. Just make sure the arch is large enough to fit the “woven” strand through.
Create a base fabric to start.
Ch 27, sc in the 2nd ch from hook, sc in each ch across, turn. -27 sc
“Wave/Arch”
Special Stitches
Foundation Single Crochet (fsc): Chain 2, insert hook in the second chain from hook, yarn over, pull through a loop, chain 1 (note this chain, pinch it, as this is where subsequent stitches are worked), yarn over, and pull through both loops on the hook. Insert hook into the pinched chain, yarn over, pull through a loop, chain 1 (pinch this one as it is the place the next subsequent stitch will be worked), yarn over, pull through both loops on hook. (For some nice videos checkout Moogly or One Dog Woof)
Extended Single Crochet (esc): Insert hook in indicated stitch, yarn over, pull up a loop, chain 1, yarn over, pull through both loops on hook.
Joined Single Crochet (Jsc): Insert hook into the chain of the last Foundation stitch created, yarn over, pull up a loop, insert hook into the next stitch of the row, yarn over, pull up a loop, yarn over, pull through 3 loops on hook.
Let’s Start!
Row 1: Ch 1, sc in same st, sc in next st, [esc in next st, 9 fsc, skip 5 sts, Jsc in next st, sc in next st] three times, sc in last st, turn. -3 “arches” made
Row 2: Ch 1, sc in each st across, change color, turn.
Notice how the second row basically just follows the row above.
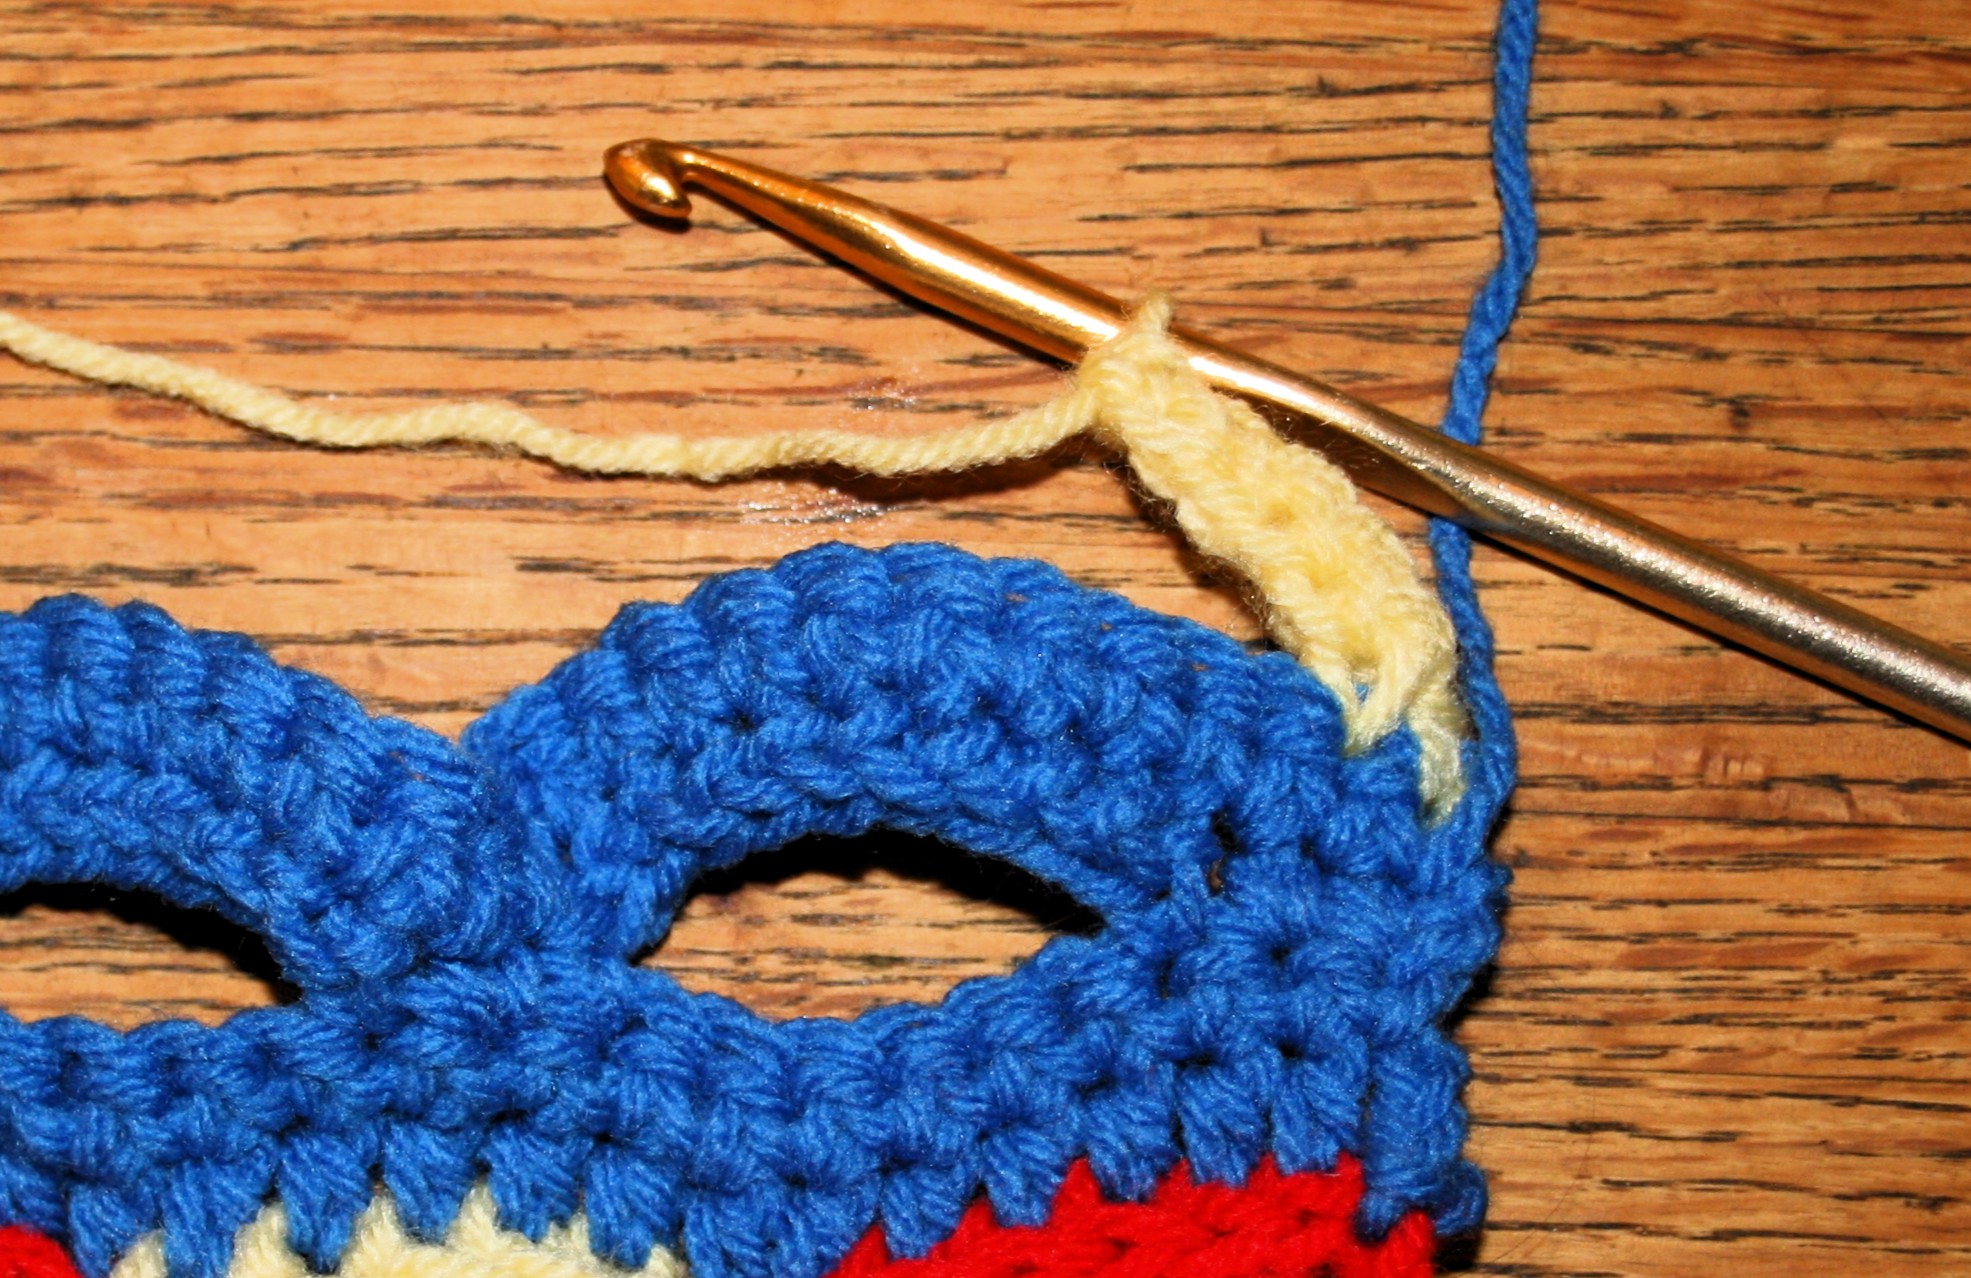
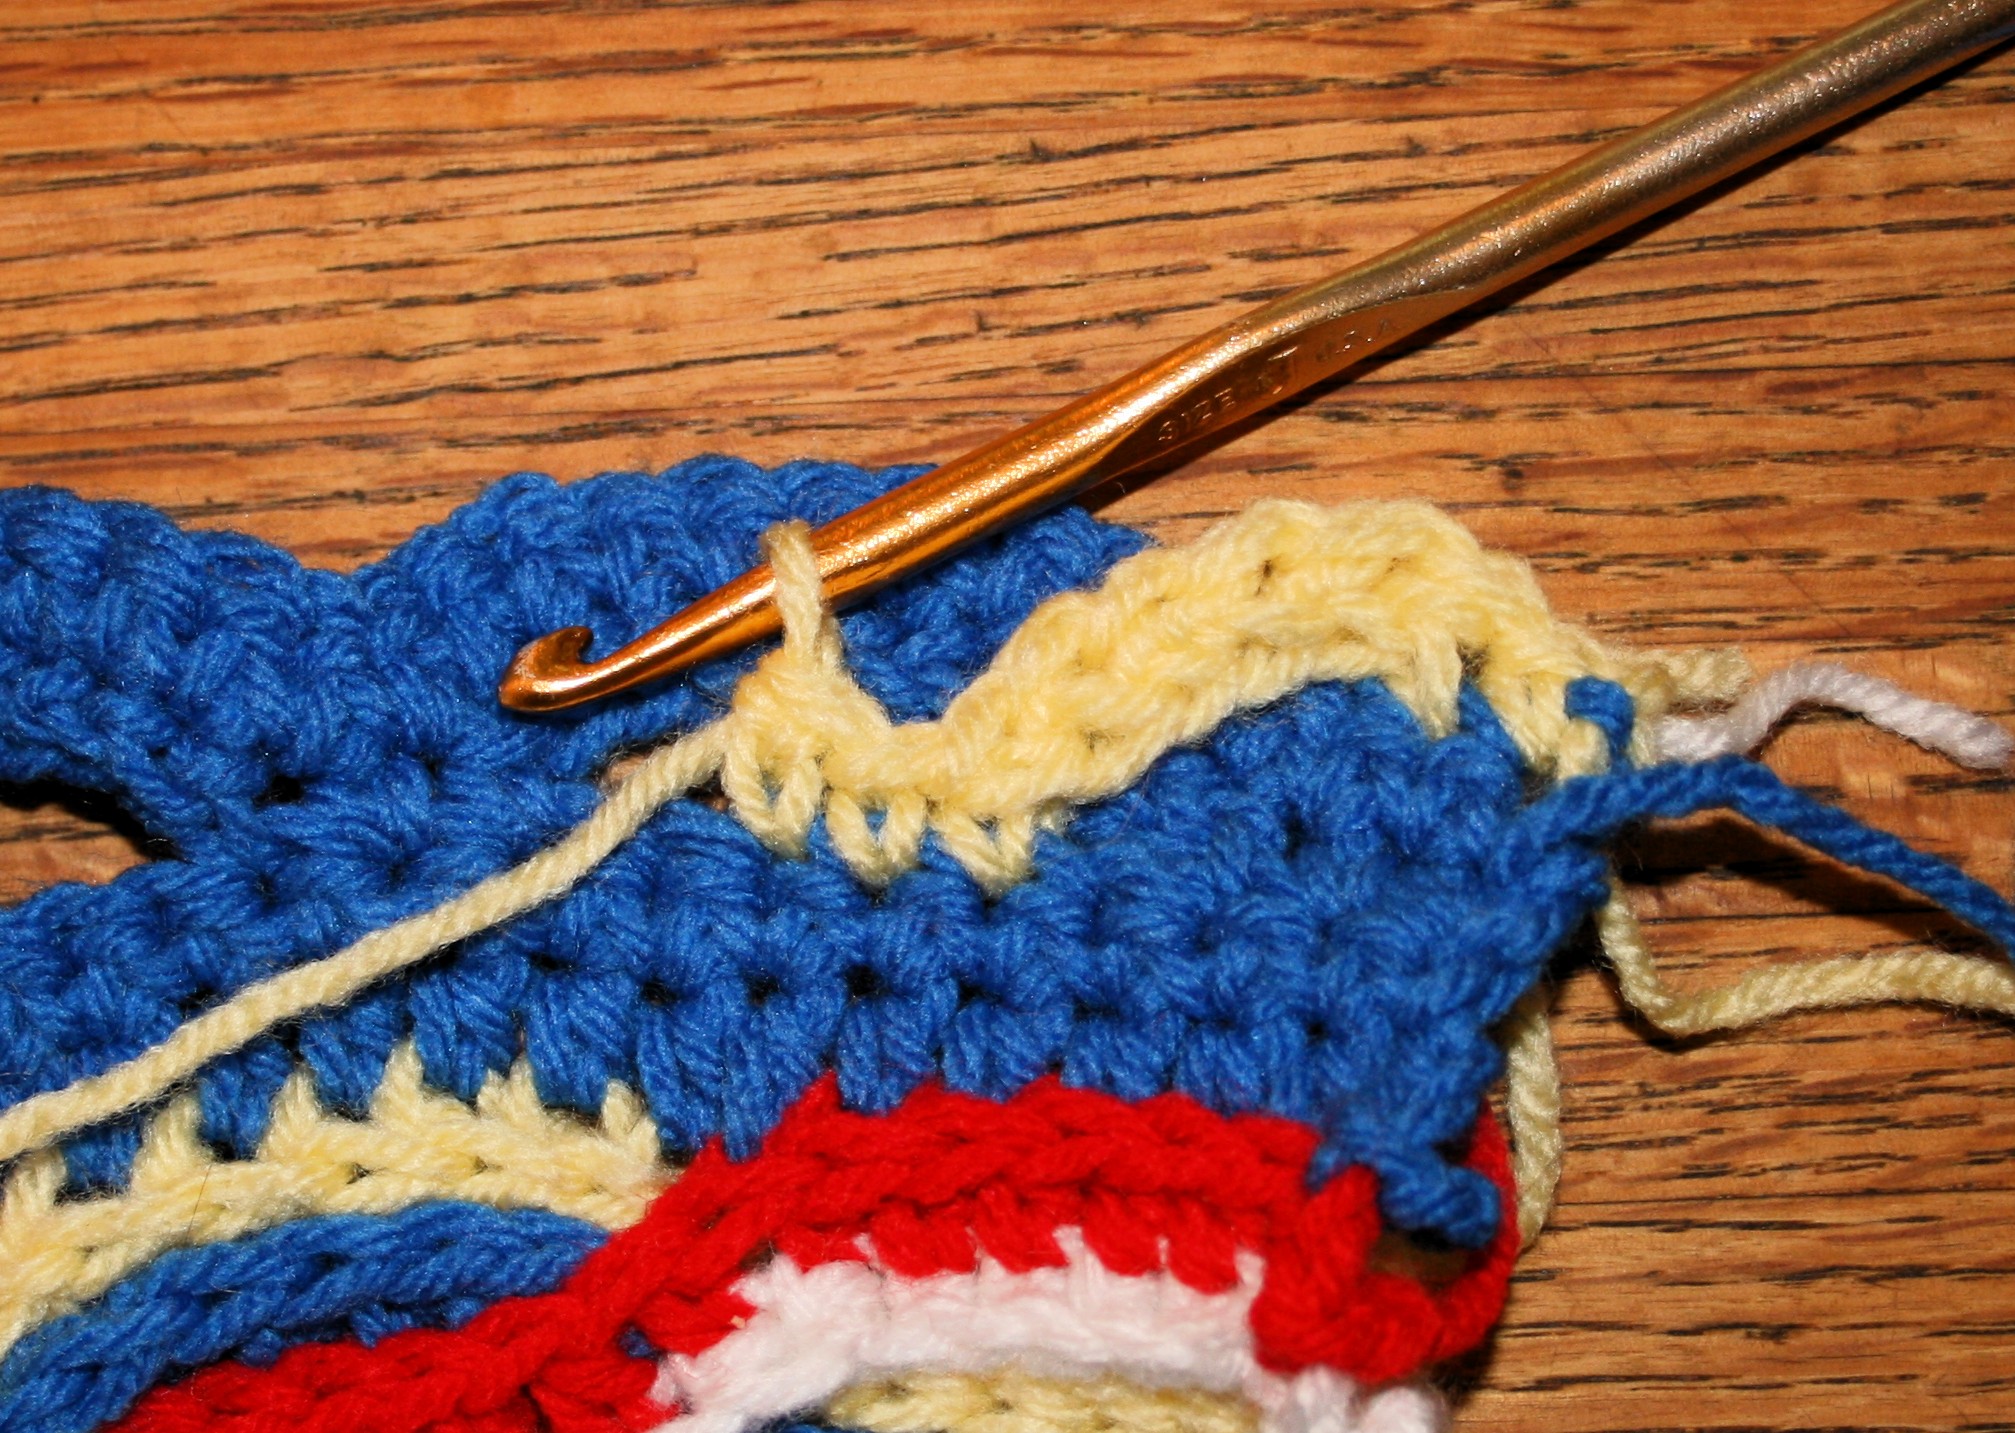
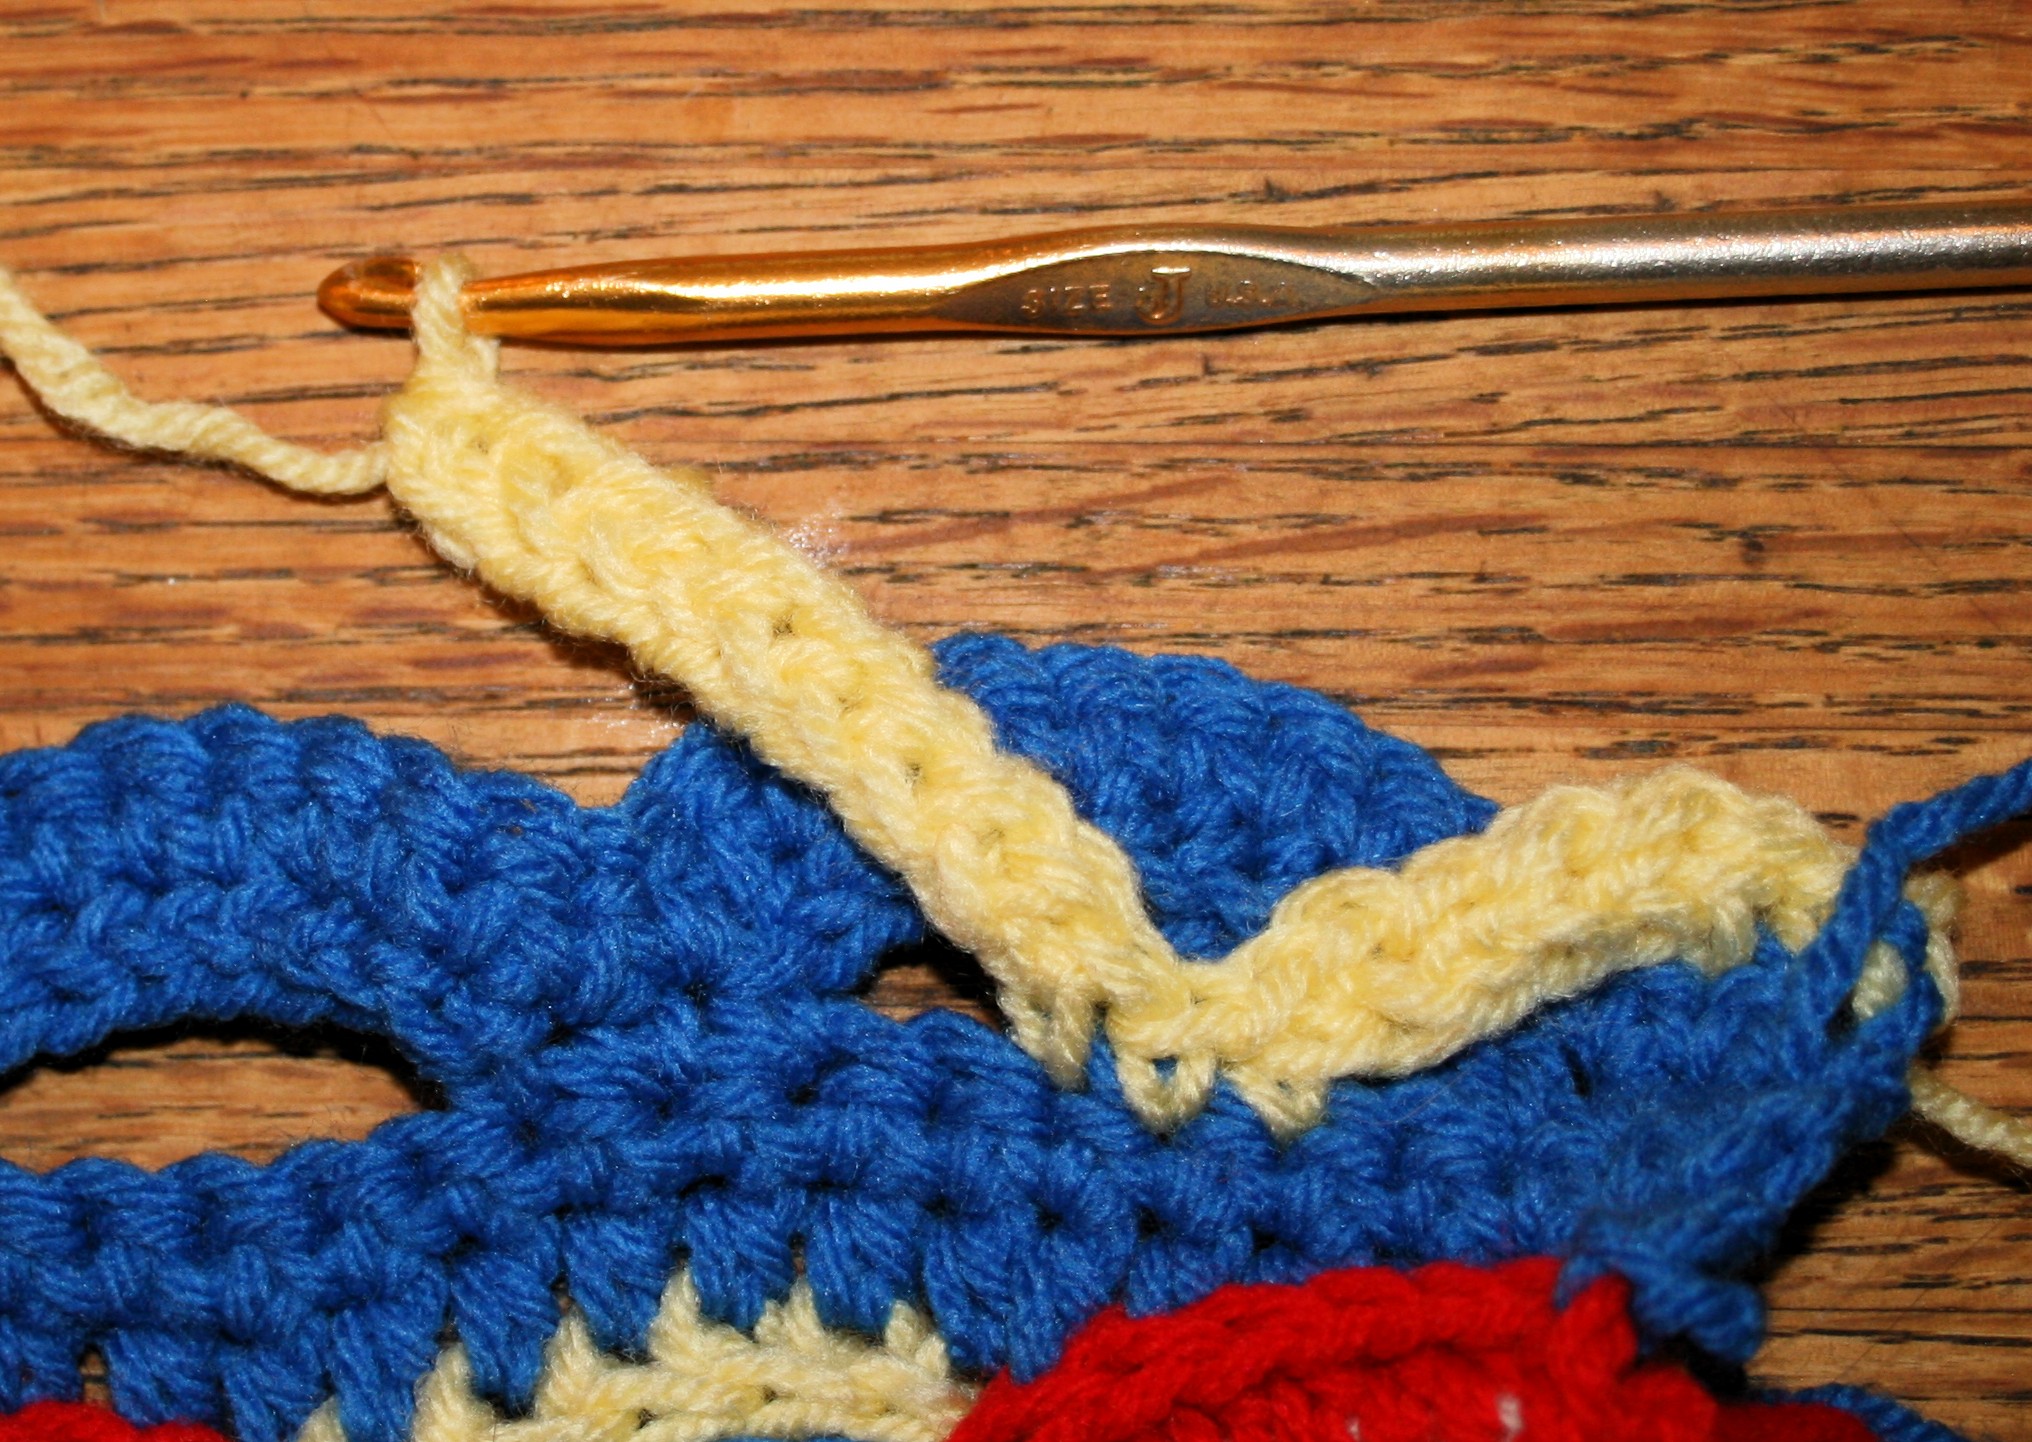
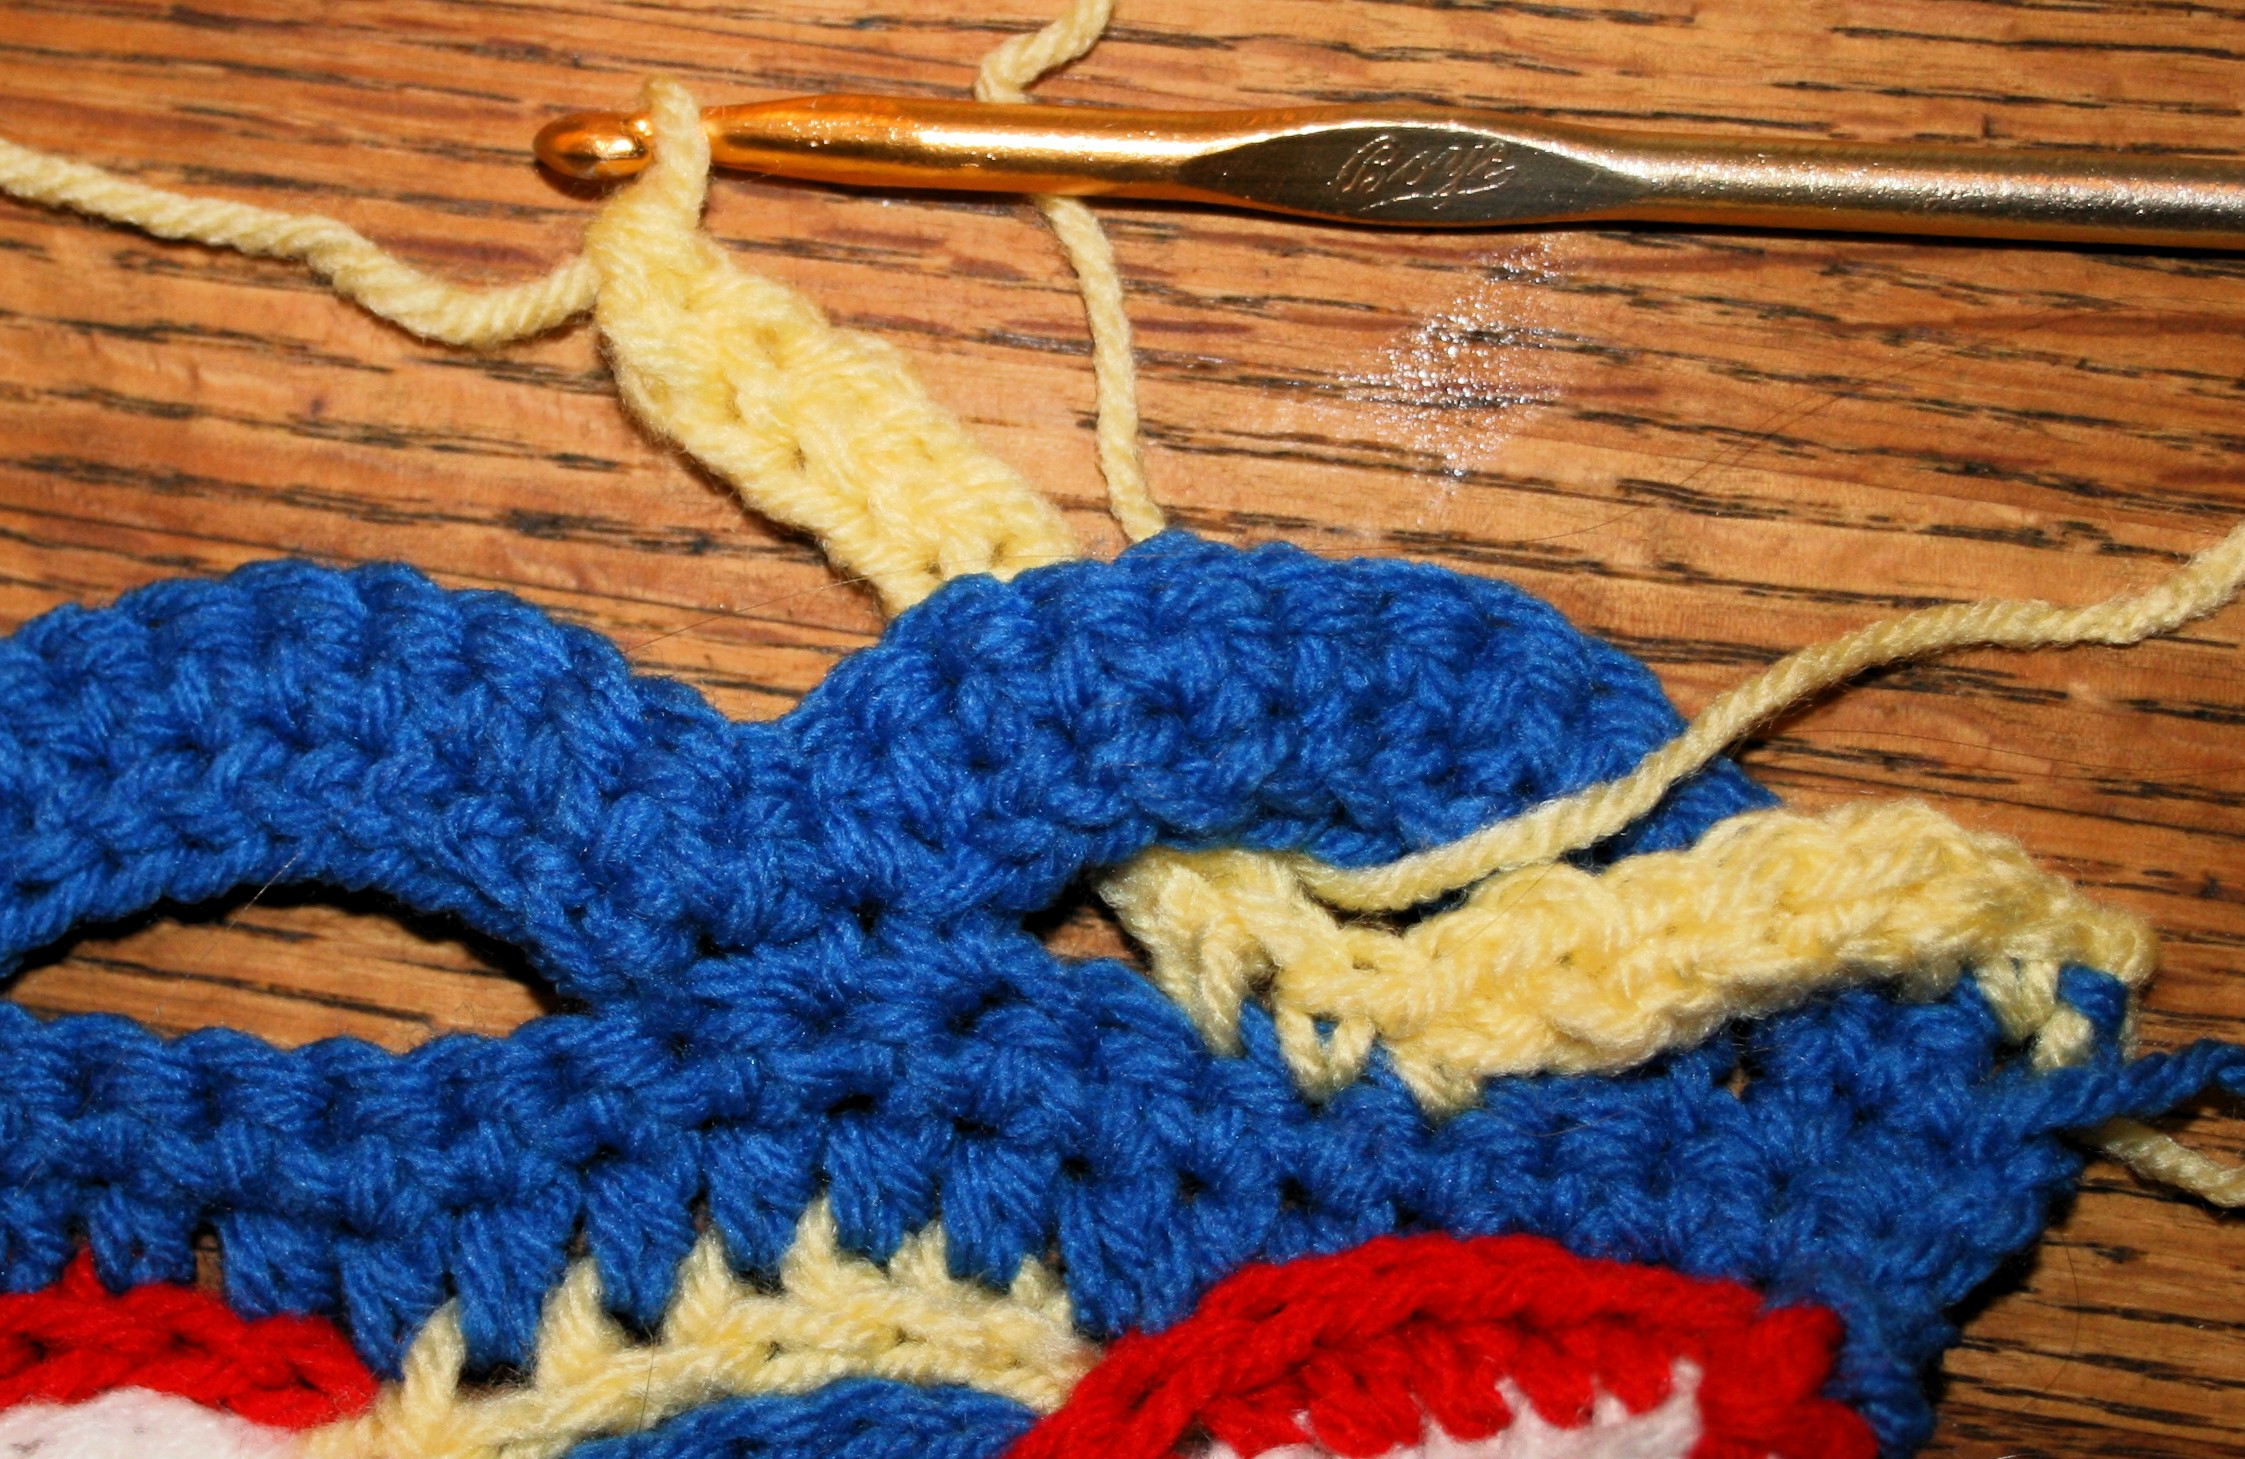
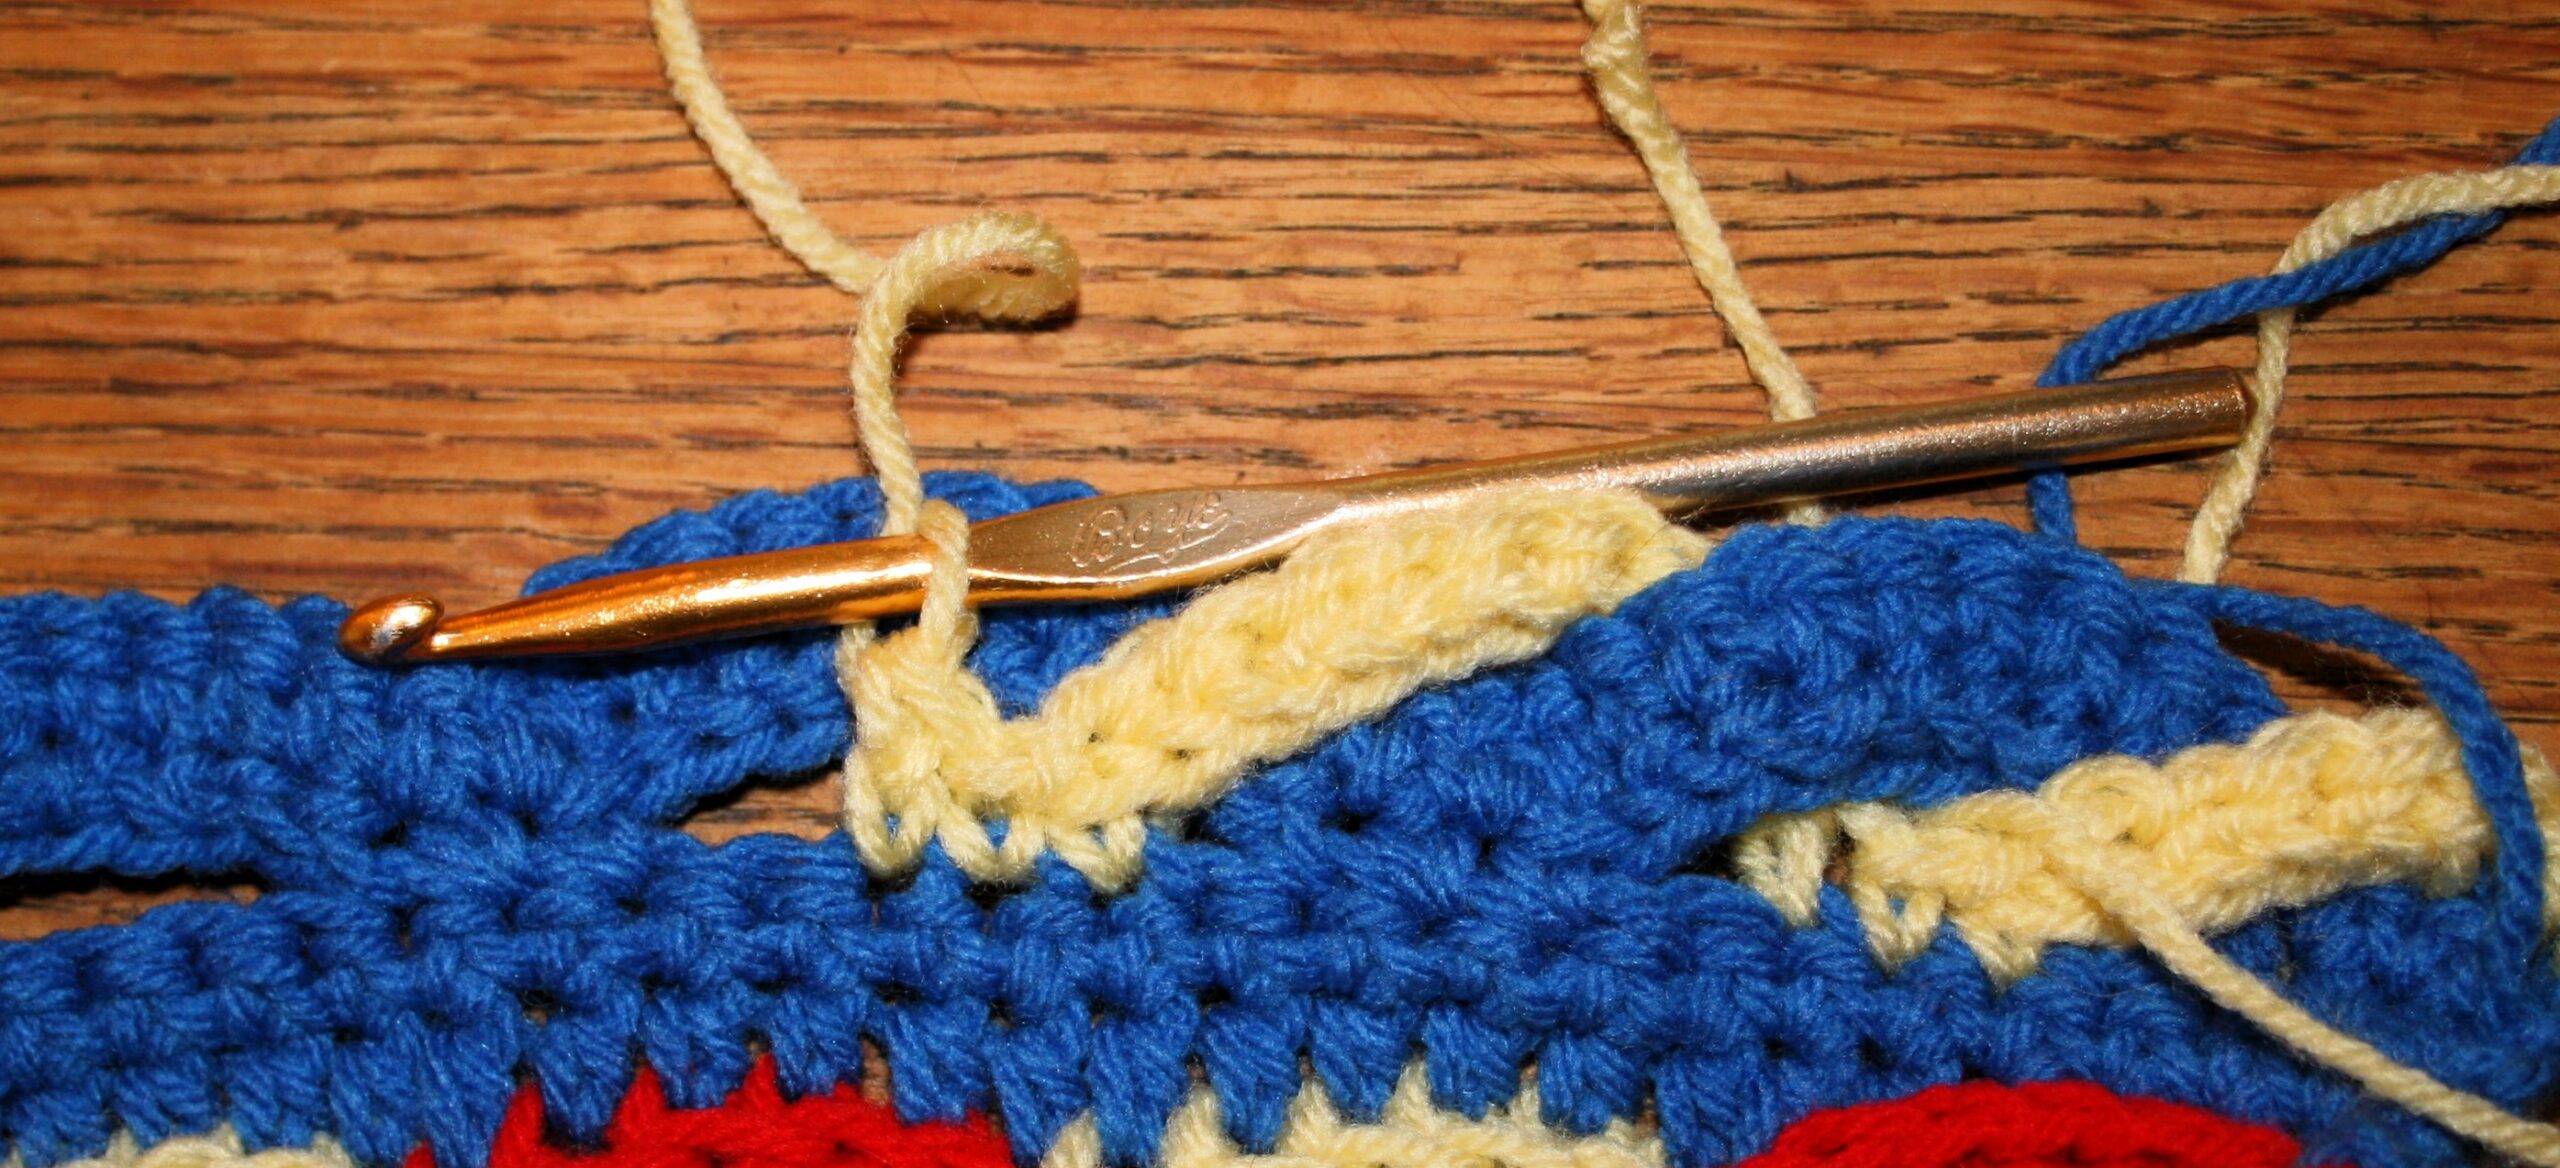
Weave the second arch through the first. You want to be mindful of where the working yarn is located before working the joining single crochet. Do not “trap” the working yarn under the foundation stitches just created.
Pay Attention Here
Row 3: Ch 1, sc in same st, esc in next st, 4 fsc, working in front of “arch”,
skip 1 st on join row, Jsc in next st, sc in next st, esc in next st,
[9 fsc, push fsc under arch, working in front of “arch”: NOTE: ensure that working yarn is not “trapped” under the fsc stitches when working the Jsc,
skip 1 st on join row, Jsc in next st, sc in next st, esc in next st] 2 times,
4 fsc, push fsc under arch, working in last 2 sts atop last row, Jsc in next st, sc in last st, turn.
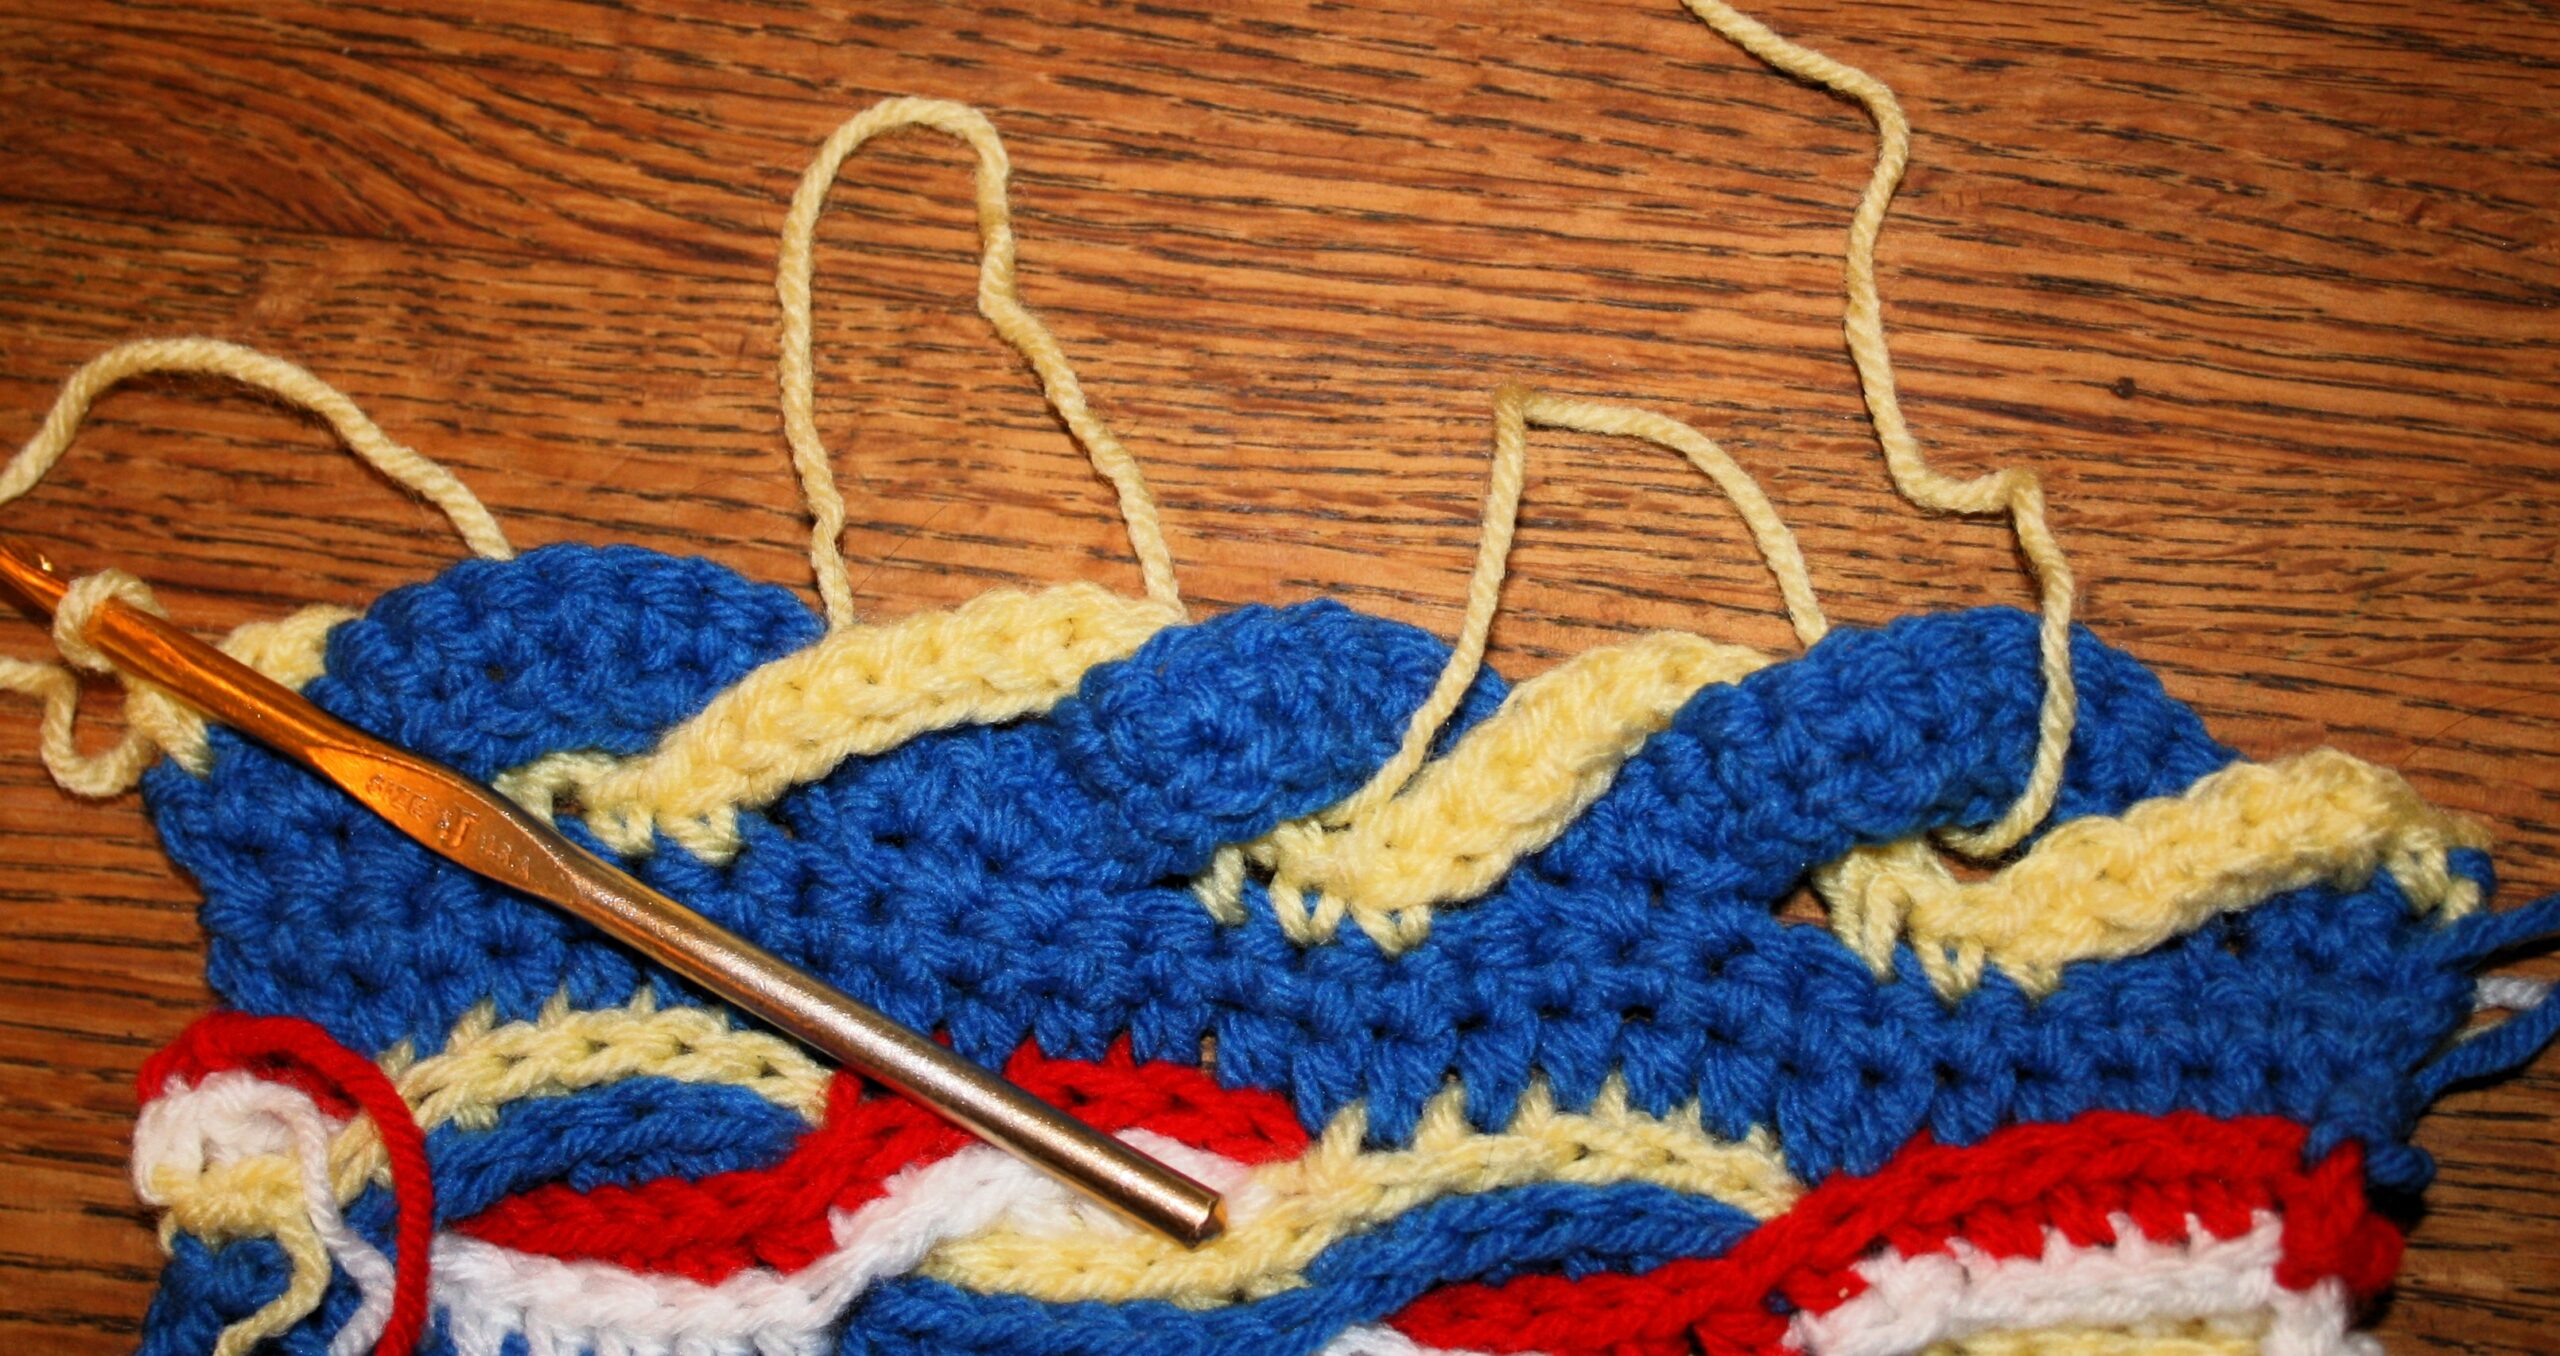
“Push” or “pull” the foundation stitches through the opposite arch to change the cable direction.
Row 4: Ch 1, sc in each st across, change color, turn.
Once again, the row above just follows the previous row.
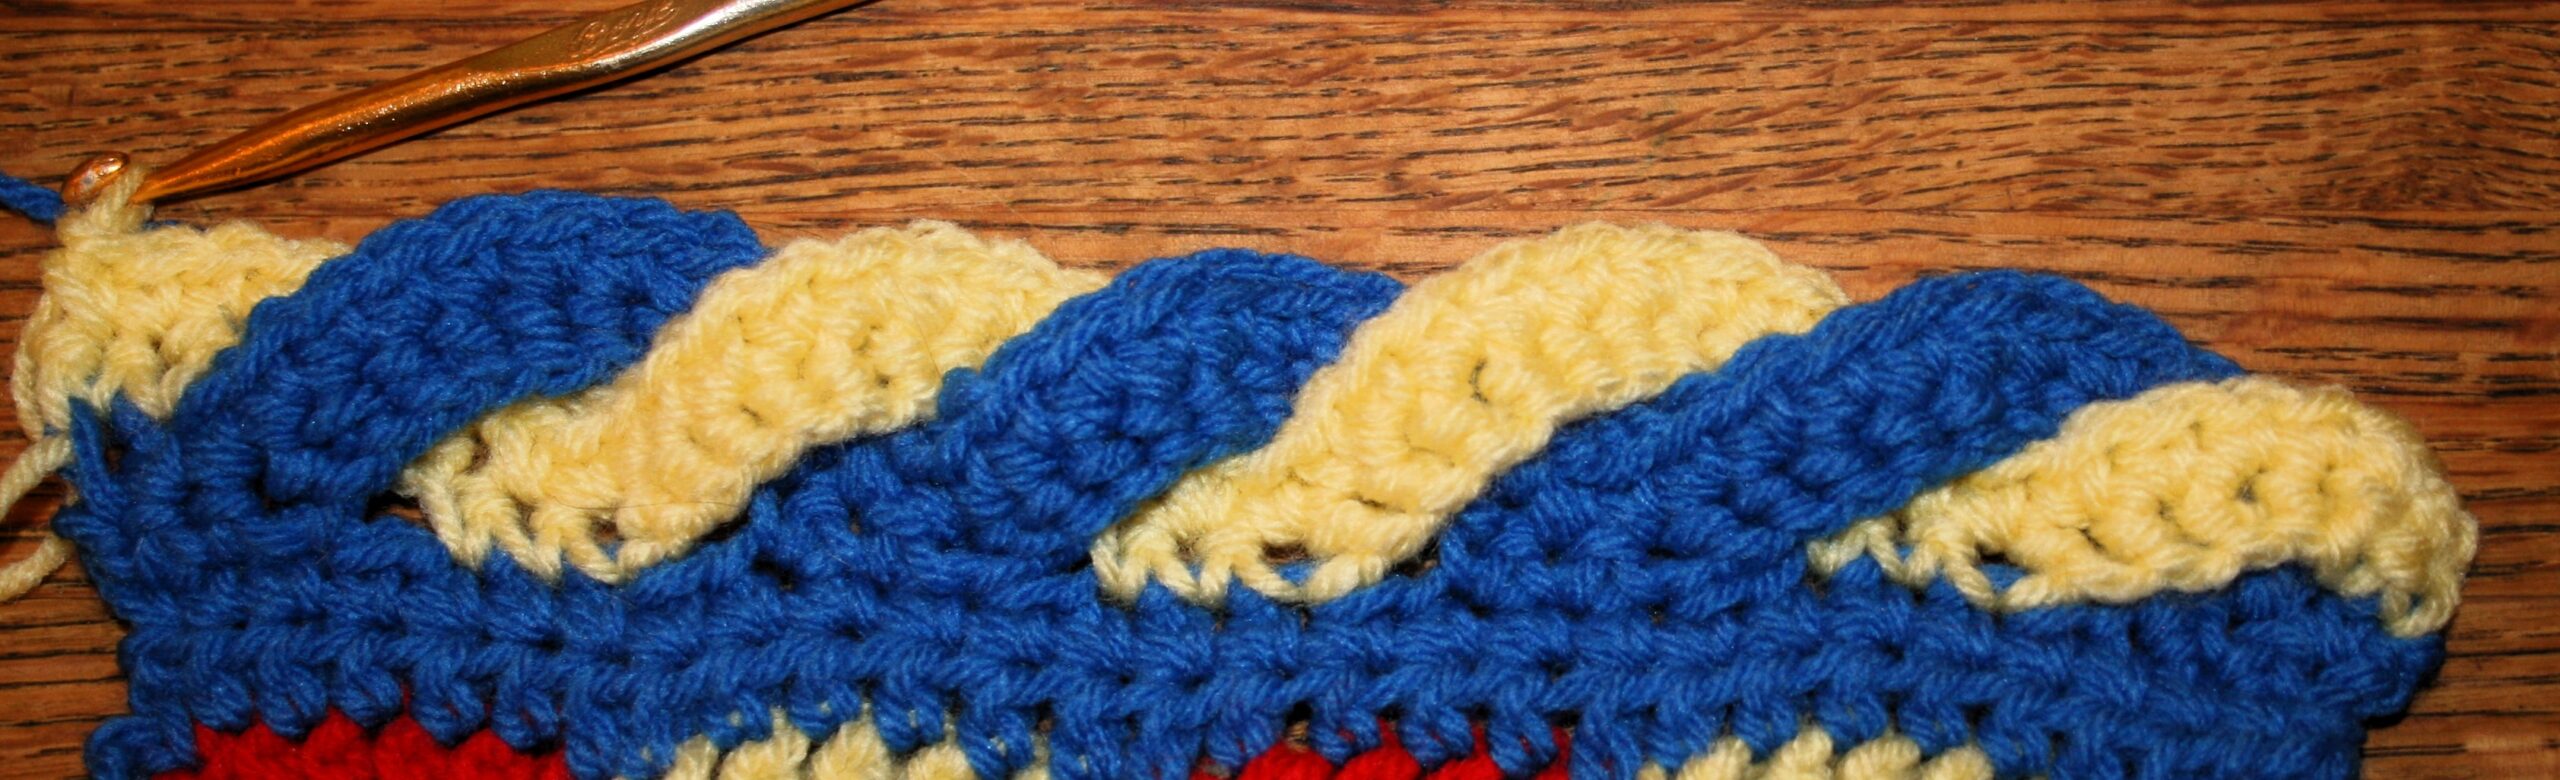
Make it an edging or an entire fabric. Just add a joining row to add more.
Row 5: Joining row: Ch 1, sc in same st, sc in next 2 sts, ch 1, [skip next 4 sts of next “arch”, sc in next 3 sts, ch 1] 5 times, skip next 4 sts of next “arch”, sc in next 3 sts, turn. : NOTE: the precise number of stitches skipped is not critical, as long as the fabric lays flat and the “arches” lay even.
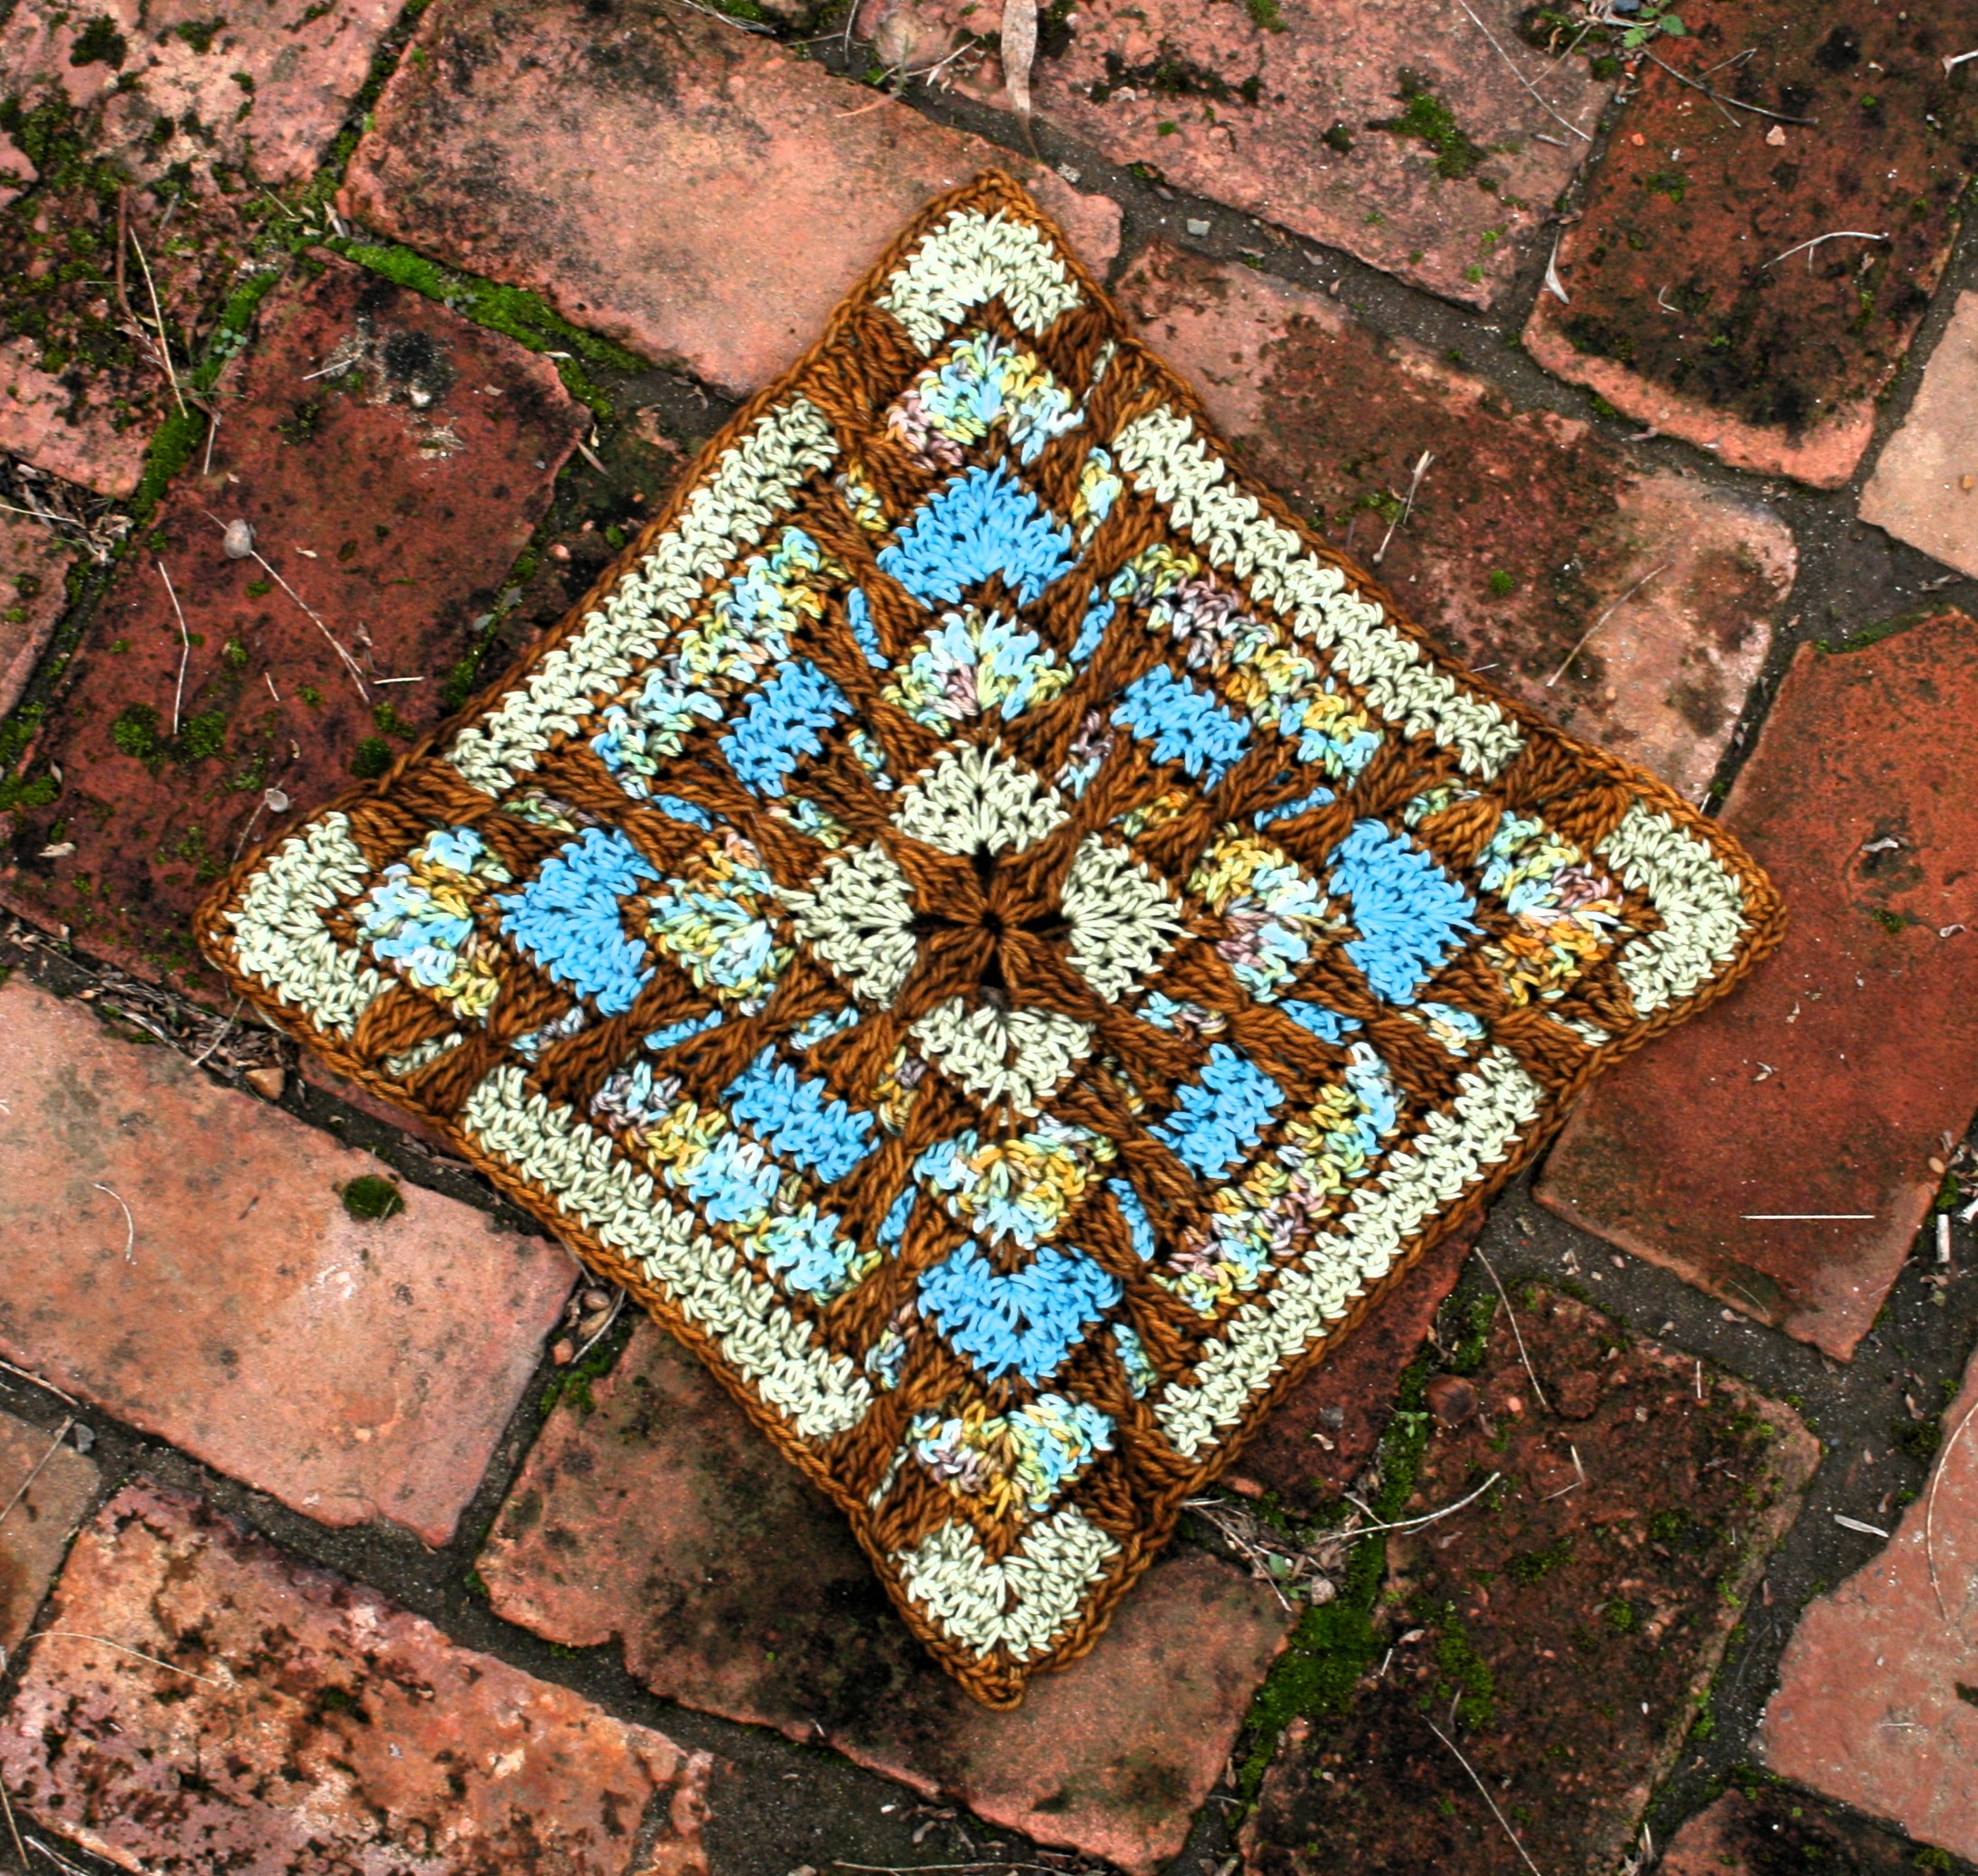
I am honored to be part of the Moogly CAL 2026, and thank you for joining along. The Radiate Champion block is in recognition of all the people that have helped champion me in the last year.
I have been fortunate enough to find many friends in the classes I teach. Friends from various walks of life that encourage and support one another, myself included.
I hope that you reach out and find a “tribe” in your community. The tribe can take many forms and include people that upon first glance may not appear to fit into your life, but if you give them an opportunity you might just discover that they are your biggest cheerleader.
Madeline Tosh Vintage medium weight 100% superwash merino yarn colors: (A) Carbon Dating, (B) Thyme, (C) Schnitzelfaced, (D) Translation
J/10/6.mm crochet hook
Abbreviations
Ssc= Standing single crochet
Cluster (CL)- YO twice, insert hook as if a Front post around first indicated st, YO, pull up a loop, YO, pull through 2 loops (3 loops on hook), YO twice, insert hook as if Front post around next indicated st, YO, pull up a loop, YO, pull through 2 loops (5 loops on hook), YO twice, insert hook as if Front Post around last indicated st, YO, pull up a loop, YO, pull through 2 loops (7 loops on hook), YO, pull through 6 loops, YO, pull through last 2 loops.
Notes
Not every row is turned, however, there is a turn at the end or each rnd 2 and 3 rep.
All CL and FPtr sts are worked in color A, into rows that are color A.
The CL stitch can cause the fabric to not lay flat, blocking helps. If it seems like there is a lot of puckering, pull the YO loops up higher for the CL sts.
Let’s Get Started!
Rnd 1 (WS): With A, Ch 4, 2 dc in 4th ch from hook, [ch 2, 3 dc in same ch] rep 3 times, ch 2, join. Fasten off. – 12 dc (3 dc per side), 4 ch-2 sps
Rnd 2: With B, ssc in any ch-2 sp, dc in same sp,{ [sc in next st, dc in next st] across until 1 st rem, sc in last st, (dc, sc, ch 2, sc, dc) in ch-2 sp} rep 3 times, [sc in next st, dc in next st] across until 1 st rem, sc in last st, (dc, sc, ch 2) in ch-2 sp, join, turn . – 7 sts per side, 4 ch-2 sps
Don’t miss the turn…
Rnd 3: Ch 1, sc in ch-2 sp, {[dc in next sc, sc in next dc] across until 1 st rem, dc in last st, (sc, ch 2, sc) in ch-2 sp} rep 3 times, [dc in next sc, sc in next dc] until 1 st rem, dc in last st, sc in ch-2 sp, ch 2, join, fasten off, turn. –9 sts per side, 4 ch-2 sps
Now turn back….
Rnd 4: With A, ssc in any ch-2 sp, [sc in next 4 sts, CL around 3 dc of Row 1, skip st directly behind CL, sc in last 4 sts, (sc, ch 2, sc) in ch-2 sp] rep 3 times, sc in next 4 sts, CL around 3 dc of Row 1, skip st directly behind CL, sc in last 4 sts, sc in ch-2 sp, ch 2, join. Fasten off. –11 sts per side (1 CL per side), 4 ch-2 sps
Rnds 5-6: With C, Rep Rnds 2 & 3. –17 sts per side, 4 ch-2 sps
Time for some Front Posts to create some inverted triangles
Rnd 7: With A, ssc in any ch-2 sp, [sc in next 5 sts, skip the first sc of Row 4, CL over next 3 sc sts of Row 4, skip st directly behind CL, sc in next st, 3FPtr around CL of Row 4, skip 3 sts directly behind post sts, sc in next st, skip next sc of Row 4 CL over next 3 sc of Row 4, skip st directly behind CL, sc in last 5 sts, (sc, ch 2, sc) in ch-2 sp] rep 3 times, sc in next 4 sts, skip the first sc of Row 4 CL over next 3 sc sts of Row 4, skip st directly behind CL, sc in next st, 3FPtr around CL of Row 4, skip 3 sts directly behind post sts, sc in next st, skip next sc of Row 4 CL over next 3 sc of Row 4, skip st directly behind CL, sc in last 5 sts, sc in ch-2 sp, ch 2, join, fasten off. –19 sts per side (2 CL, 3 FPtr per side), 4 ch-2 sps
Rnds 8-9: With D, Rep Rnds 2 & 3. -25 sts per side, 4 ch-2 sps
Back to some Radiate Champion Clusters
Rnd 10: With A, ssc in any ch-2 sp, [sc in next 5 sts, skip the first two sc of Row 7, CL over next 3 sc of Row 7, skip st directly behind CL, sc in next st, 3 FPtr around CL of Row 7, skip 3 sts behind post st, sc in next 5 sts, 3 FPtr around next CL st of Row 7, skip 3 sts behind post sts, sc in next st, skip the next sc of Row 7, CL over the next 3 sc of Row 7, skip st directly behind CL, sc in next 5 sts, (sc, ch-2, sc) in ch-2 sp] rep 3 times, sc in next 5 sts, skip the first two sc of Row 7, CL over next 3 sc of Row 7, skip st directly behind CL, sc in next st, 3 FPtr around CL of Row 7, skip 3 sts behind post st, sc in next 5 sts, 3 FPtr around next CL st of Row 7, skip 3 sts behind post sts, sc in next st, skip the next sc of Row 7, CL over the next 3 sc of Row 7, skip st directly behind CL, sc in next 5 sts, sc in ch-2 sp, ch 2, join, fasten off. –27sts per side (2 CL, 6 FPtr per side), 4 ch-2 sps
Rnds 11-12: With C, rep Rnds 2 & 3. – 33 sts per side, 4 ch-2 sps
Do you see the back and forth yet?
Rnd 13: With A, ssc in any ch-2 sp, [sc in next 6 sts, skip the first 2 sc of Rnd 10, CL over next 3 sc of Rnd 10, skip st directly behind CL, sc in next st, 3 FPtr around CL of Rnd 10, skip 3 sts behind post st, sc in next 11 sts, 3 FPtr around CL of Rnd 10, skip 3 sts directly behind post sts, sc in next st, sk 1 sc of Row 10, CL over next 3 sc sts of Rnd 10, skip st directly behind CL, sc in last 6 sts, (sc, ch 2, sc) in ch-2 sp] rep 3 times, sc in next 6 sts, skip the first 2 sc of Rnd 10, CL over next 3 sc of Rnd 10, skip st direcly behind CL, sc in next st, 3 FPtr around CL of Rnd 10, skip 3 sts behind post st, sc in next 11 sts, 3 FPtr around CL of Rnd 10, skip 3 sts direcly behind post sts, sc in next st, sk 1 sc of Rnd 10, CL over next 3 sc sts of Rnd 10, skip st directly behind CL, sc in last 6 sts, sc in ch-2 sp, ch 2, join, fasten off. – 35 sts per side (2 CL, 6 FPtr per side), 4 ch-2 sps
Rnds 14-15: With B rep Rows 2 & 3. –41 sts per side, 4 ch-2 sps
Let’s finish up!
Rnd 16: With A, ssc in any ch-2 sp, [sc in next 6 sts, skip the first 3 sc of Rnd 13, CL over next 3 sc of Rnd 13, skip st directly behind CL, sc in next st, 3 FPtr around CL of Rnd 13, skip 3 sts directly behind post sts, sc in next 19 sts, 3 Fptr around CL of Rnd 13, skip 3 sts behind post st, sc in next st, skip next sc of Rnd 13, CL over next 3 sc of Rnd 13, skip st directly behind CL, sc in next 6 sts, (sc, ch 2, sc) in ch-2 sp] rep 3 times, sc in next 6 sts, skip the first 3 sc of Rnd 13, CL over next 3 sc of Rnd 13, skip st directly behind CL, sc in next st, 3 FPtr around CL of Rnd 13, skip 3 sts directly behind post sts, sc in next 19 sts, 3 Fptr around CL of Rnd 13, skip 3 sts behind post st, sc in next st, skip next sc of Rnd 13, CL over next 3 sc of Rnd 13, skip st directly behind CL, sc in next 6 sts, sc in ch-2 sp, ch 2, join, fasten off. – 43 sts per side (2 CL, 6 FPtr per side), 4 ch-2 sps
Quick holiday gifts are a must, so why not give a couple of home decor items a try. The Classic Kitchen Towel is a go-to.
All you need is a kitchen hand towel, yarn, and a hook. Within the afternoon you can make up a stack and be all set for beginning your wrapping.
Classic Kitchen Towel
I prefer to not use an actual written pattern for this project, I think it can get in the way a bit. Instead, I take the approach of “this is the basics, lets jump in”
Lets Cut
To begin, I fold the towel in half, short edge to short edge. Then I cut it in half at the fold. I do this because I fond it easier to crochet through I piece of fabric. Having an intact towel usually means to insert your hook through the fold, and thus 2 pieces of fabric. In addition, I get two gifts out of each towel. Double bonus!
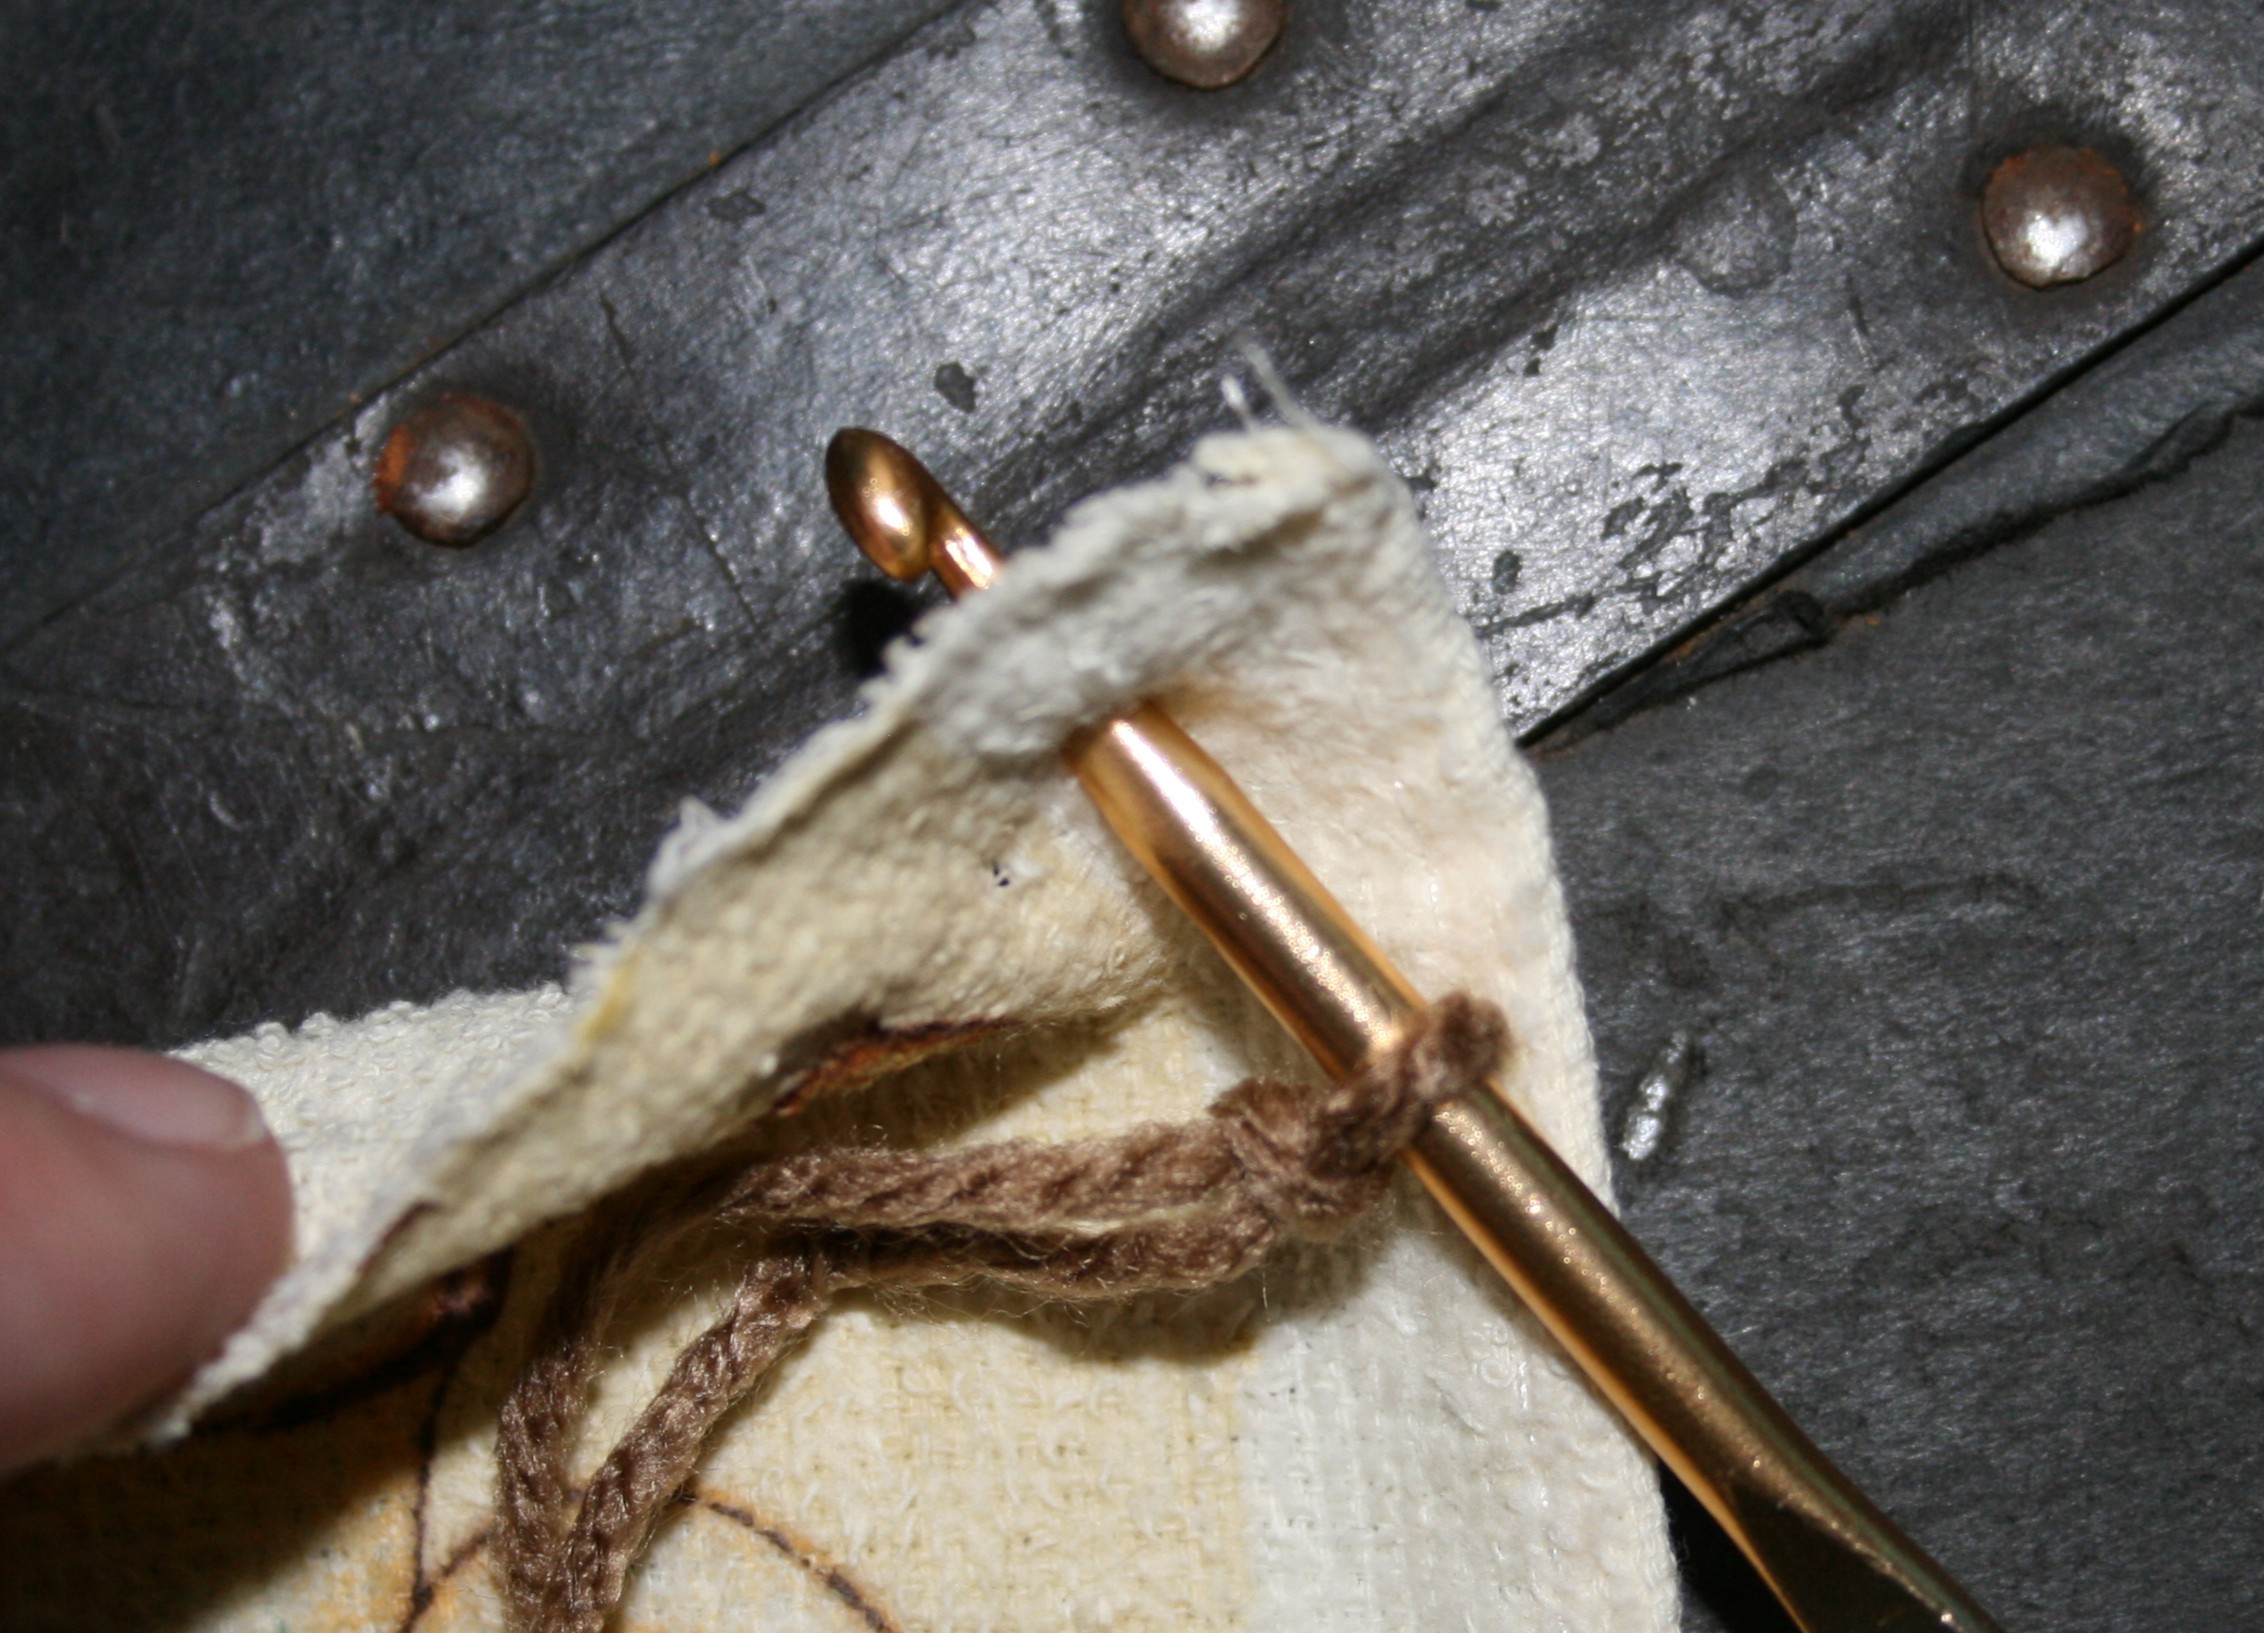
Now we stab
Then find a crochet hook that will “stab” through the fabric, about ½” (1.25 cm) from the cut edge. The weave of the towel will typically give way to the hook. In the rare occasion that it doesn’t, try a smaller hook, for you can use a hammer and nail to “punch” holes into the fabric.
“Stab” through the fabric
Some people like to ensure that these “stabbed” or “punched” points are evenly spaced across the top edge. I have found that I don’t usually notice it being uneven from being eye-balled, especially since the towel usually folds back on itself.
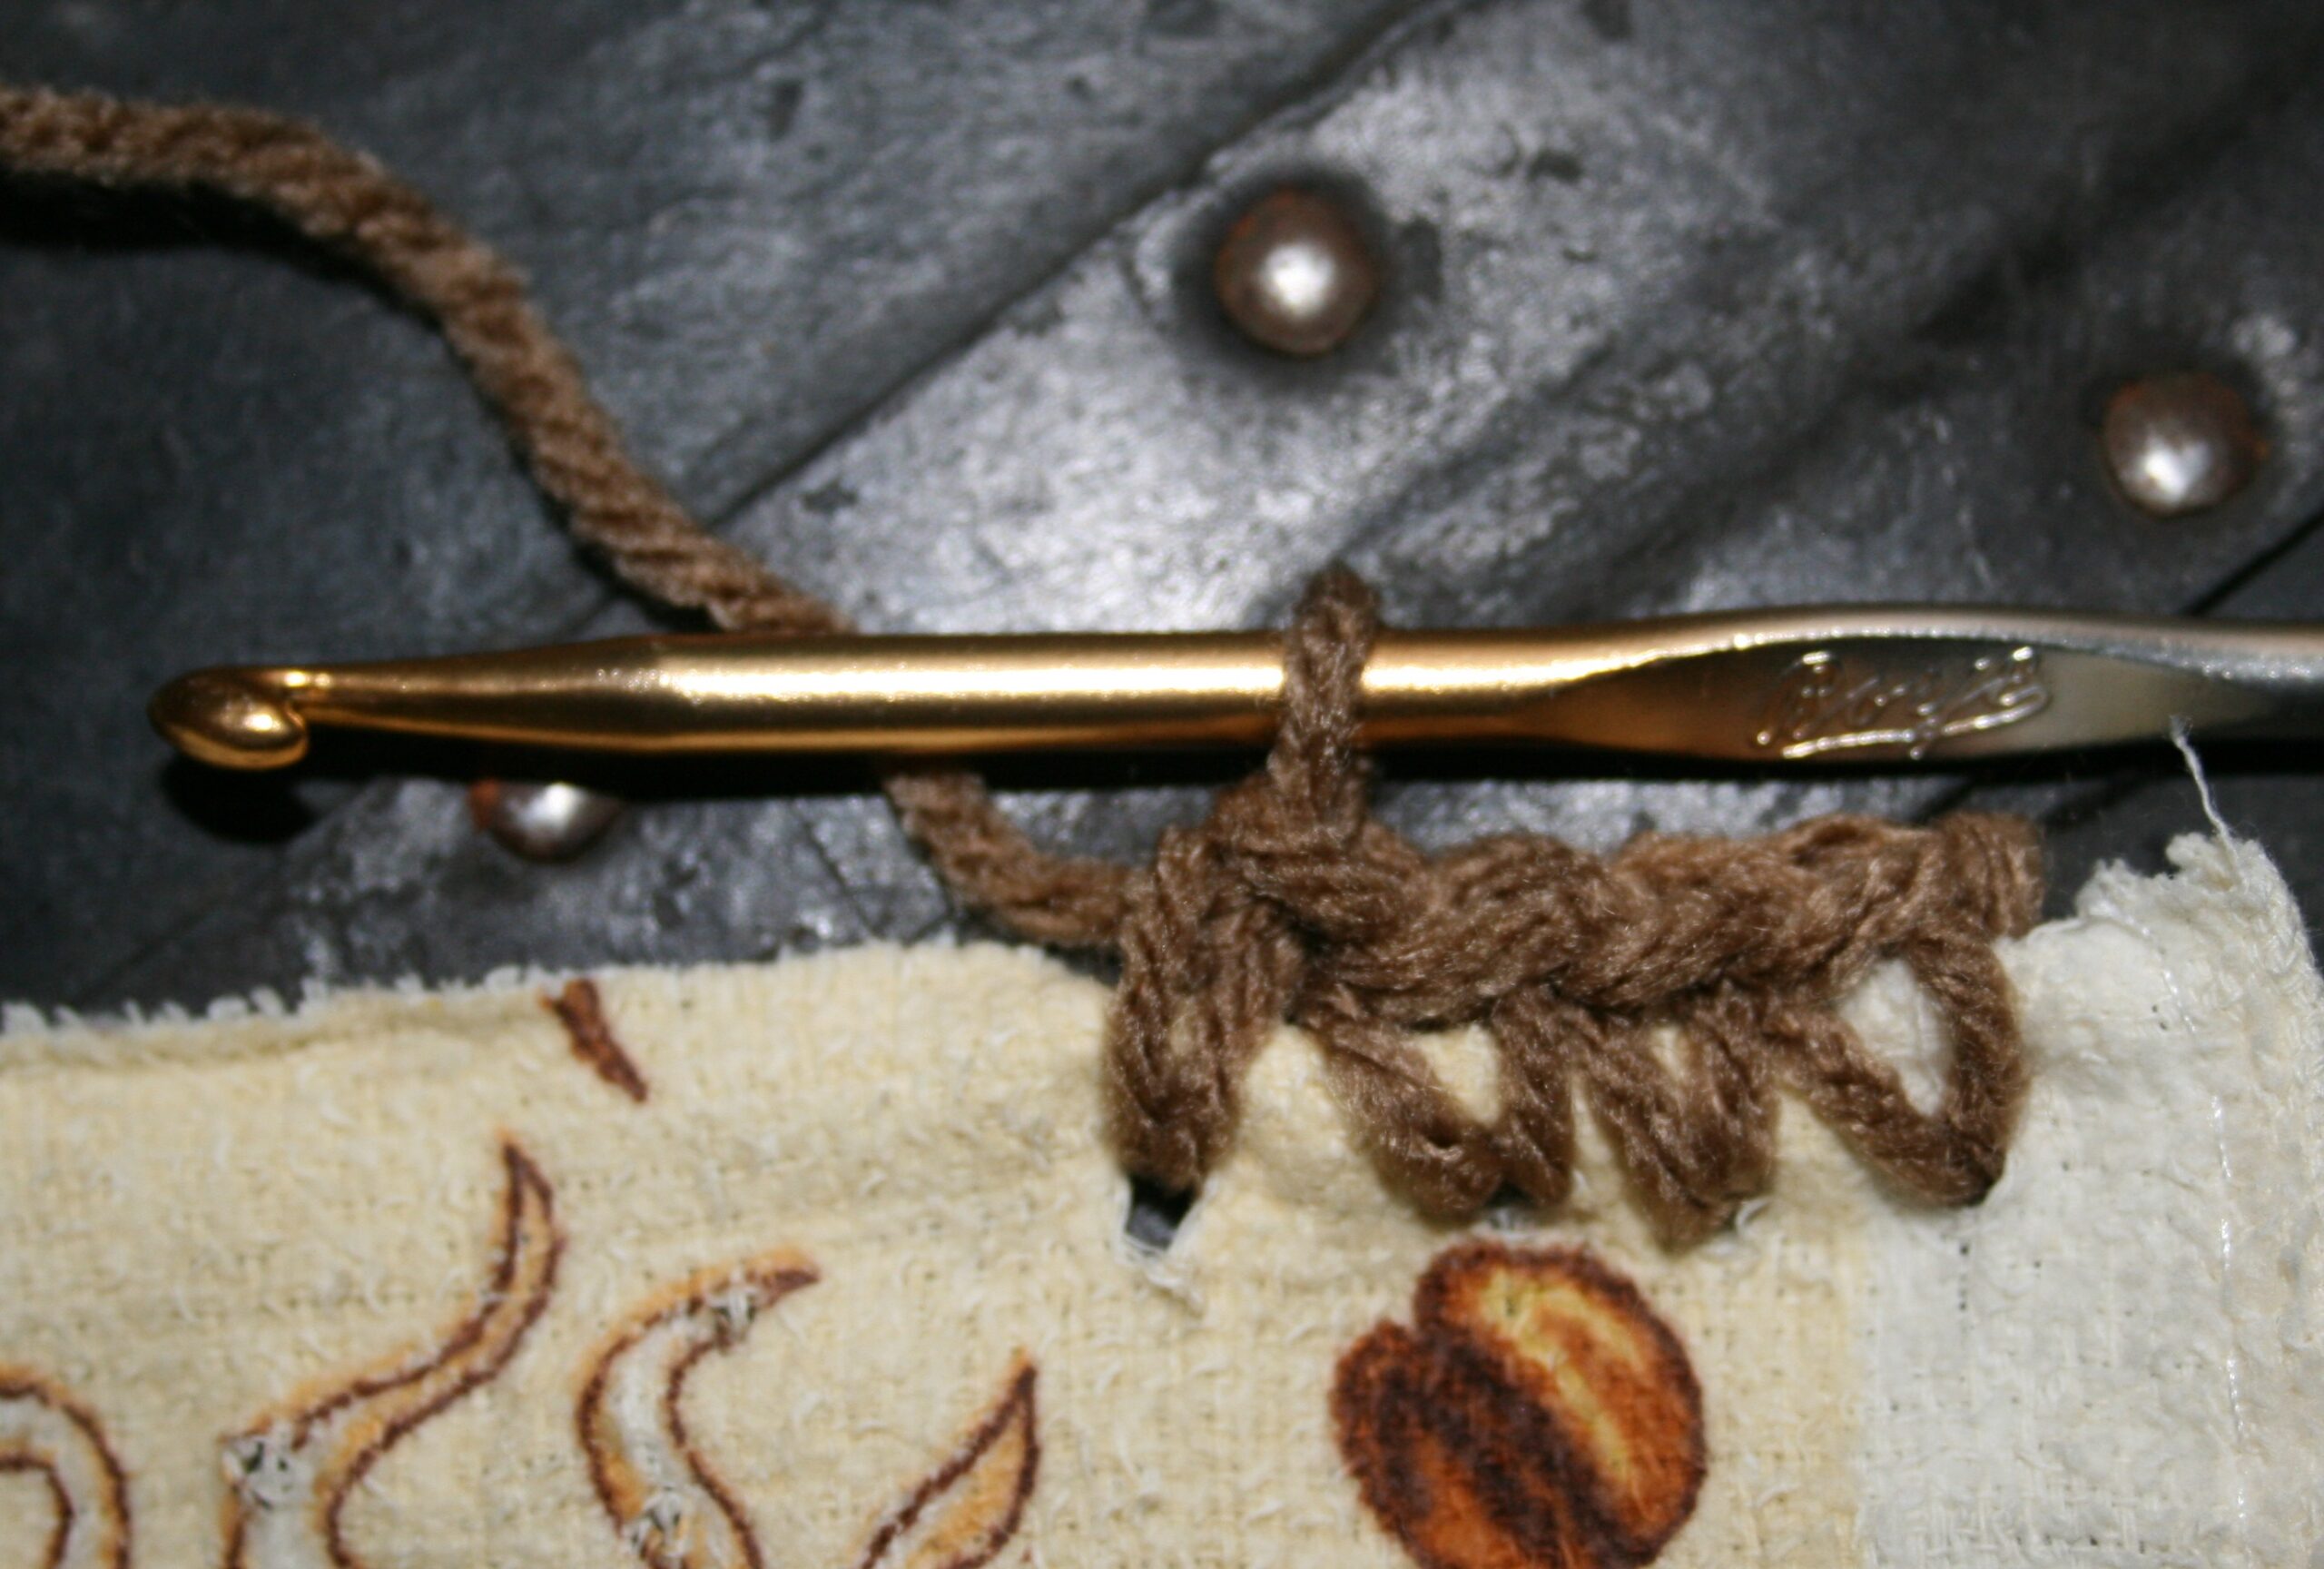
Single crochet stitches are worked in these “stabbed” or ‘punched” points, a chain can be worked between the single crochets, but that is a personal choice. After getting all the way across, chain 3 and turn.
Single crochet across
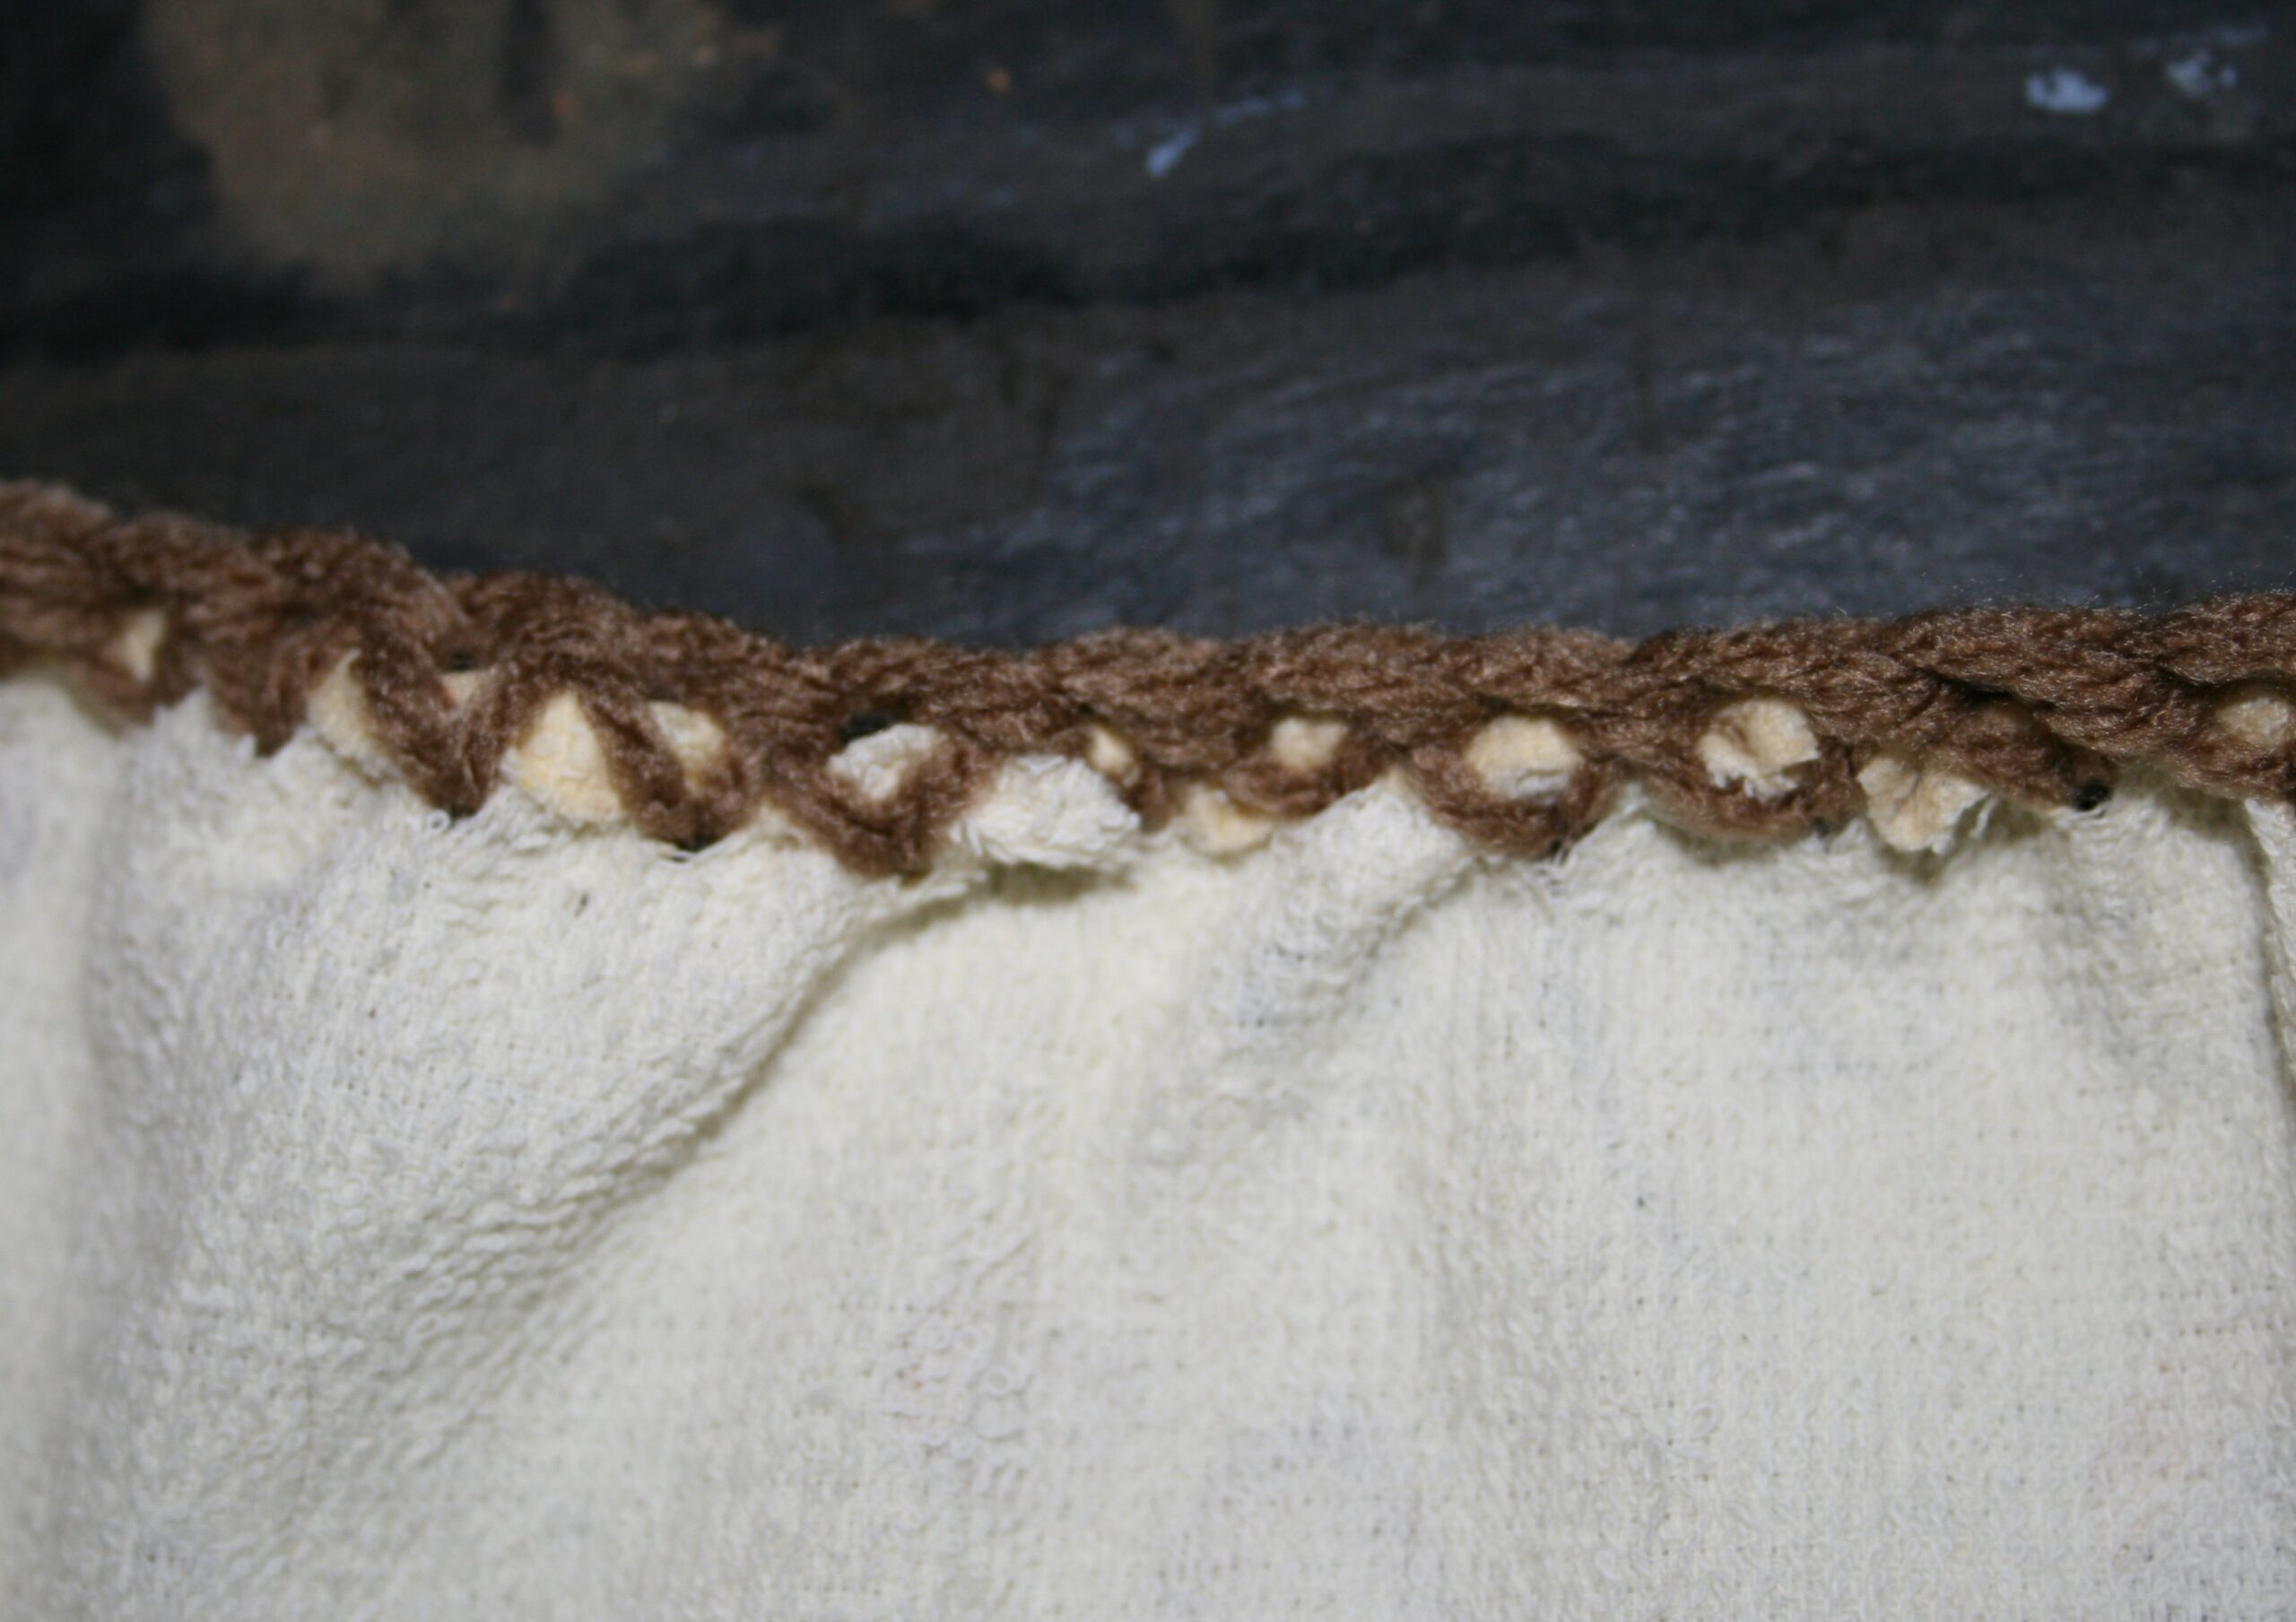
(Don’t worry about the cut edge, it will typically roll under when you begin stitching, if it doesn’t you can help it to curl under the stitches).
The cut edge will “curl” under
The second row is just double crochet all the way across.
Now some regular crochet
Row 3 just chain 2, double crochet in the next stitch and work a double crochet 2 together all the way across. If the stitch count doesn’t work out evenly, don’t worry just work 1 double crochet at the end. Then turn.
Repeat Row 3 until there are only between 5-9 stitches remaining. This will become the “neck” or “hanging part” of the towel.
Making the “neck” is simply working the stitches even (by working: chain 3, double crochet in each stitch across, turn). By the second row of the “neck” you want to make a “buttonhole”. This is done by making a chain space (chain 1, skip 1 stitch) in the center of the row. The next row a double crochet is worked into the chain. Continue working even until the neck is between 9-14” long.
Work decrease every row until there are only a few stitches, then work even, inserting a “buttonhole”
No button is actually needed. Instead, when the length of the “neck” is finished, work an additional row with 3 double crochet stitches in each stitch across. This makes a flared and sometime ruffled end that can be inserted through the “buttonhole” to secure it to any rod.
Create a fan at the end to act as a button
Lastly, weave in the ends, and this gift is done.
As far as yarn to use, I usually use some scraps that are usually a medium weight (#4) and usually acrylic. This just happens to be what I have on hand the most, but really anything can be used.
Life constantly reminds me of how crochet unites us. It can bring us together and help us working through difficult times. This I learned decades ago. I continue to be reminded of it over the years.
When I was a teenager, my brother used to joke that if you were cold have someone break my heart and you would have a blanket shortly after. In some respects that might have been true, and thus some feel I need to thank my old boyfriend for furthering my crochet career.
There have been several times when I have used crochet to work through difficult times. I recently lost a long-time student to cancer and crochet has shown itself, yet again, as a therapeutic response.
This time, I did what I usually do, I ask for any of their unfinished projects. I work them, working the stitches and completing the project for my friend’s family and loved ones. It is a cathartic event for me. It slows me down and allows me time to focus on the friend that I have lost.
I don’t rush this process. The projects do not have deadlines. They are just an opportunity for me to reflect. Recalling why they would choose the colors or particular pattern. Why they told me these stitches were one of their favorites.
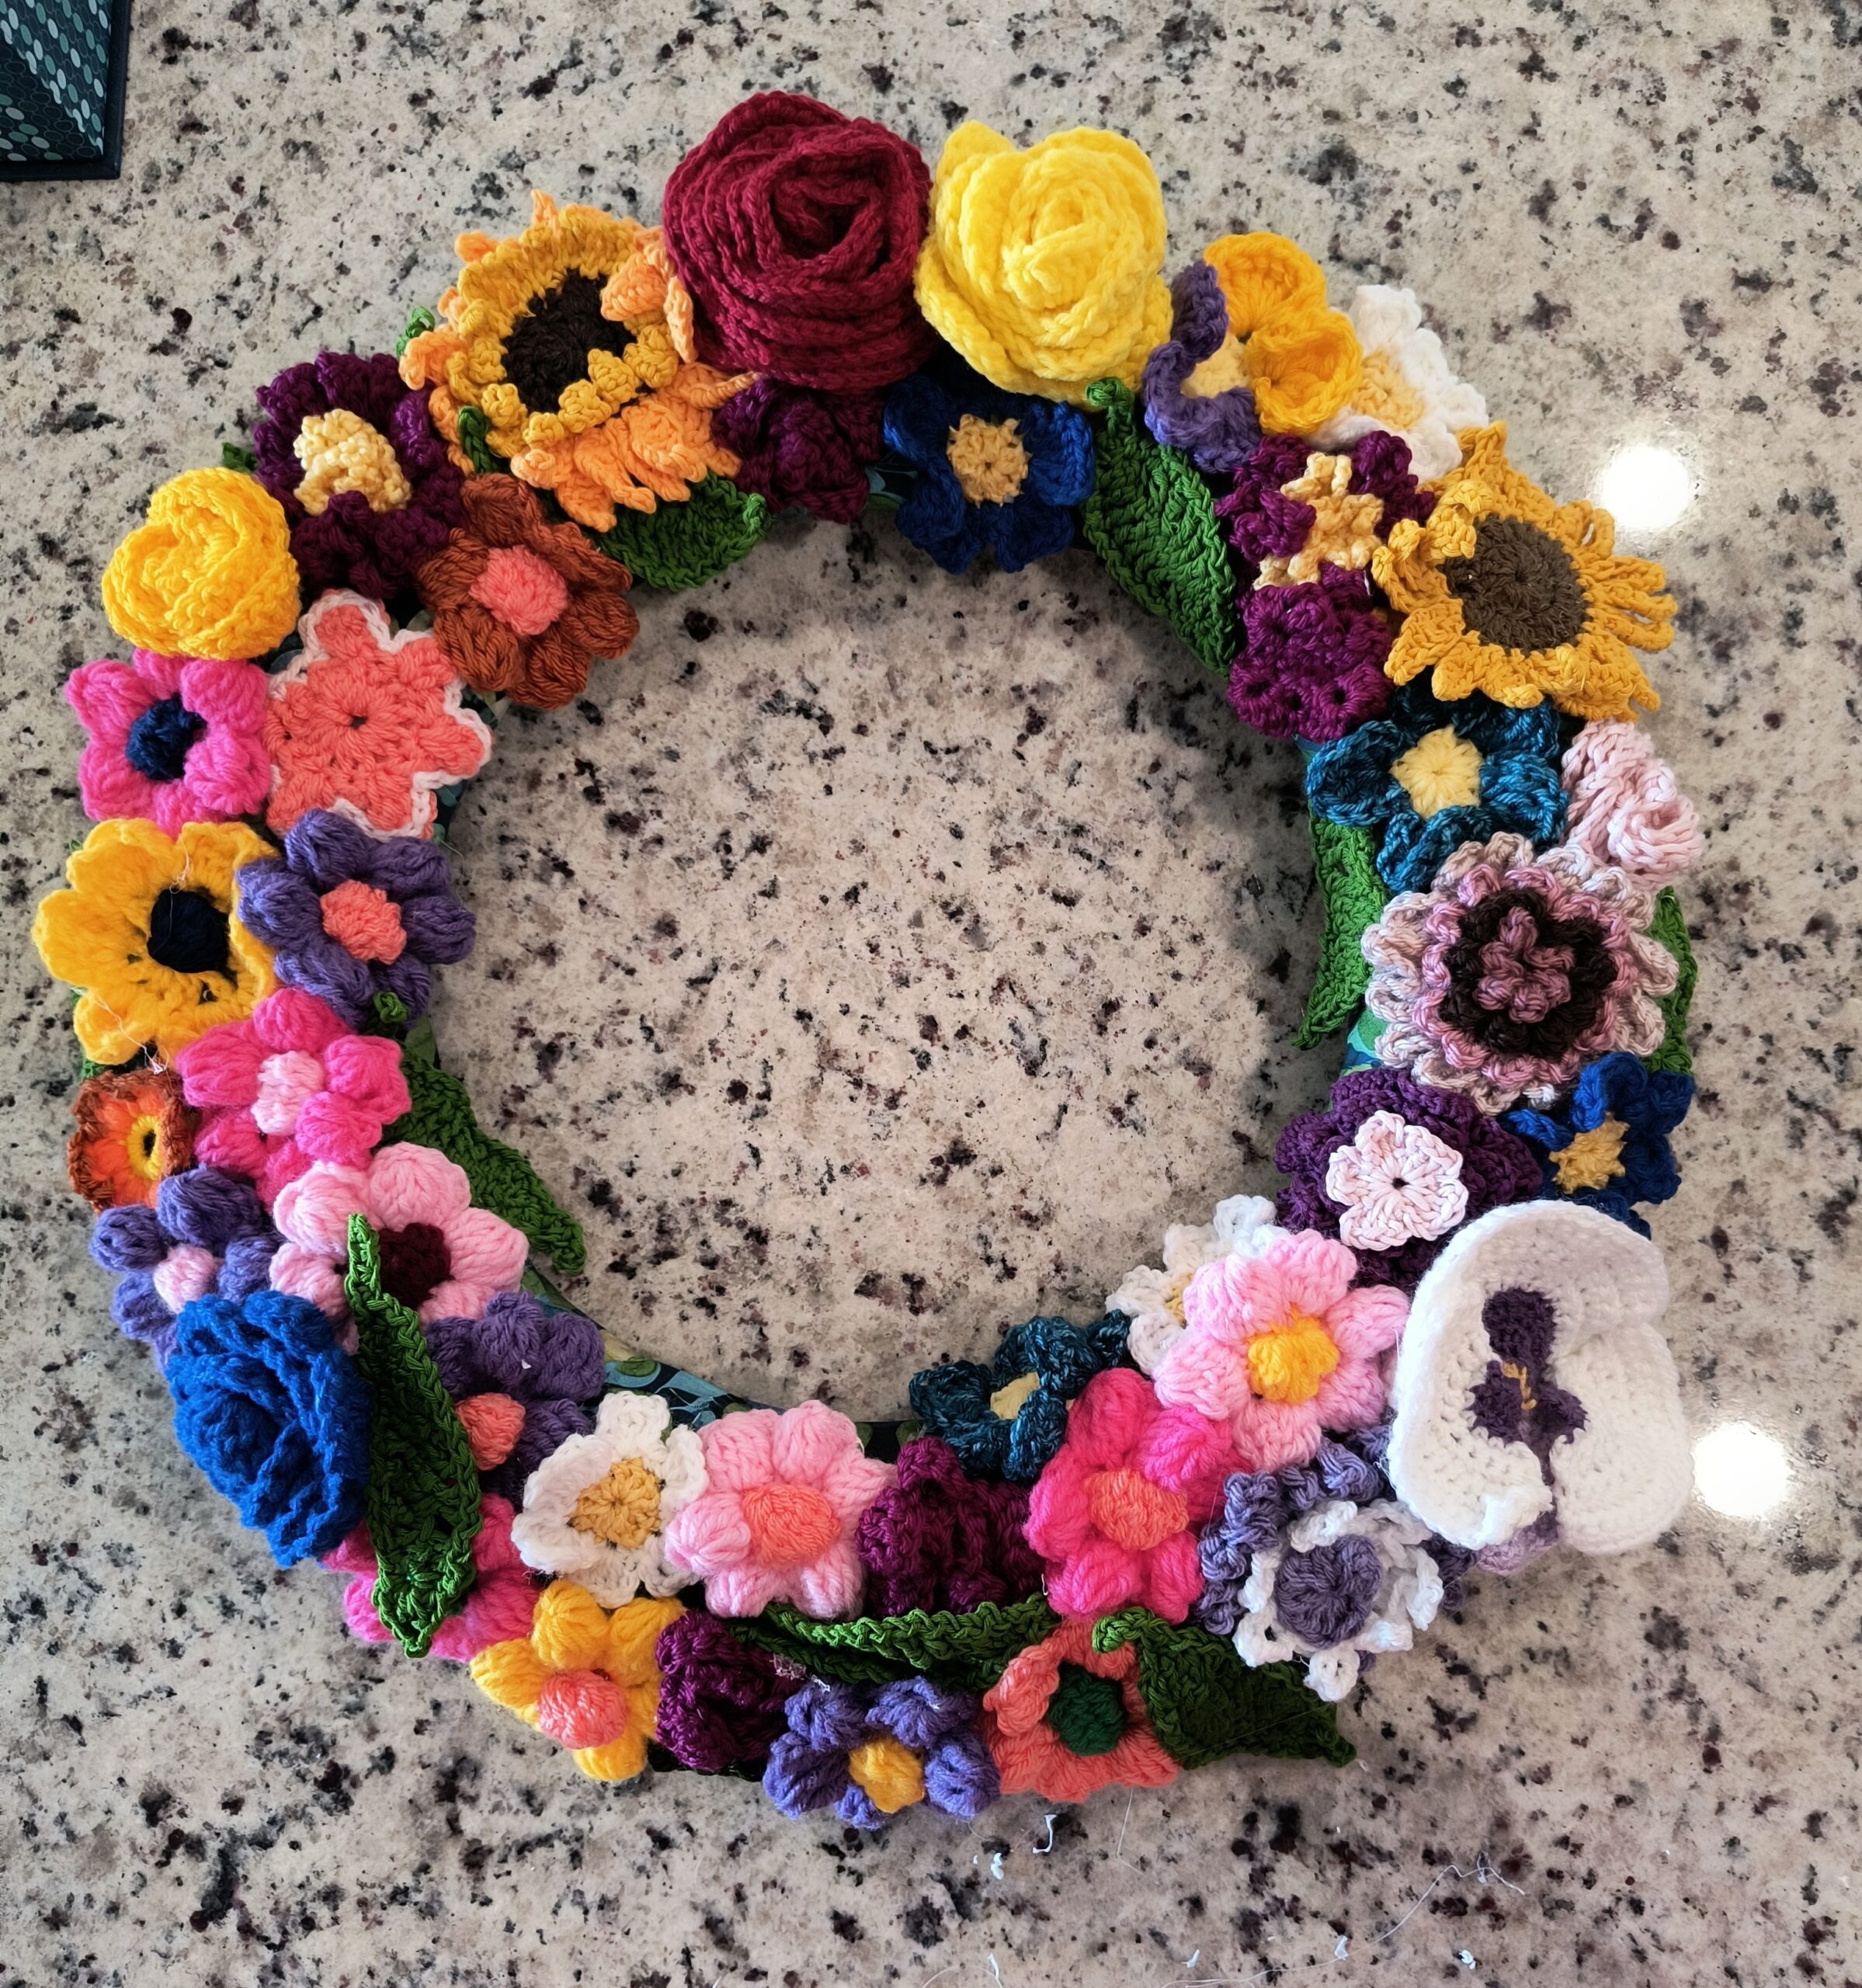
Something a bit different occurred with this friend’s passing, she was part of a larger crochet community for me. We divided up her unfinished projects, allowing each of us to take this journey.
A new way to process and honor
In addition, we spent an afternoon crocheting flowers. Flowers were then attached to a circular form to create a wreath. The wreath hung as a display at her funeral service and was given to her family to adorn their wall as a remembrance of the bright joy our friend gave us and the world that knew her.
Crochet is in my life for milestones, accomplishments, joys and sorrows. I feel fortunate to have this skill in my life’s toolbox, and I feel blessed to share it with others and have them share their lives with me.
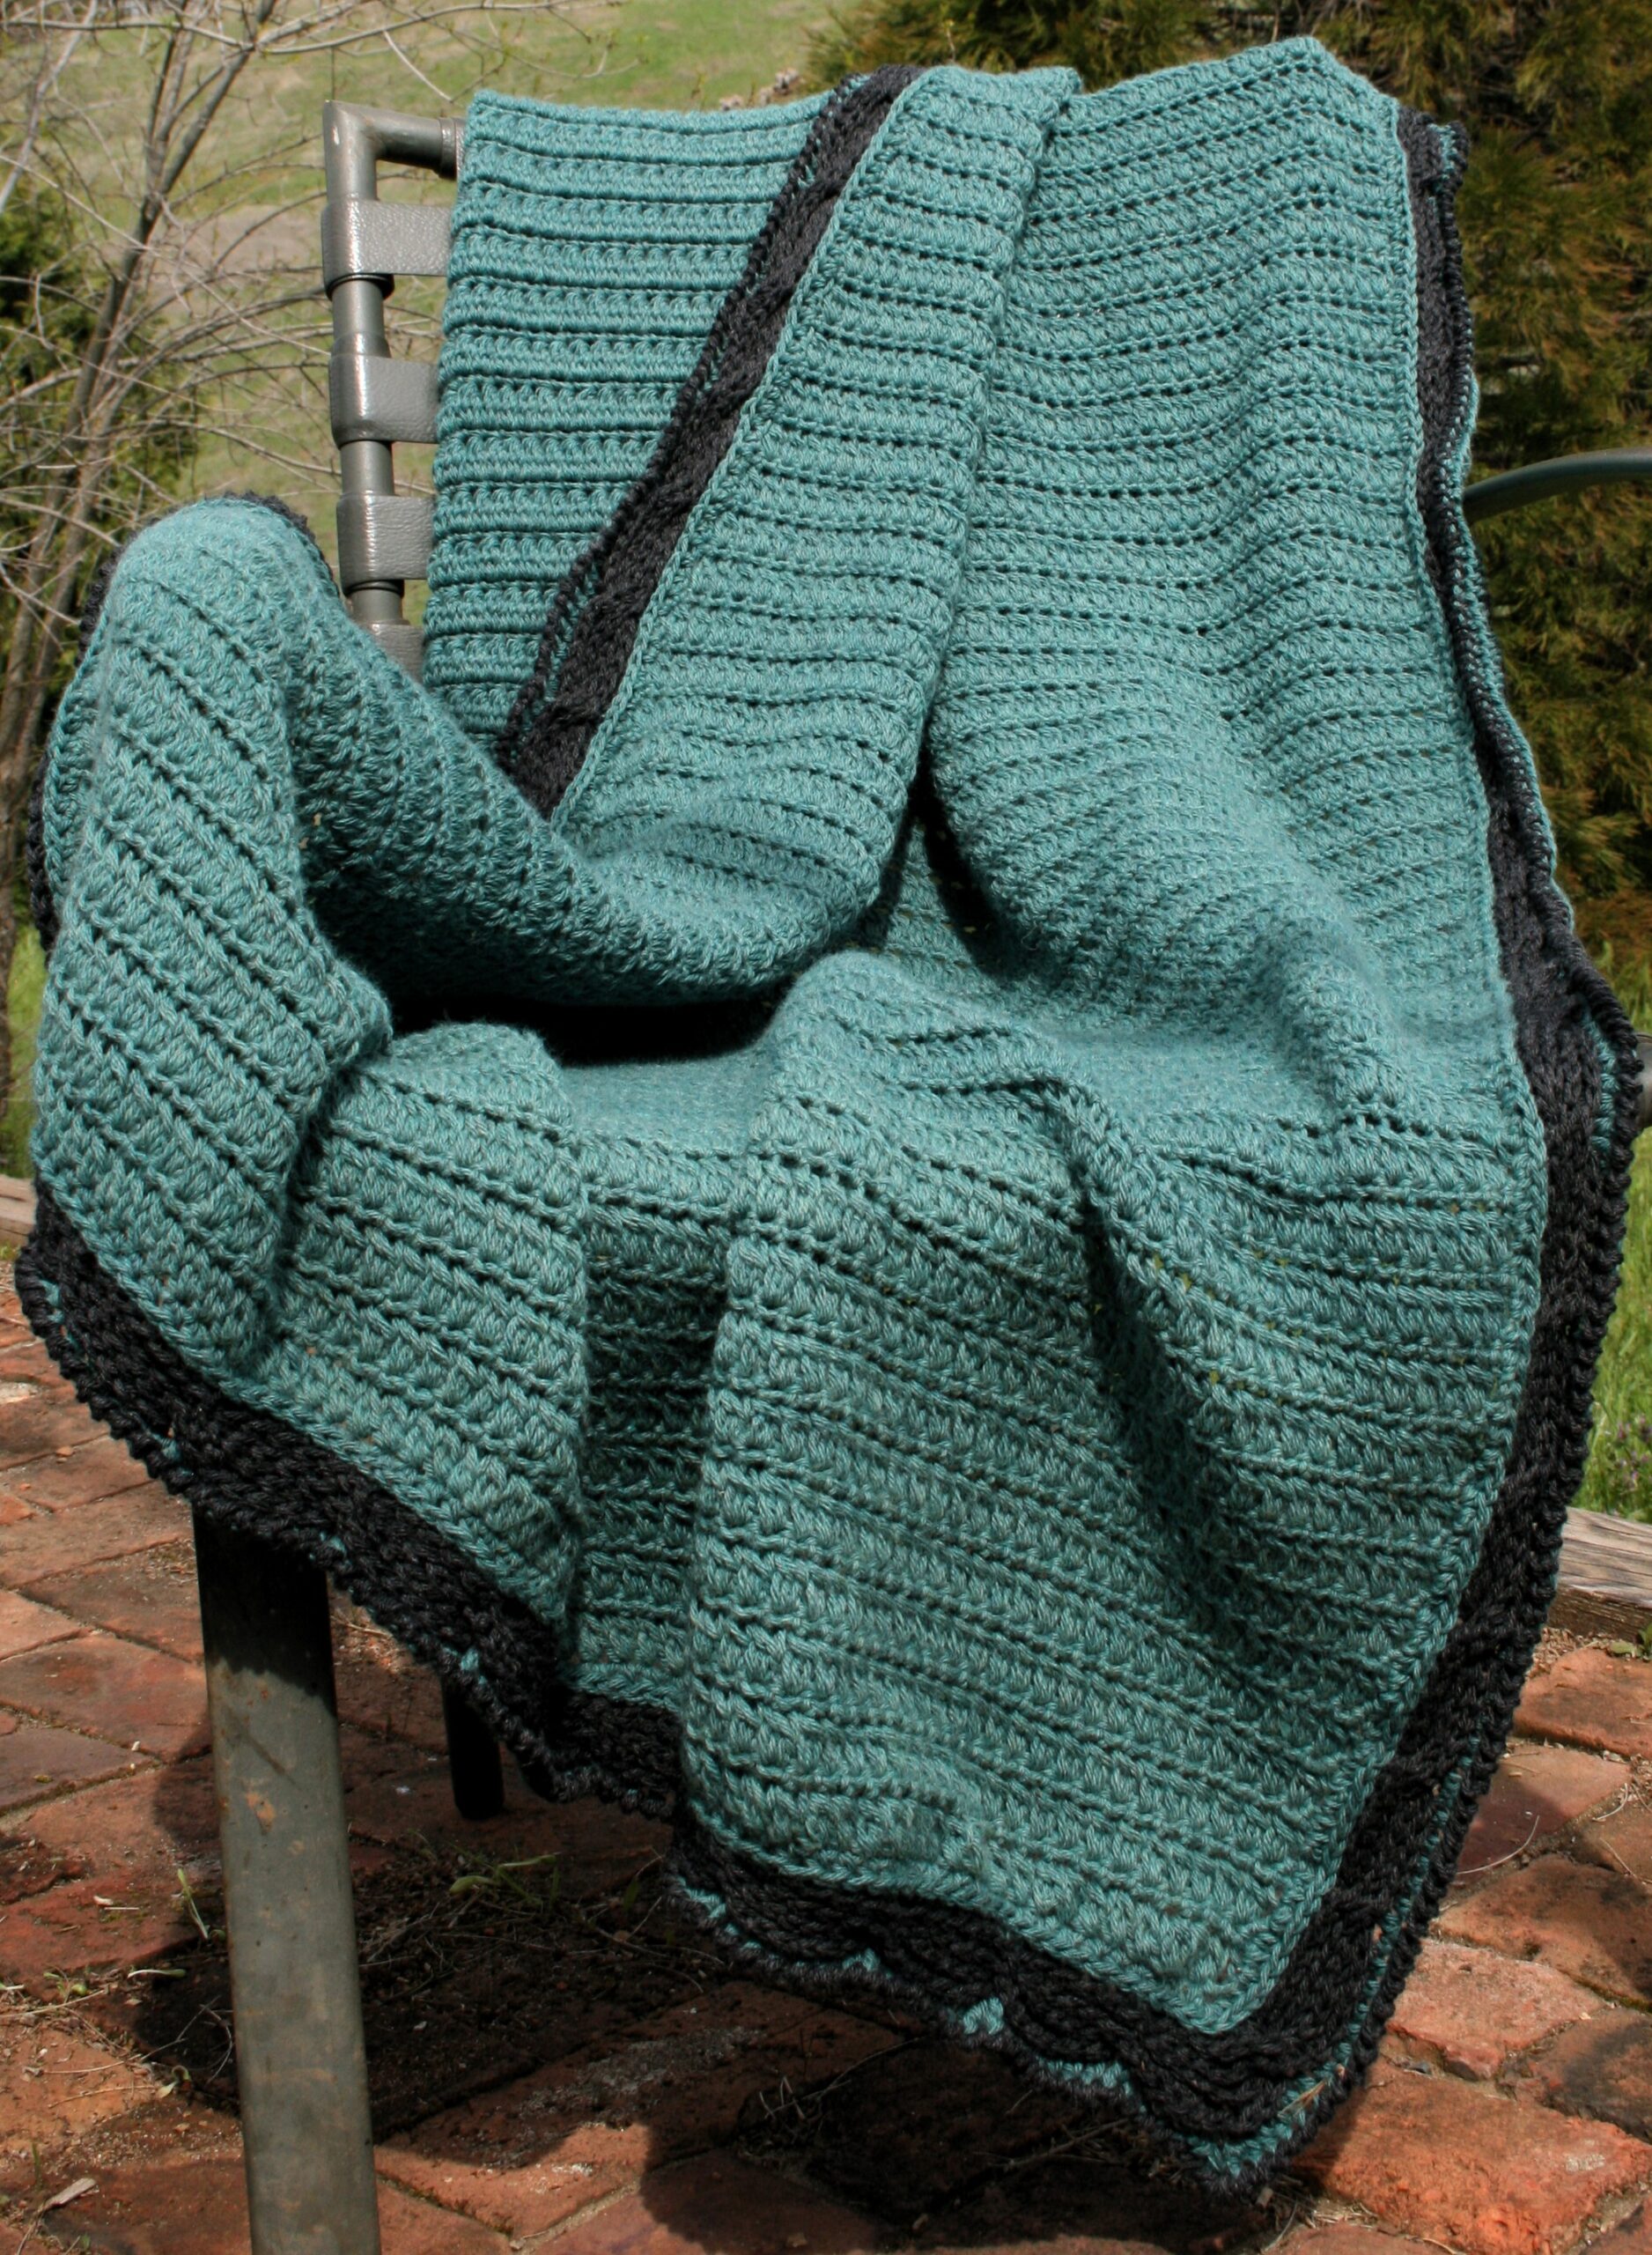
I found a stitch pattern that I really got into a rhythm working. I could keep working it for hours, with the Walking Pathways Throw. The cluster row might be a bit involved. But following it up with a simple row keeps it fun.
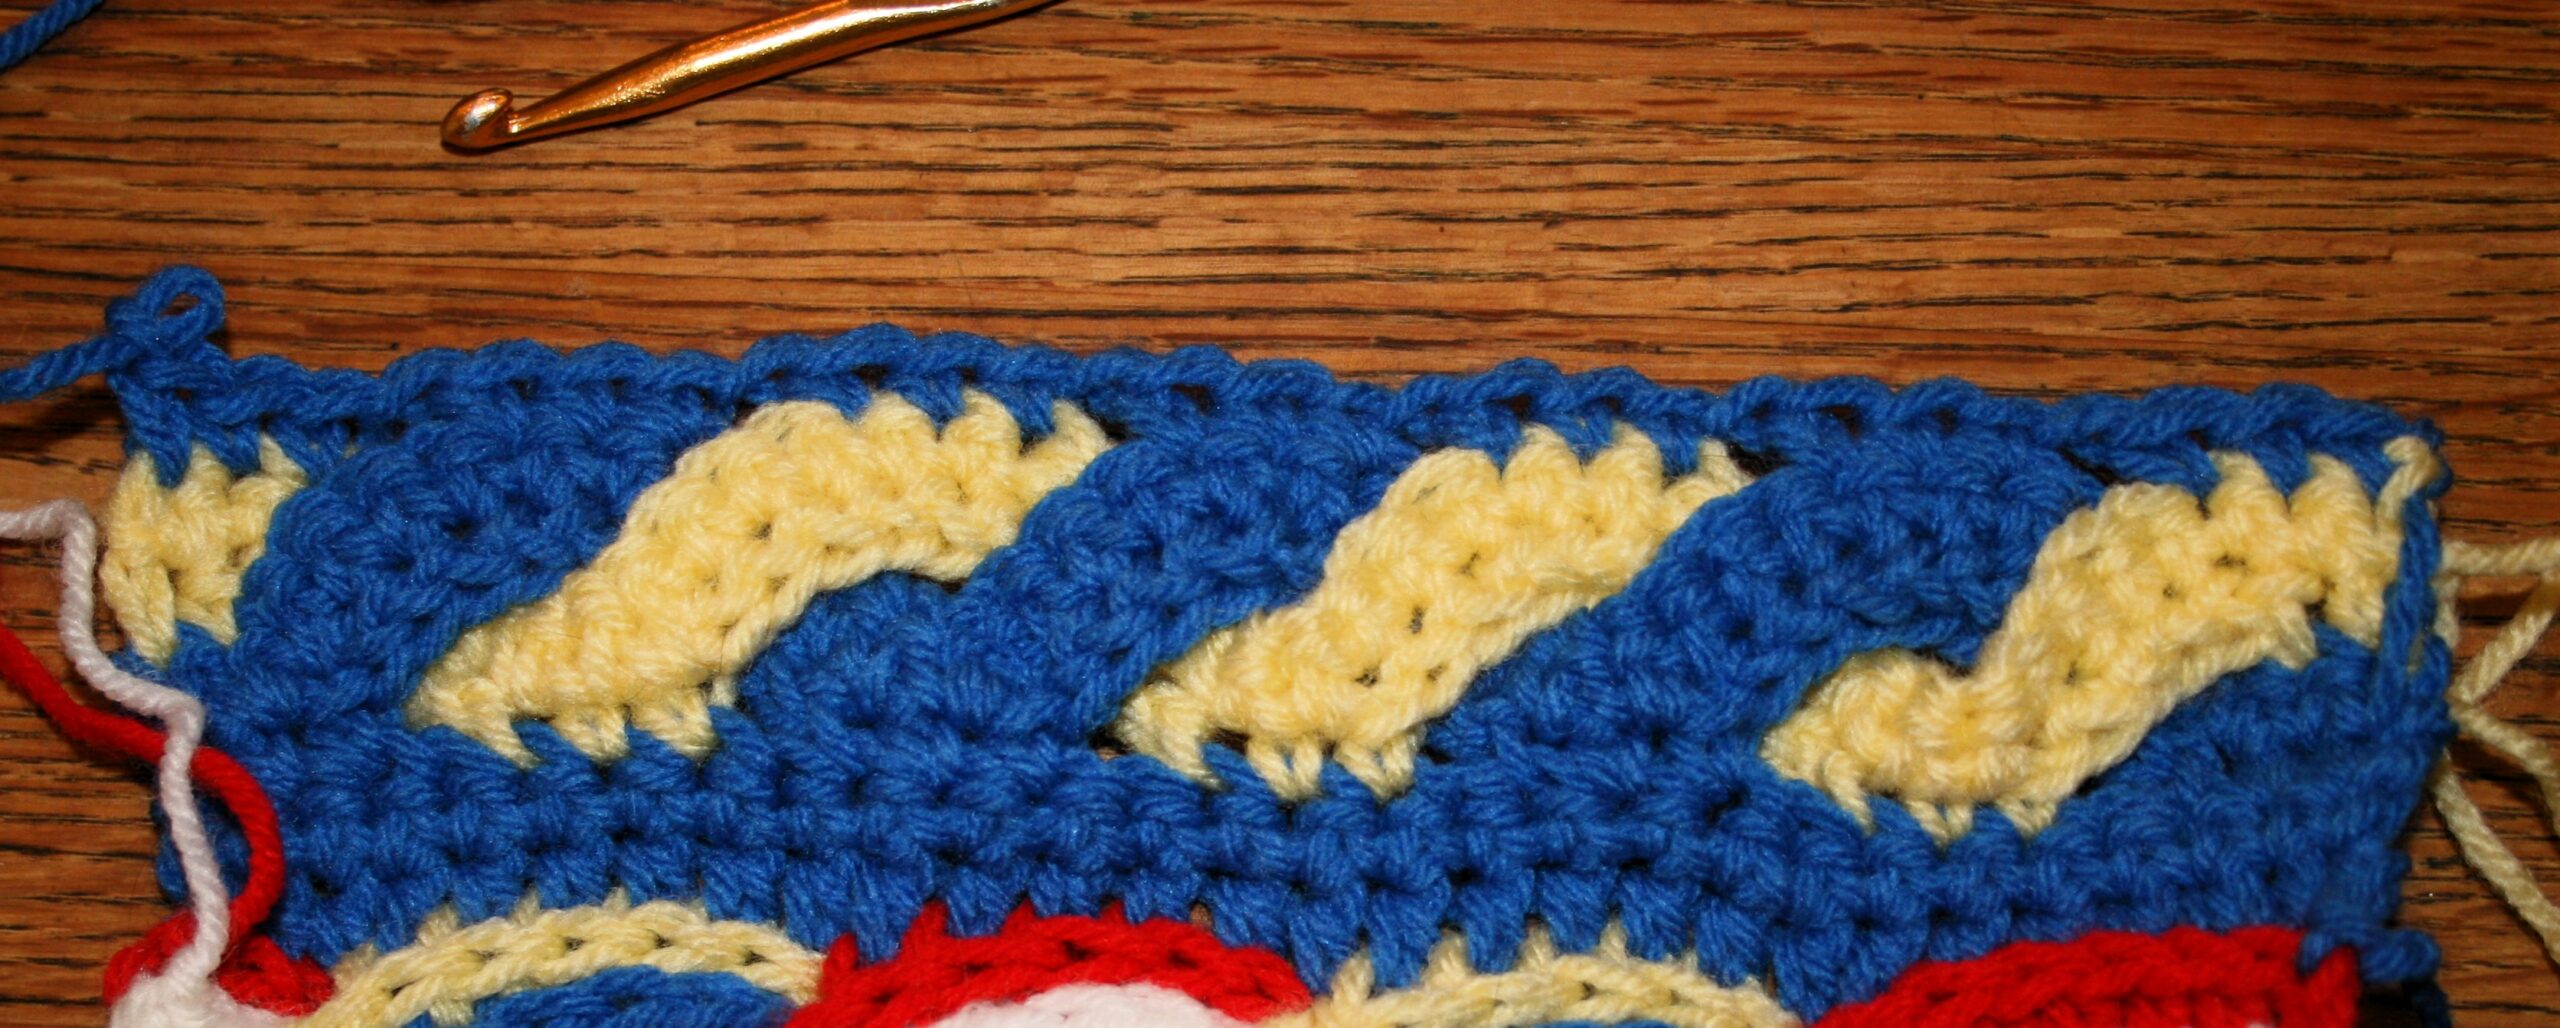
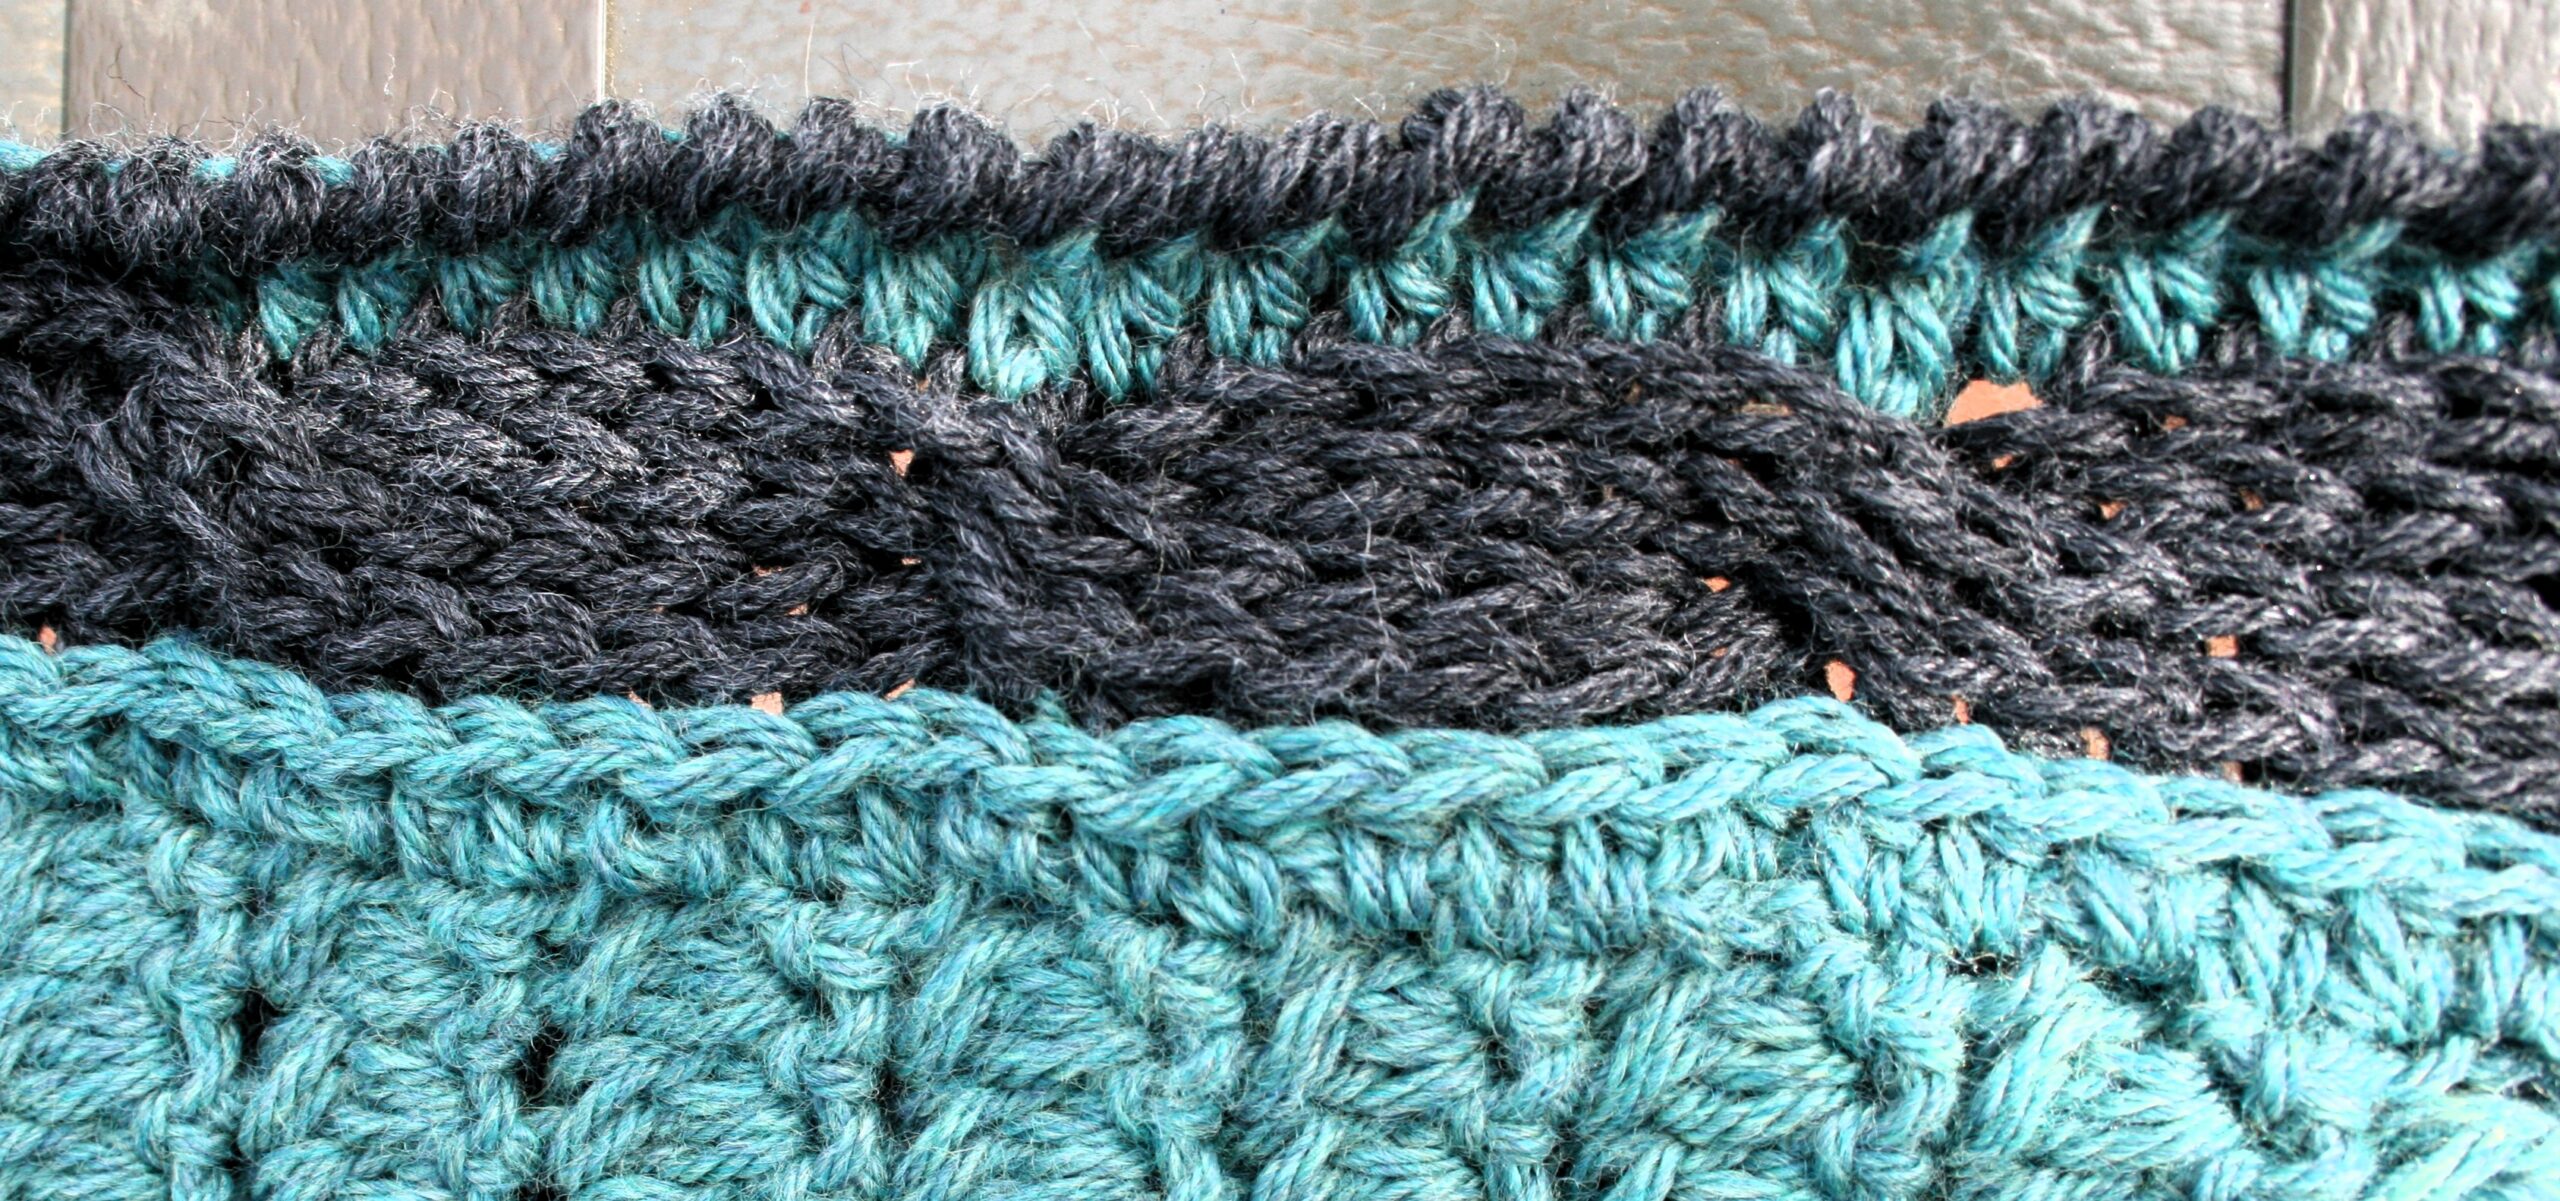
What brings this throw to life however is the edging, featuring a horizontal cable in a contrasting color.
So way it was made
I created the original of this design for a long time friend. We reconnected with just as they were moving across the country. The throws that followed were made for others that hold a special place in my heart.
Walking Pathways Throw
It has taken me a while to actually get this design written and out in the world. This is mostly because the horizontal cable is not completely straight forward to write. I have managed to complete a visual post about it (see it here). You will also find a link to a video to help explain to further.
Some of my students have taken up the stitch pattern of the body, loving the subtle texture. They have played with varying stripes of color. It really does lend itself to many possibilities.
Main fabric of Walking Pathways Throw
The name comes from my personal walk of figuring out midlife. All the differing paths this journey of life has been taking me on.
The Pattern
Walking Pathways Throw by Linda Dean
A relatively simple 2 row repeat gets an eye catching and rhythmic edging of a horizontal cable. Quicker to work than you might think, this throw will be a delight.
Size 46”x 60” (including a 2” boarder all the way around)
Skill intermediate
Gauge 10 CL sts/ 9 rows 4”
Materials
K/10 ½ /6.5 mm crochet hook
Berroco Vintage medium weight, 52% Acrylic, 40% Wool, 8%Nylon yarn (3.5oz/100g/218yd/200m) per ball; 12 skeins MC #5189 Charcoal and 2 skeins (divided in half) of CC #5194 Breezeway
Special Stitches
Foundation Double Crochet Cluster (FCL): Yo, insert hook in chain/base of previous stitch, yo, pull up a loop, ch 1 (creates base of current stitch), yo, pull through 2 loops, [yo, insert hook into chain/base of current stitch, yo, pull up a loop, yo, pull through 2 loop] twice, yo, pull through 4 loops.
Double Crochet Cluster (CL): [Yo, insert hook into st, yo, pull up a loop, yo, pull through 2 loops] rep 3 times, yo, pull through all 4 loops on hook.
Standing Half Double Crochet (Shdc): Yo, hold yo on hook, insert hook into indicated stitch, yo, pull up a loop, yo pull through all 3 loops on hook.
Reverse Single Crochet(Rsc): Working in the opposite direction as normal, insert hook into next stitch and complete a single crochet.
Let’s Start The Main Body
Row 1:
Version1: With MC, chain 205, CL in 5th ch from hook, [sk 1 ch, CL in next ch] rep across until 2 chs rem, sk 1 ch, dc in last st, turn. -100 CL, 2 dc
Version 2: With MC, ch 4, FCL in 4th ch from hook, FCL 99 times, Fdc. -100CL, 2 dc
Row 2: Ch 1, sc in each st across, turn.
Row 3: Ch 3, CL next st, CL in each st across until 1 st rem, dc in last st, turn.
Rows 4-119: Rep Rows 2 & 3, 58 times. Do not fasten off.
Let’s Start the Edging
Rnd 1: Working down edge, sc in the ends of the rows evenly across to corner, 3 sc in corner, sc in unused loops of foundation chain to corner, 3 sc in corner, sc in ends of rows evenly across to corner, 3 sc in corner, sc across last row 3 sc in last st, sl st to join, fasten off.
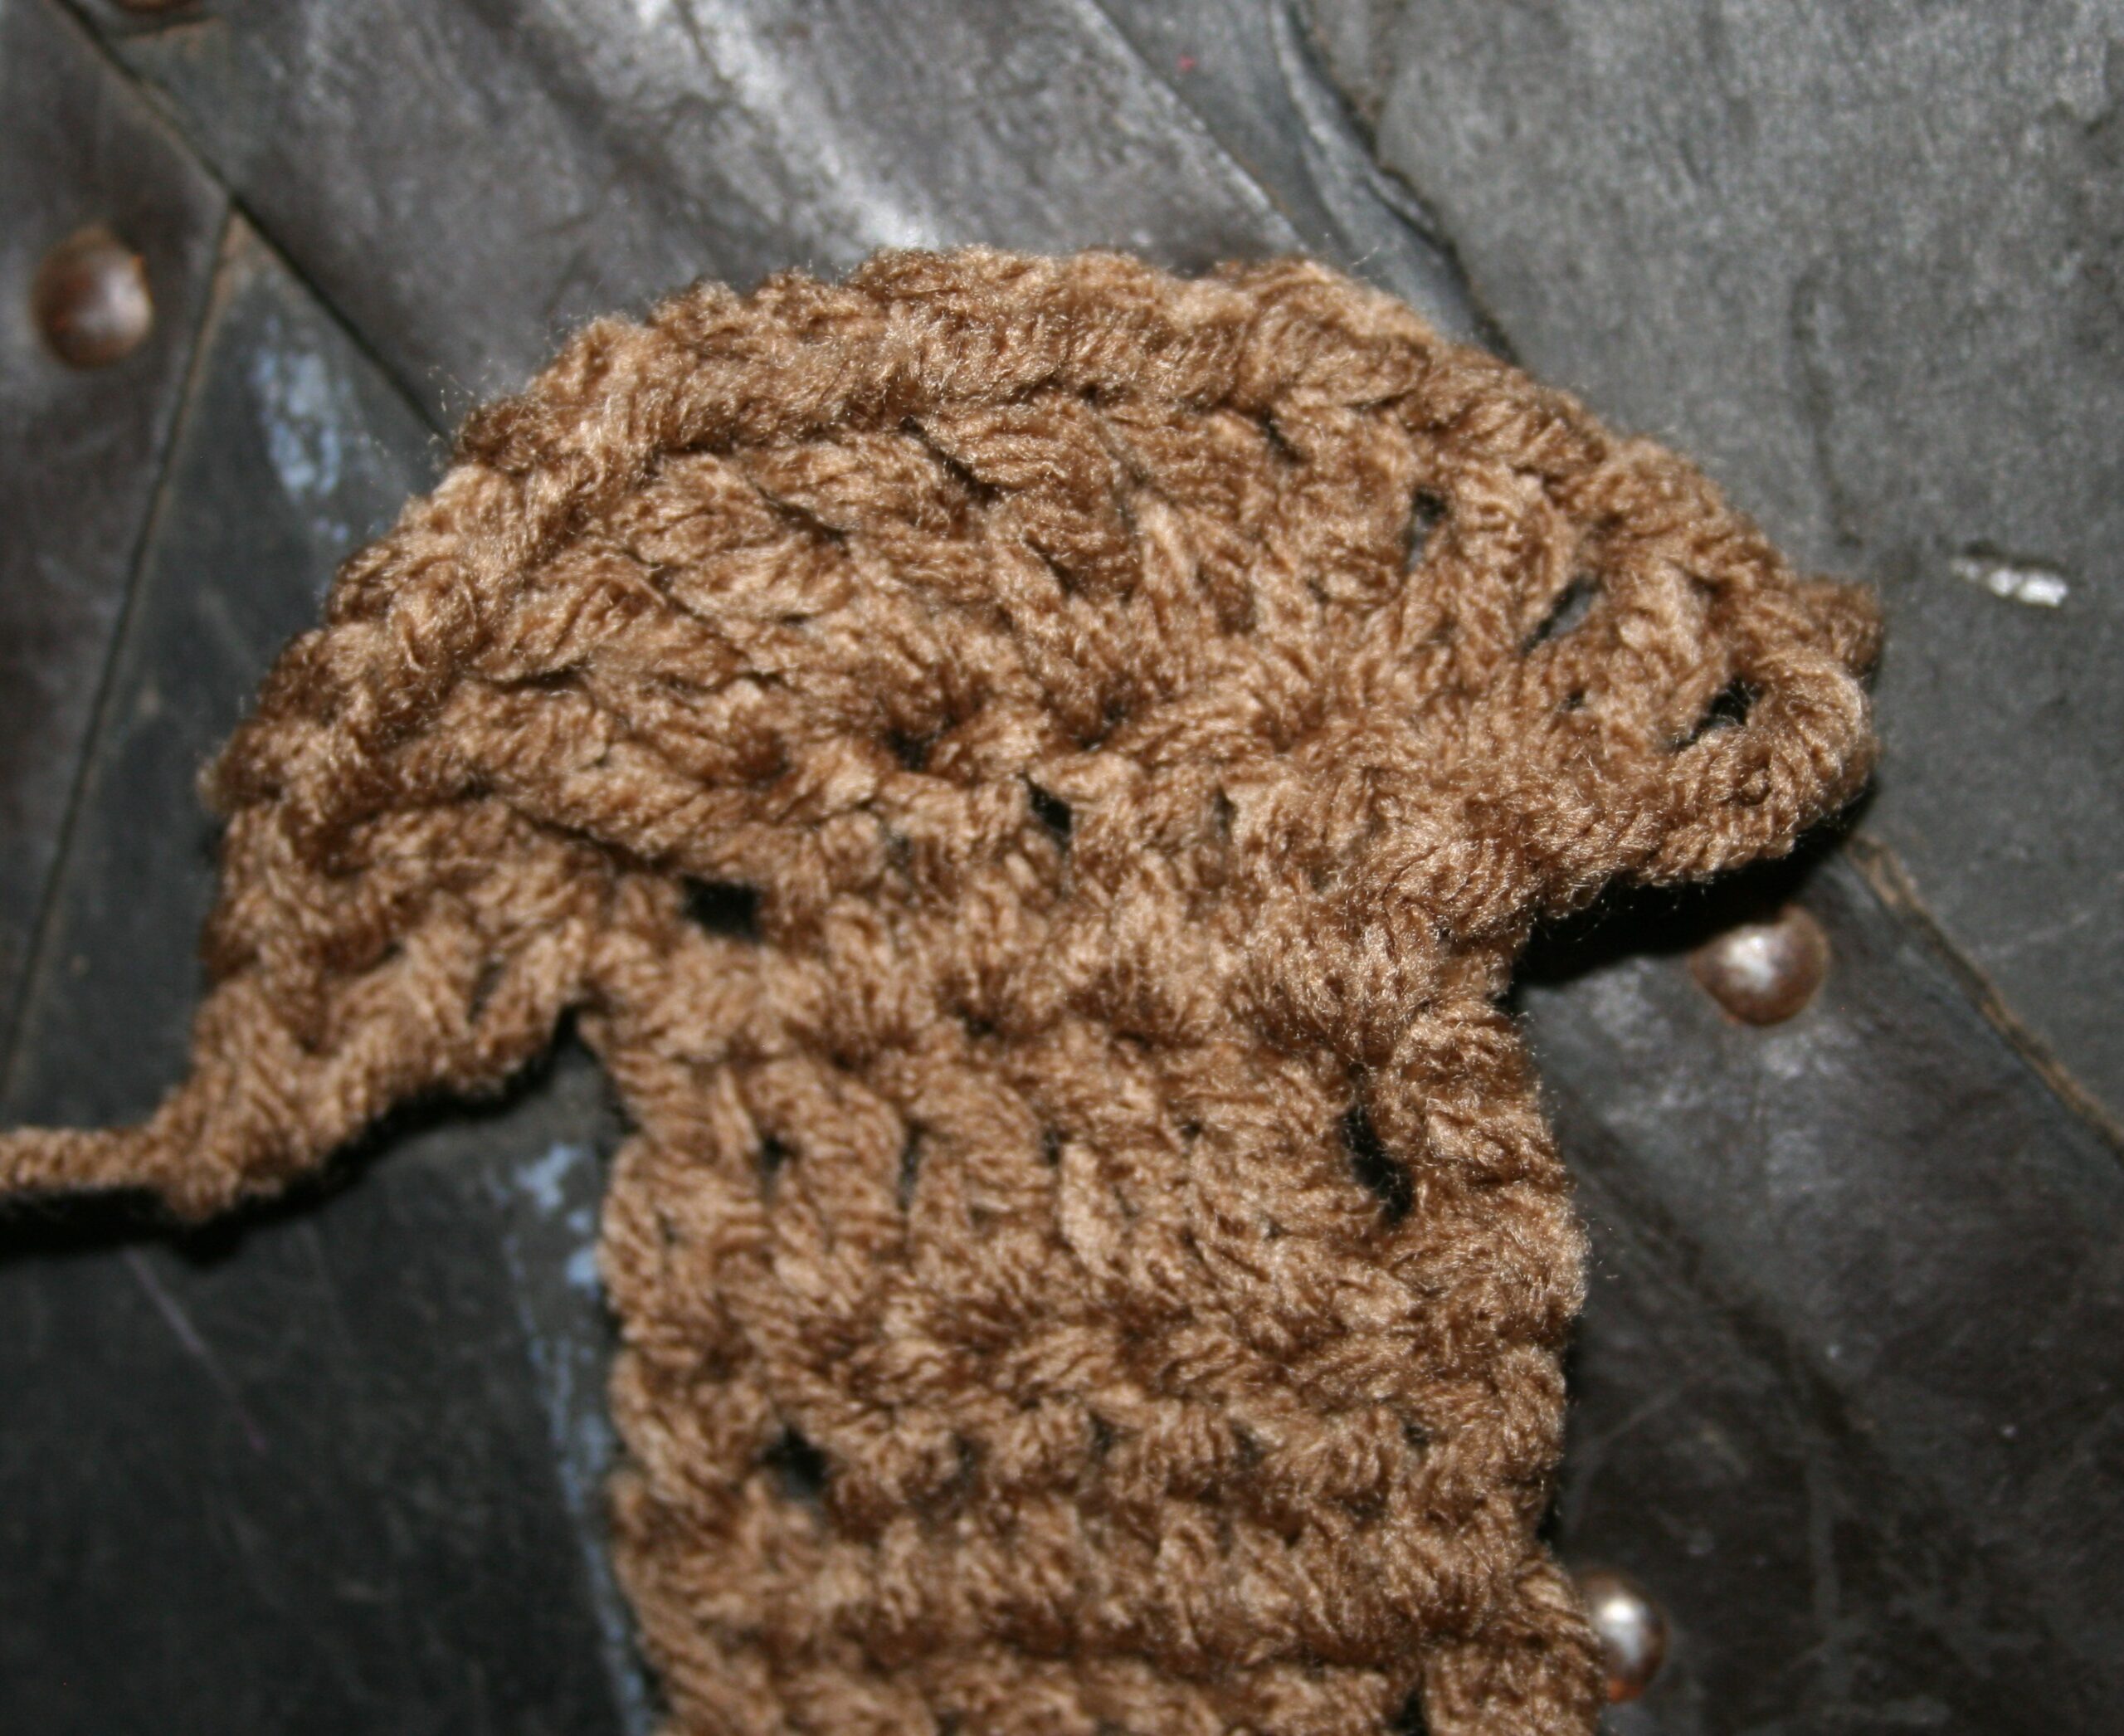
Work Horizontal Braid using 4 different balls of CC- each ball will need to be at least 26 grams in weight. For a step by step of how to work the braid, please check out this post, which will have a link to a video if needed. To ensure that the corners do not cup, make note of the corners in this post as well.
Braided Edging featuring a horizontal cable
Let’s start the Braid…or Cable
Rnd A: With CC, join to any st on edge with a Shdc, hdc in next 6 sts, remove hook from loop and bring yarn to front of fabric. Work Rnd B
Rnd B: With CC, join to back bar first hdc of Rnd A with a Shdc, hdc in back bar of each hdc across, remove hook from loop and bring yarn to front of fabric. Work Rnd C
Rnd C: With CC, join to back bar of first hdc of Rnd B with a Shdc, hdc in back bar of each hdc across, hdc in next 7 sts of edging Rnd 1, remove hook from loop and bring yarn to front of fabric. Work Rnd D
Rnd D: With CC, join to back bar of first hdc of Rnd C with a Shdc, hdc in back bar of each hdc across, remove hook from loop and bring yarn to front of fabric. Work Rnd A1
This is where you can start repeating
Rnd A1: Pick up working loop of Rnd A, working in back bar of hdc of Rnd D hdc in each st across, hdc in next 7 sts of edging Rnd 1, remove hook from loop and bring yarn to front of fabric. Work Rnd B1
Rnd B1: Pick up working loop of Rnd B, working in back bar, hdc in each st across, remove hook from loop and bring yarn to front of fabric. Work Rnd C1
Rnd C1: Pick up working loop of Rnd C, working in back bar of hdc of Rnd B hdc in each st across, hdc in next 7 sts of edging Rnd 1, remove hook from loop and bring yarn to front of fabric. Work Rnd D1
Rnd D1: Pick up loop of Rnd D, working in back bar of hdc, hdc in each st across, remove hook from loop and bring yarn to from of fabric. Work Rnd A1
Repeat Rnds A1-D1 round, join to the corresponding Round, Fasten off all 4 rounds.
Time to finish this up
Rnd 2: With MC join to back bar of any stitch with a Shdc, working in back bar hdc in each st around, join, fasten off.
Rnd 3: With CC join to any st, ch 1, Rsc around edge, fasten off.