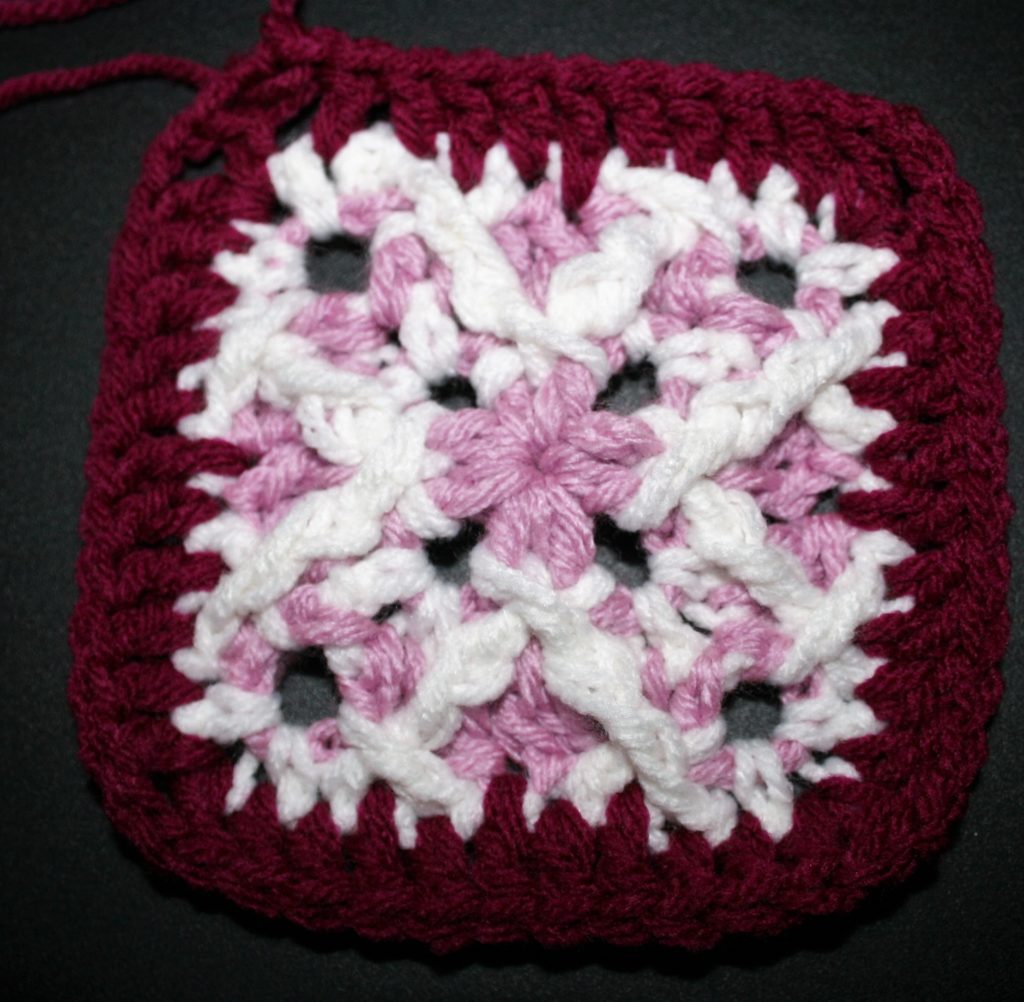
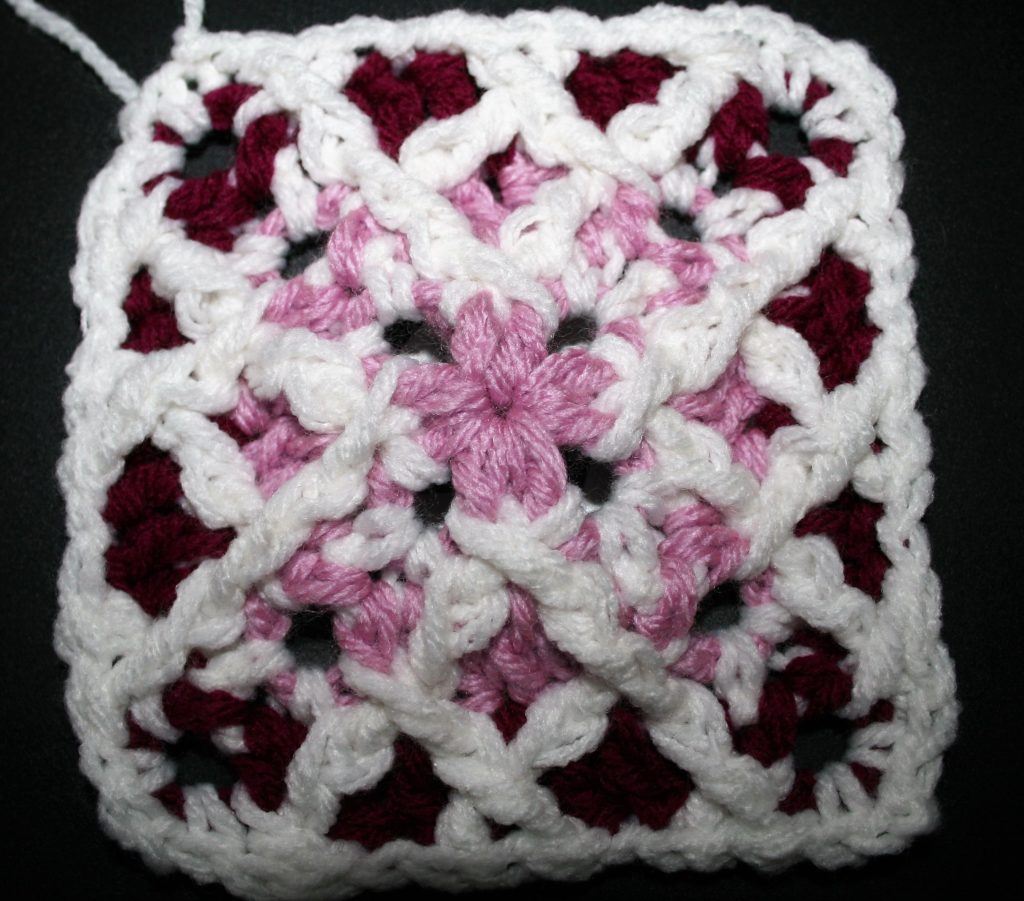
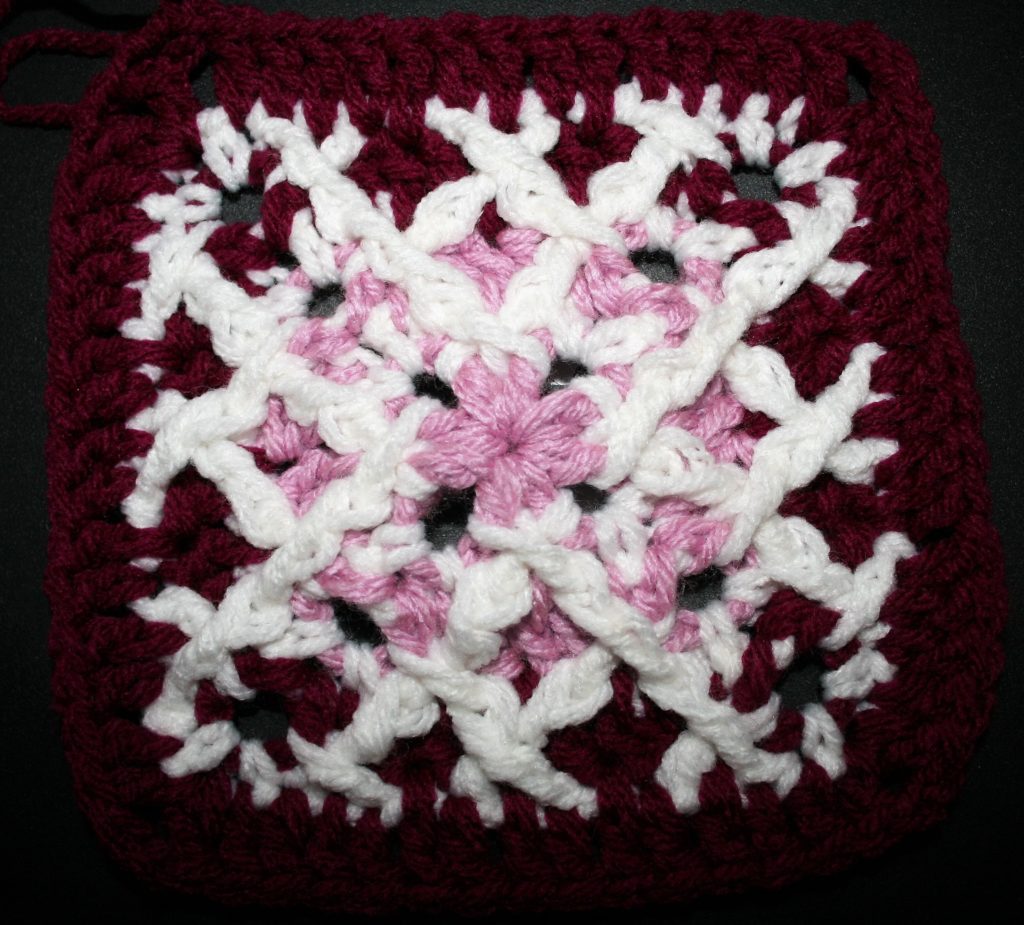
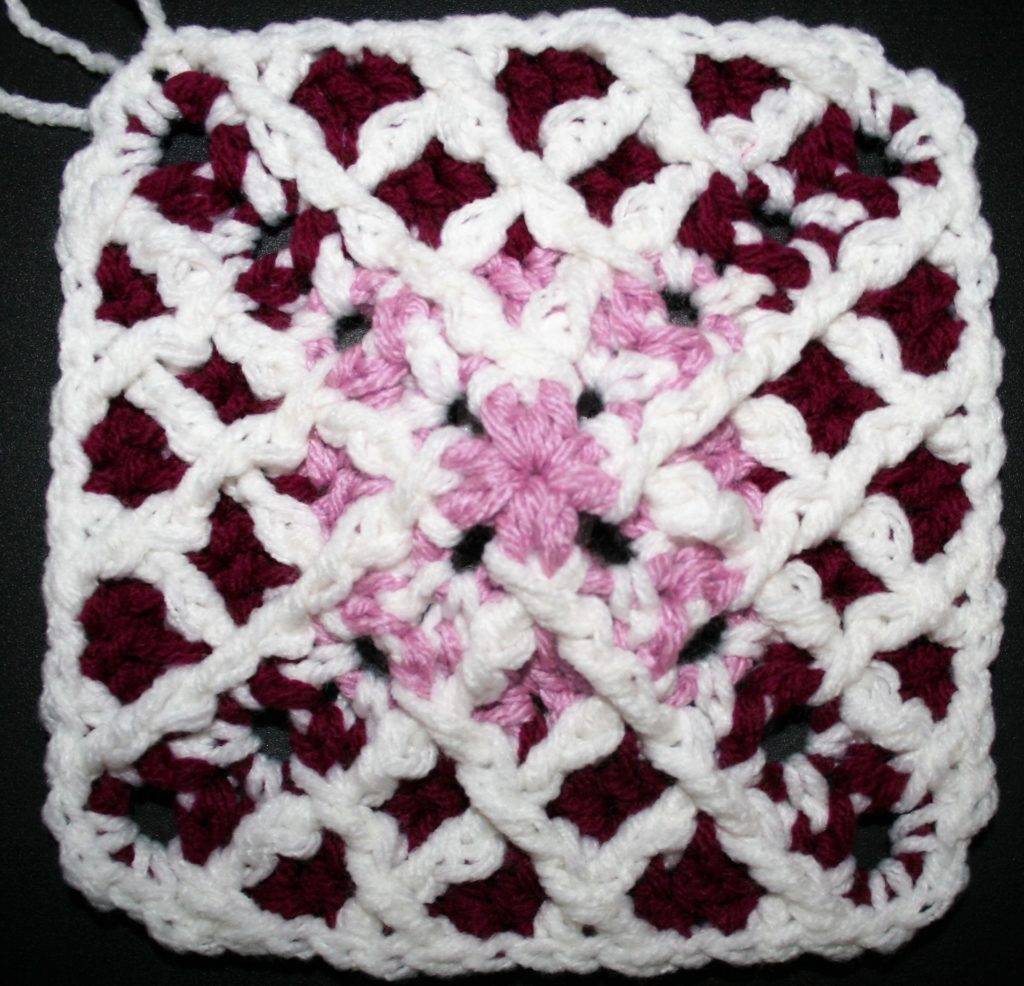
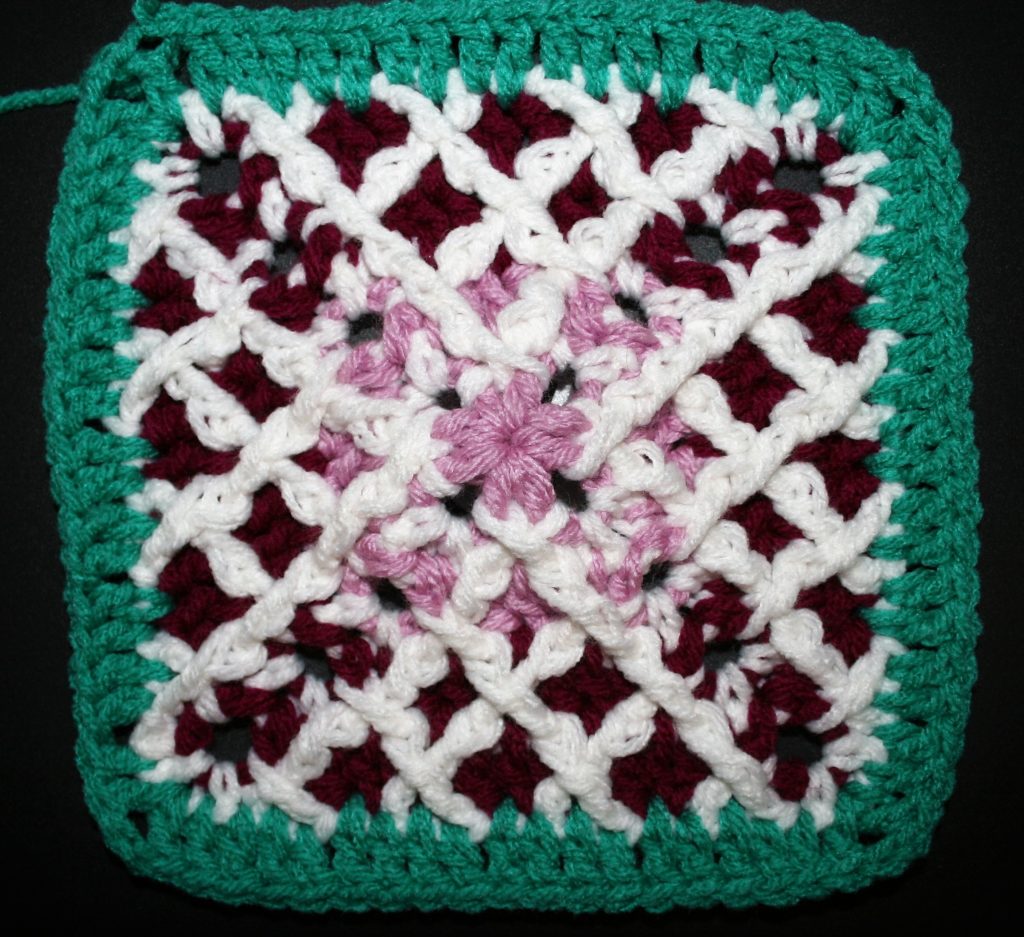
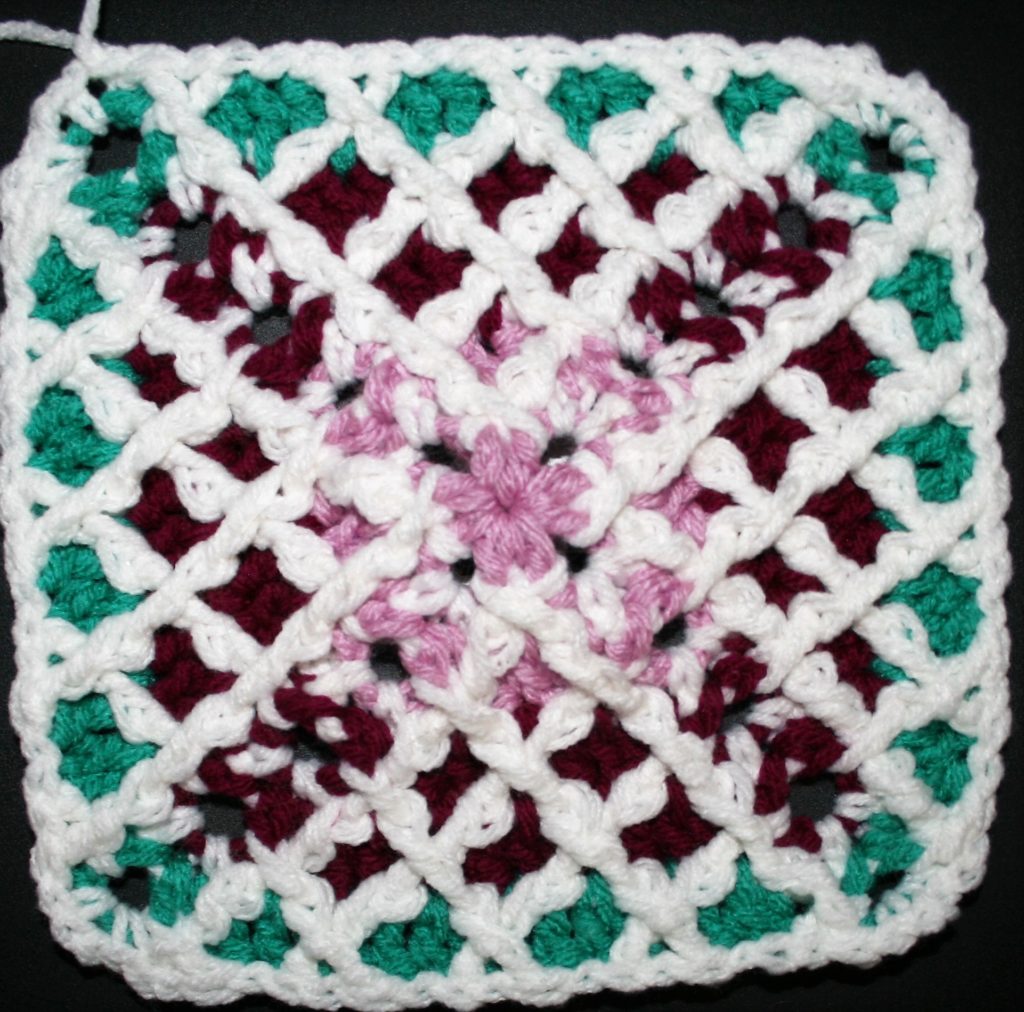
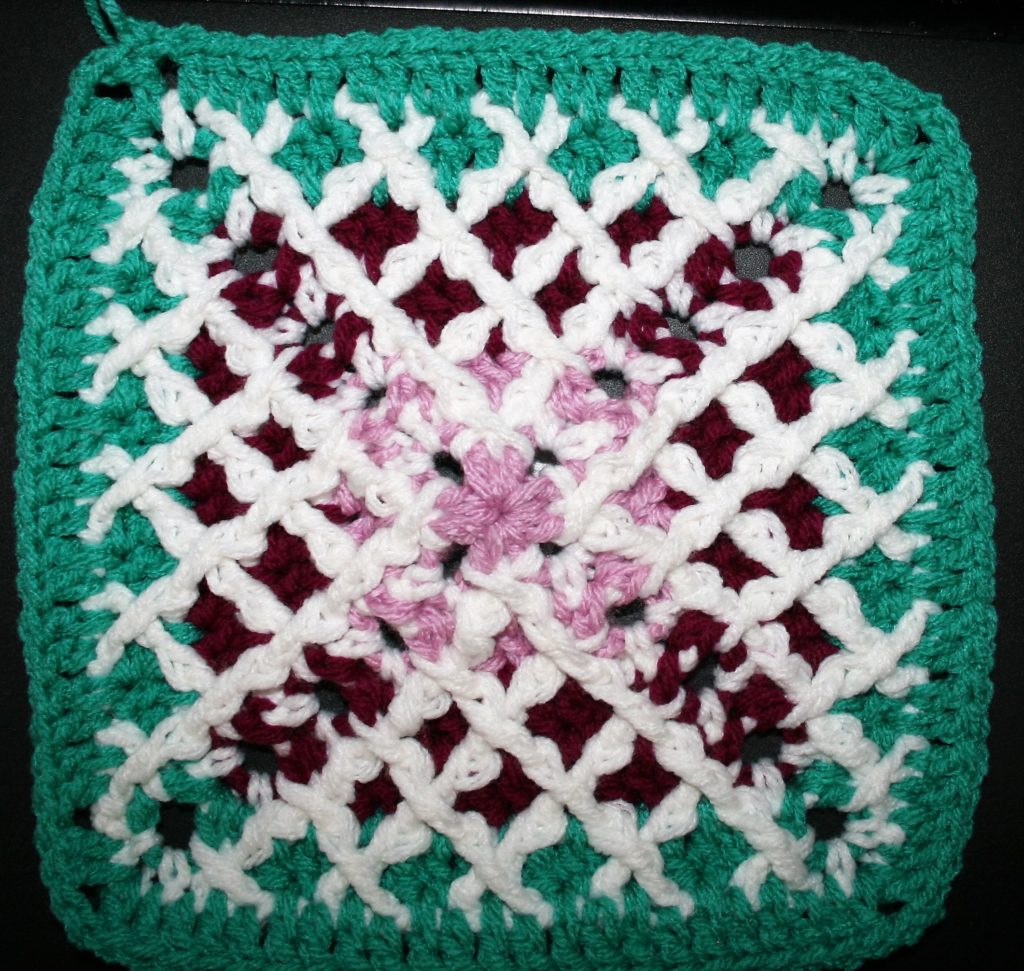
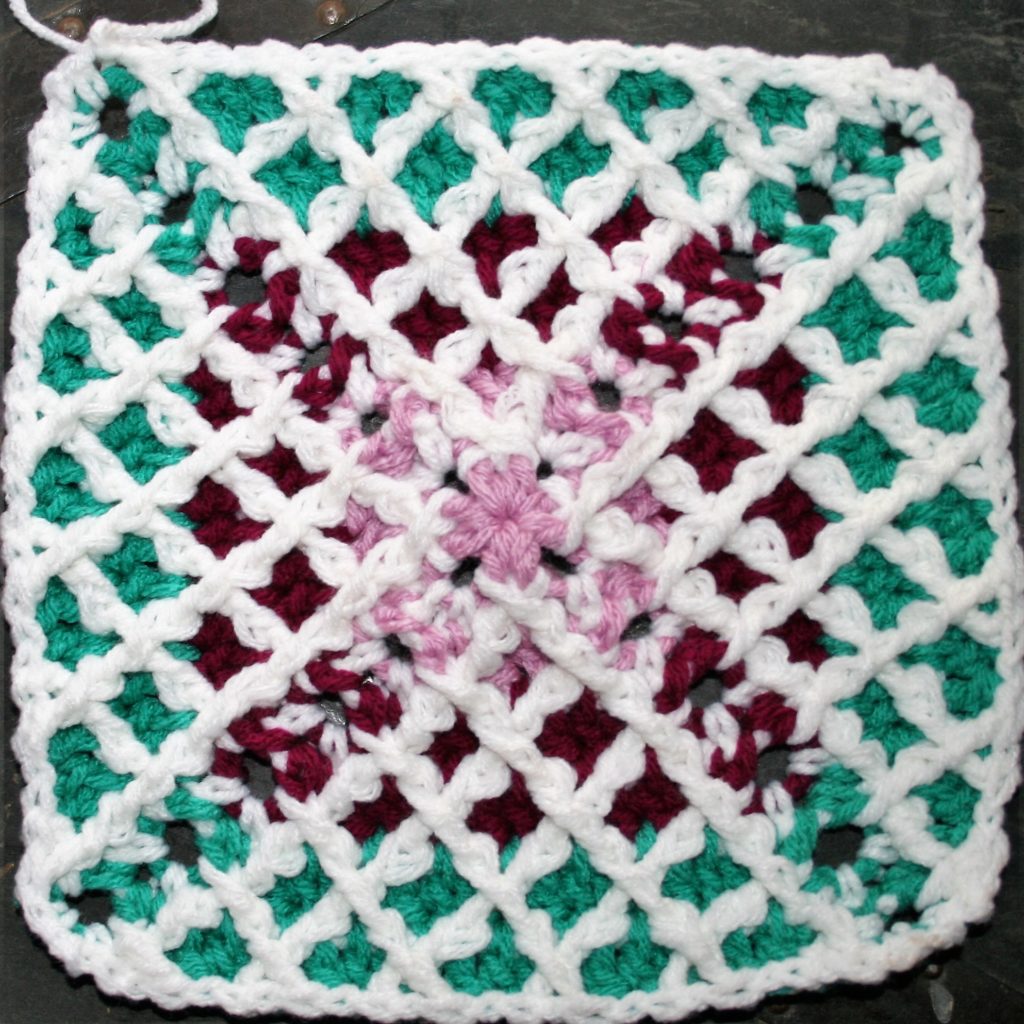
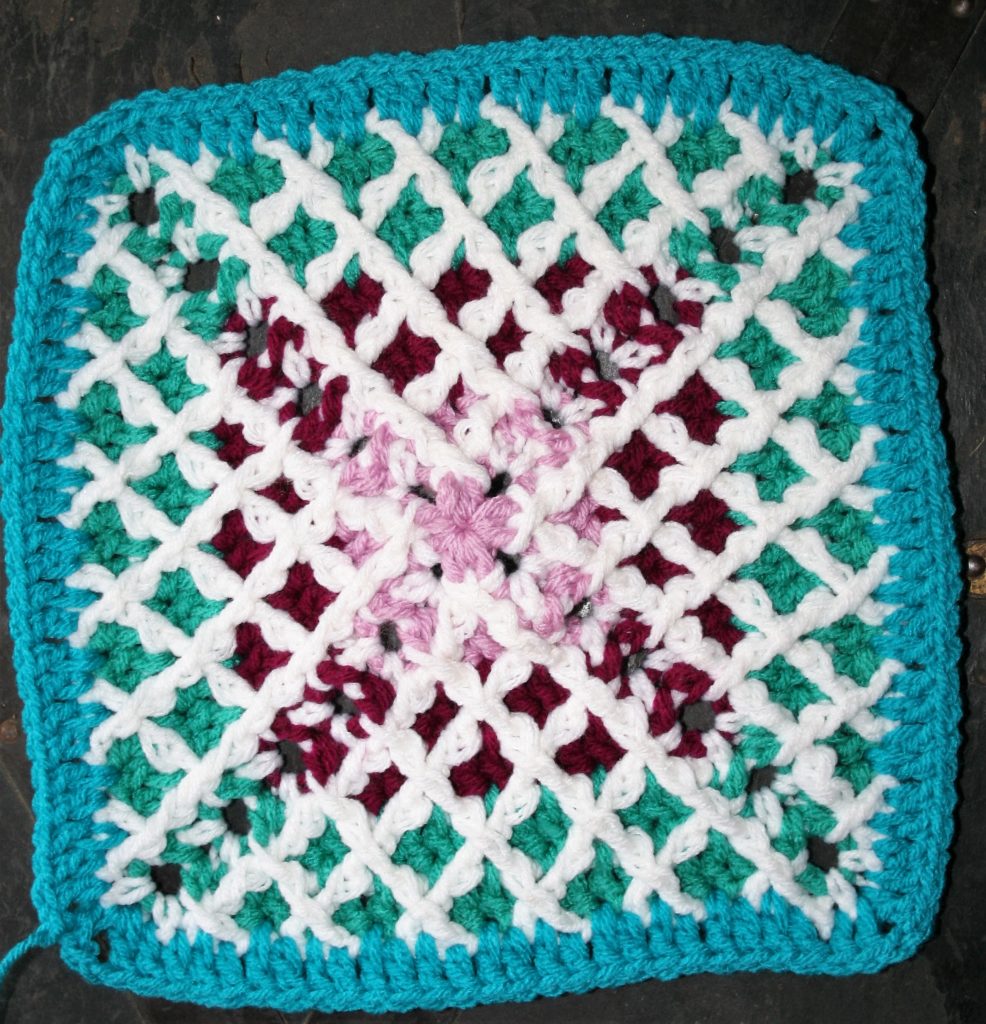
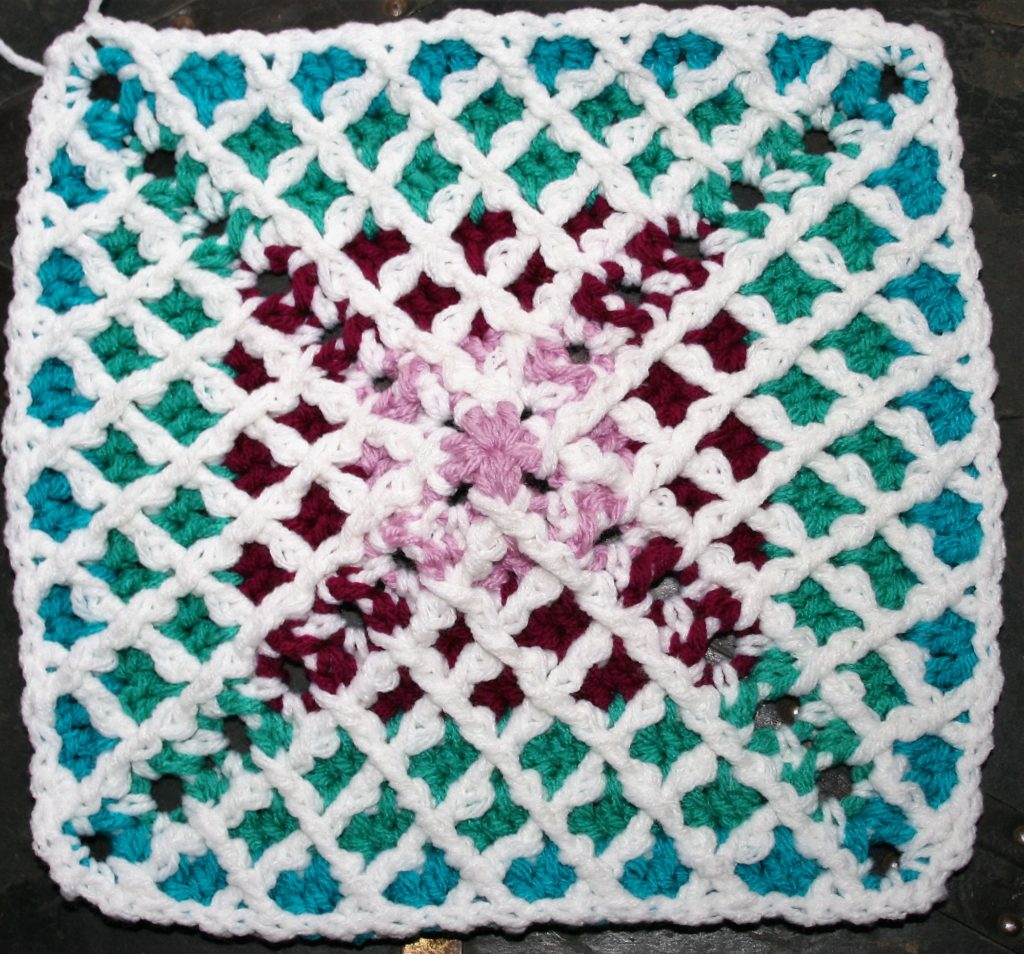
Do you hear the Music? Happy National Crochet Month! I am part of the annual Crochetville Blog tour to celebrate the event. This year the theme is Crochet Concert and features how music can be an inspiration, as my inspiration I have created a Music Tapestry Block to Celebrate crochet.
I Celebrate Crochet with Music
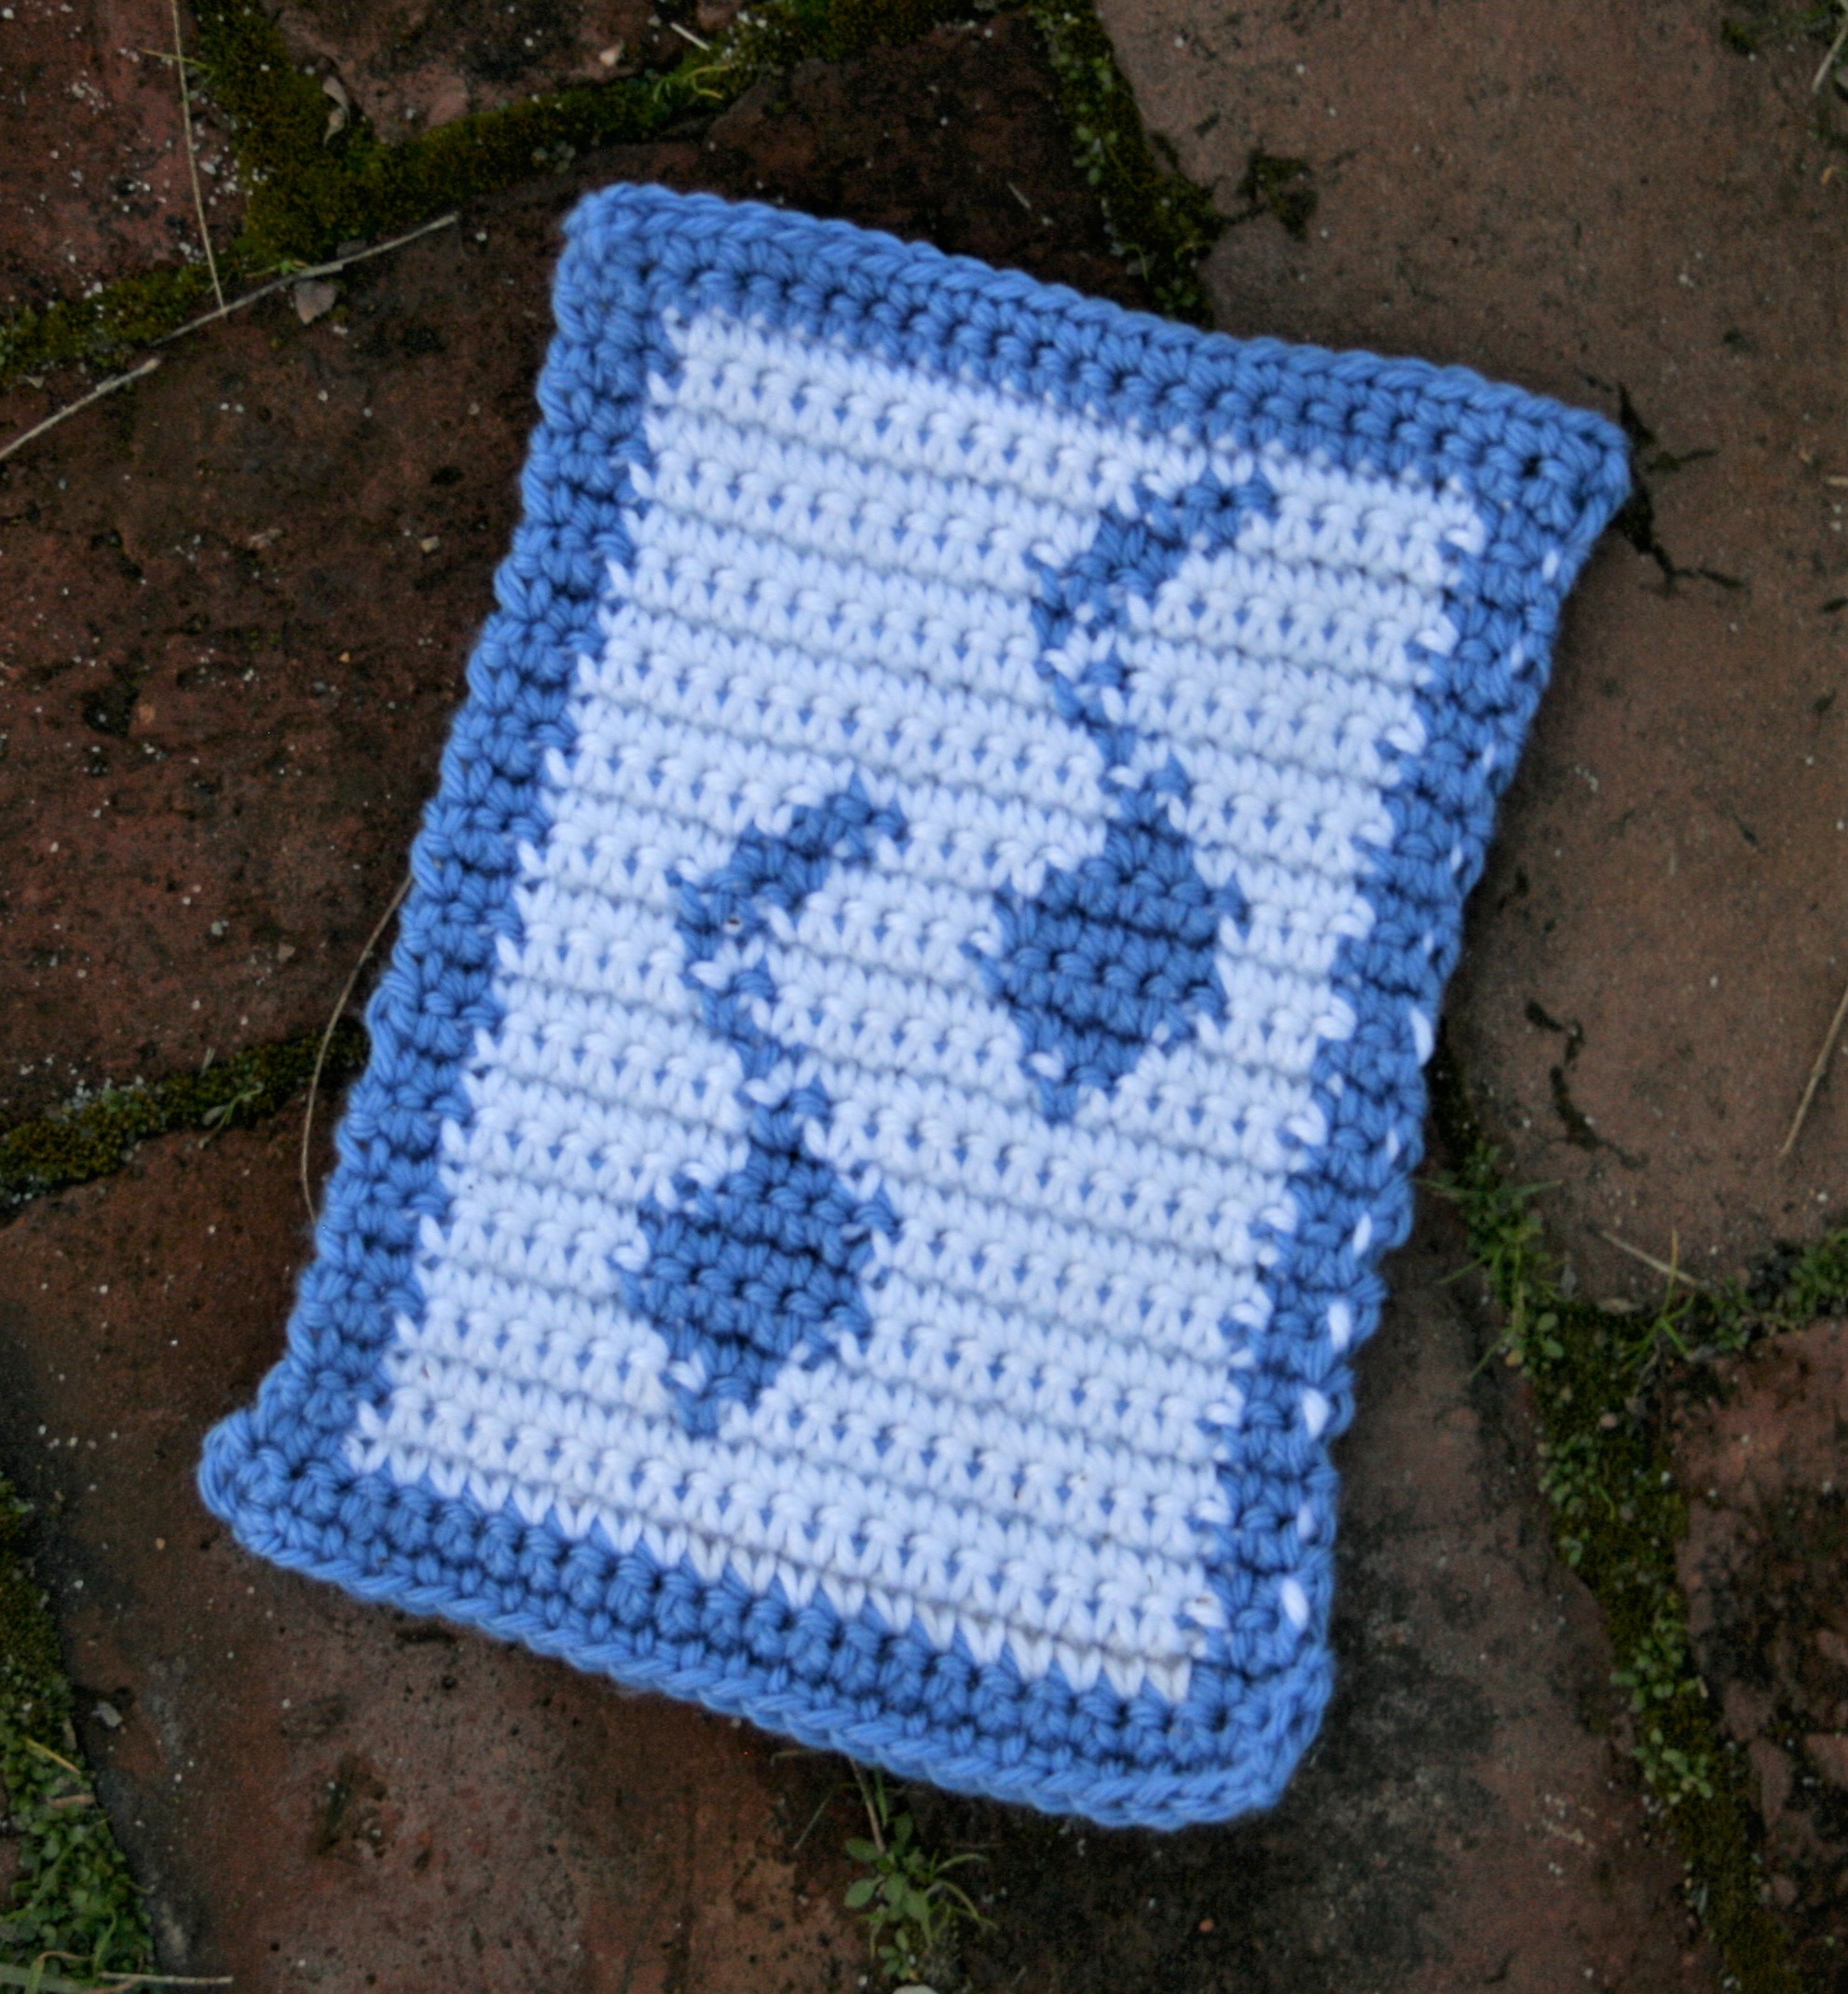
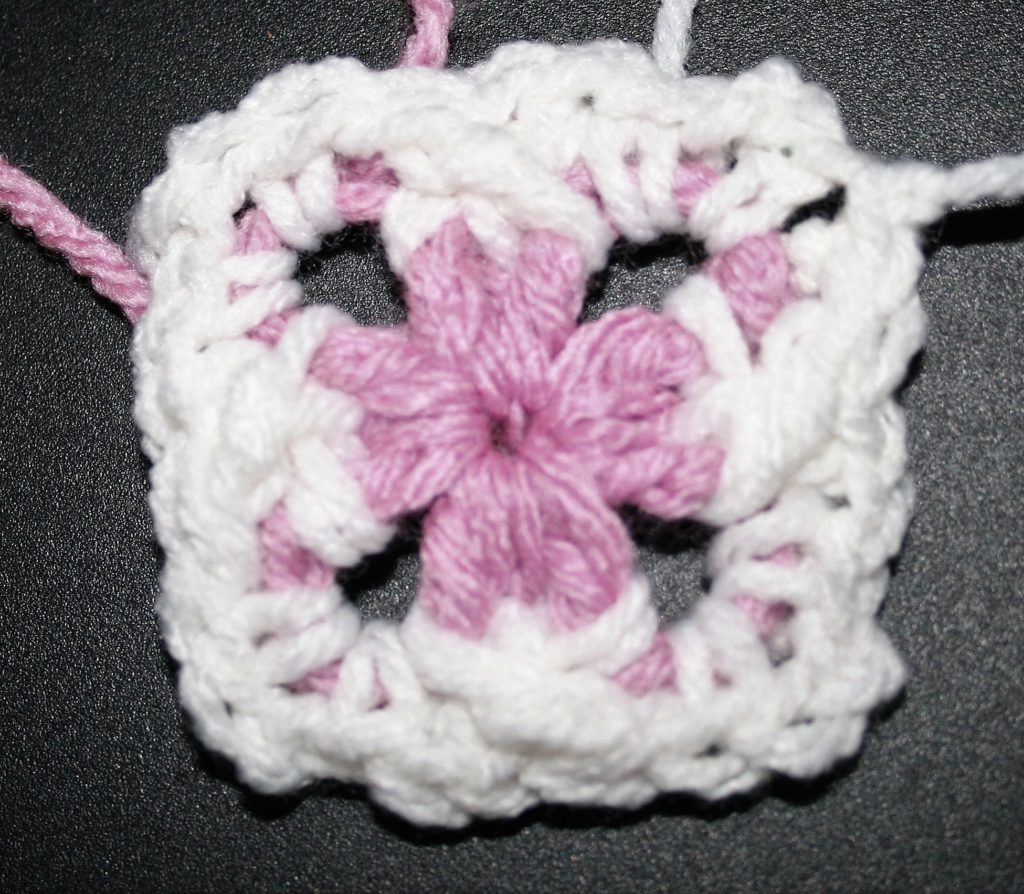
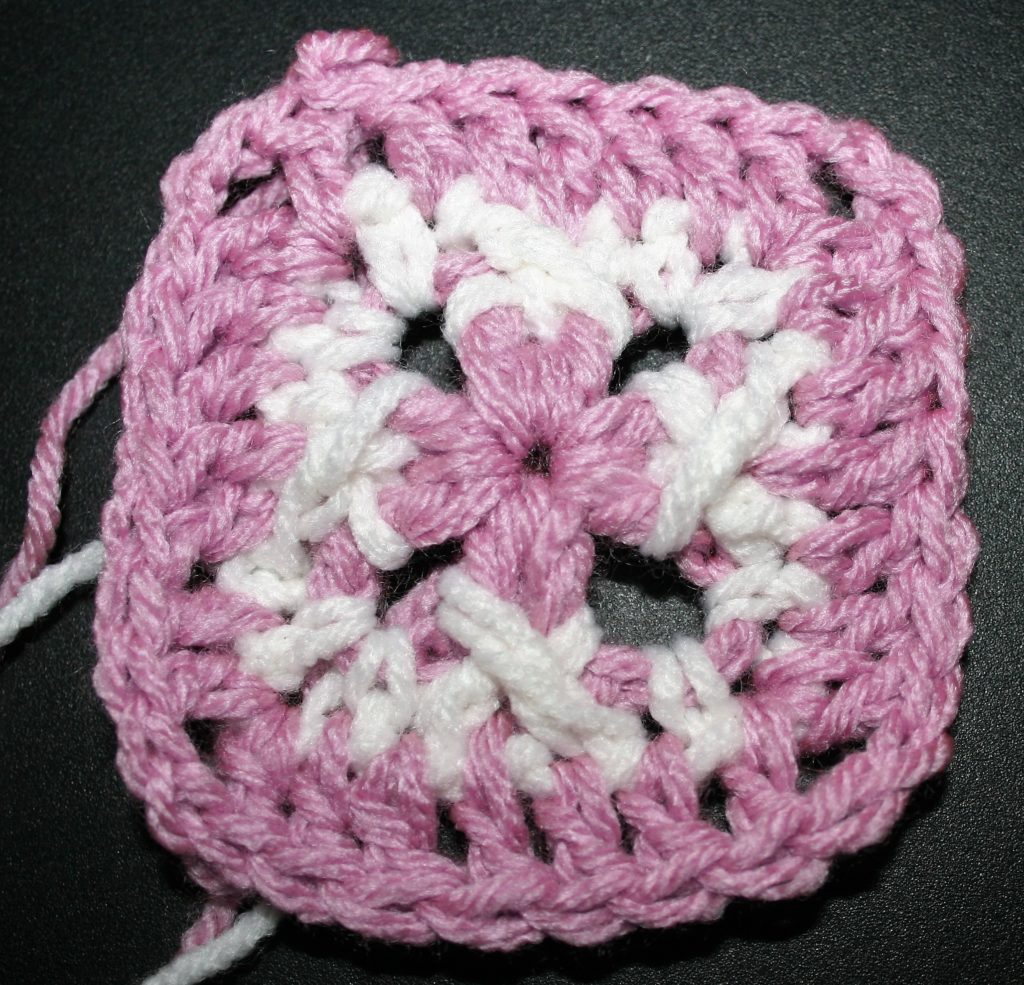
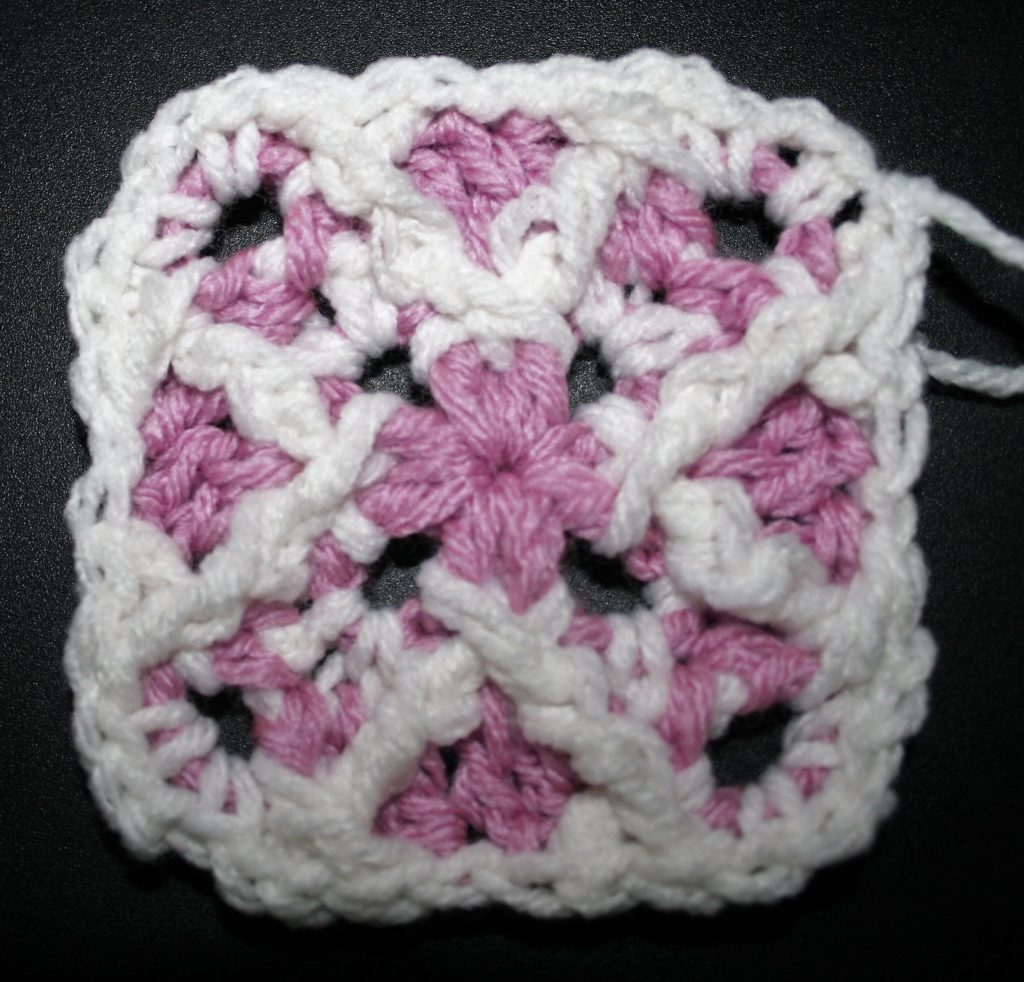
As my contribution to this tour I have created a Music Block. Use this block for various things including as a contribution to Warm Up America.
Music Block
You can donate to Warm Up America as a nationwide organization. Donating locally is encouraged, however donations can be sent to their office to be assembled. Assembled blankets will be donated through the United States.
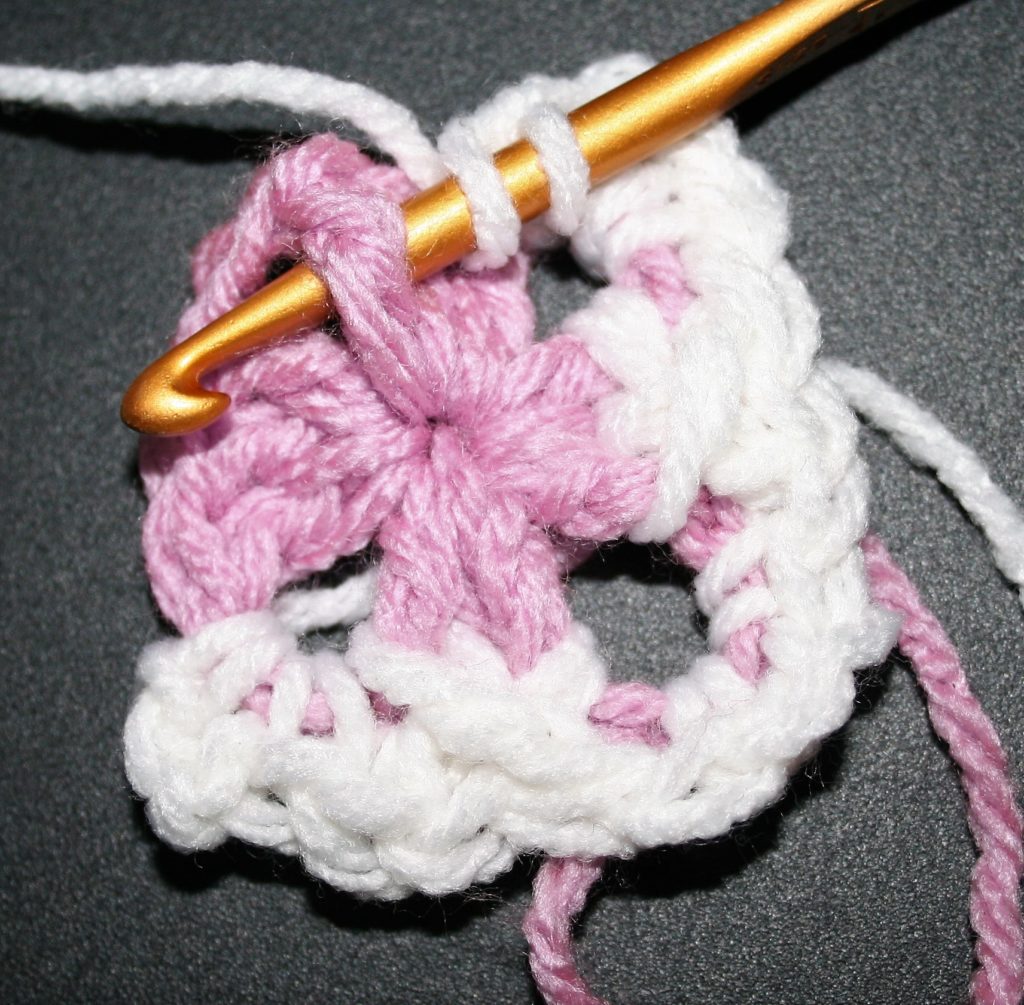
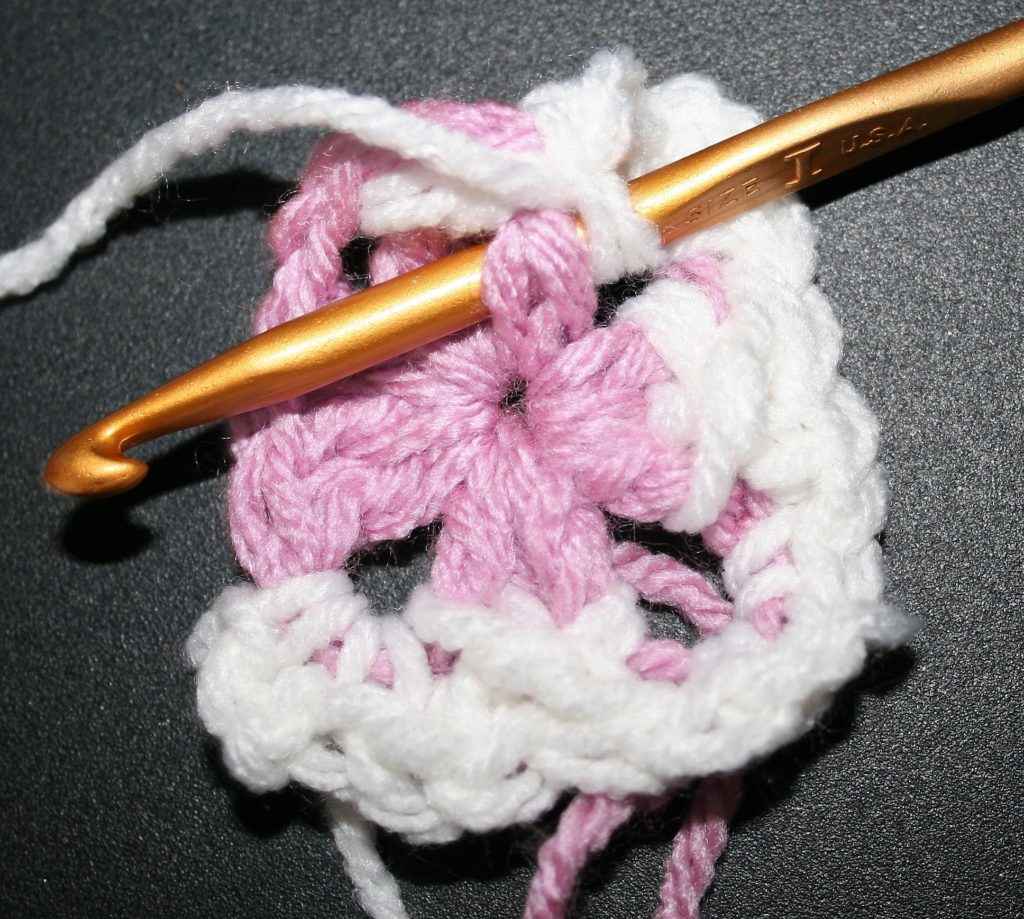
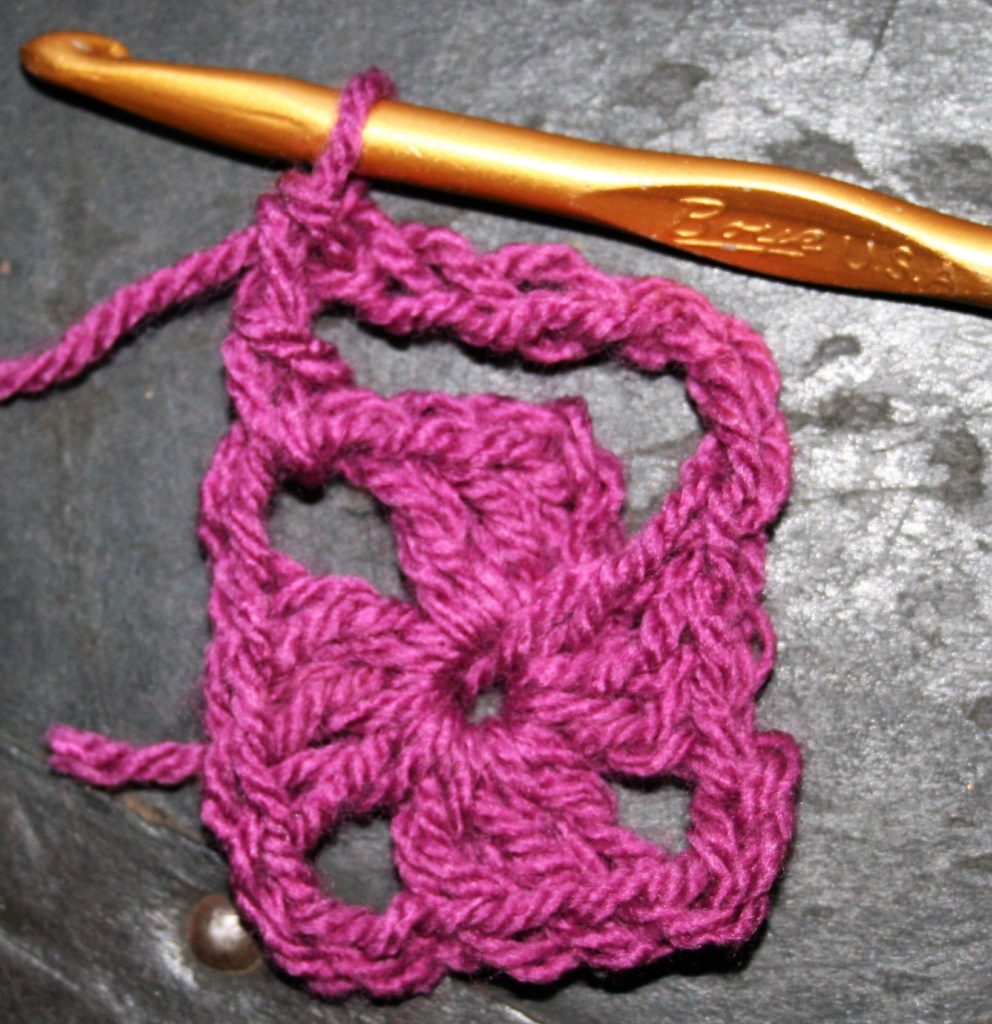
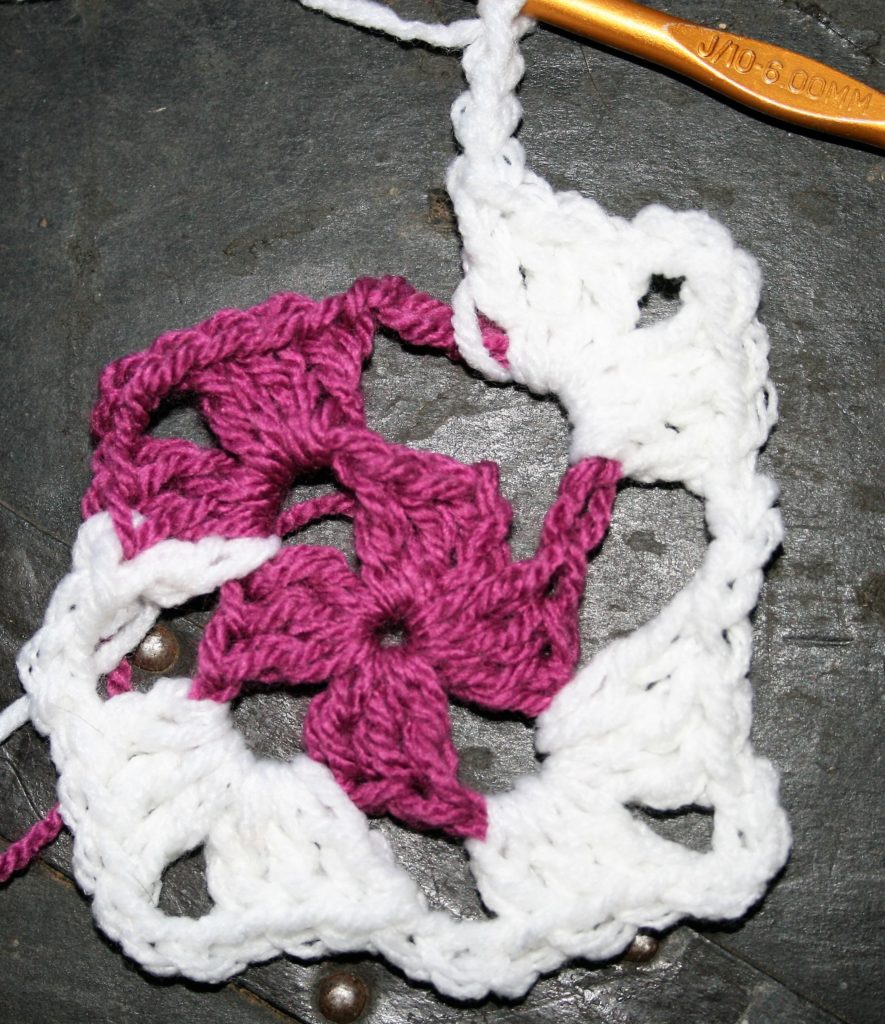
Tapestry Crochet to Create Music
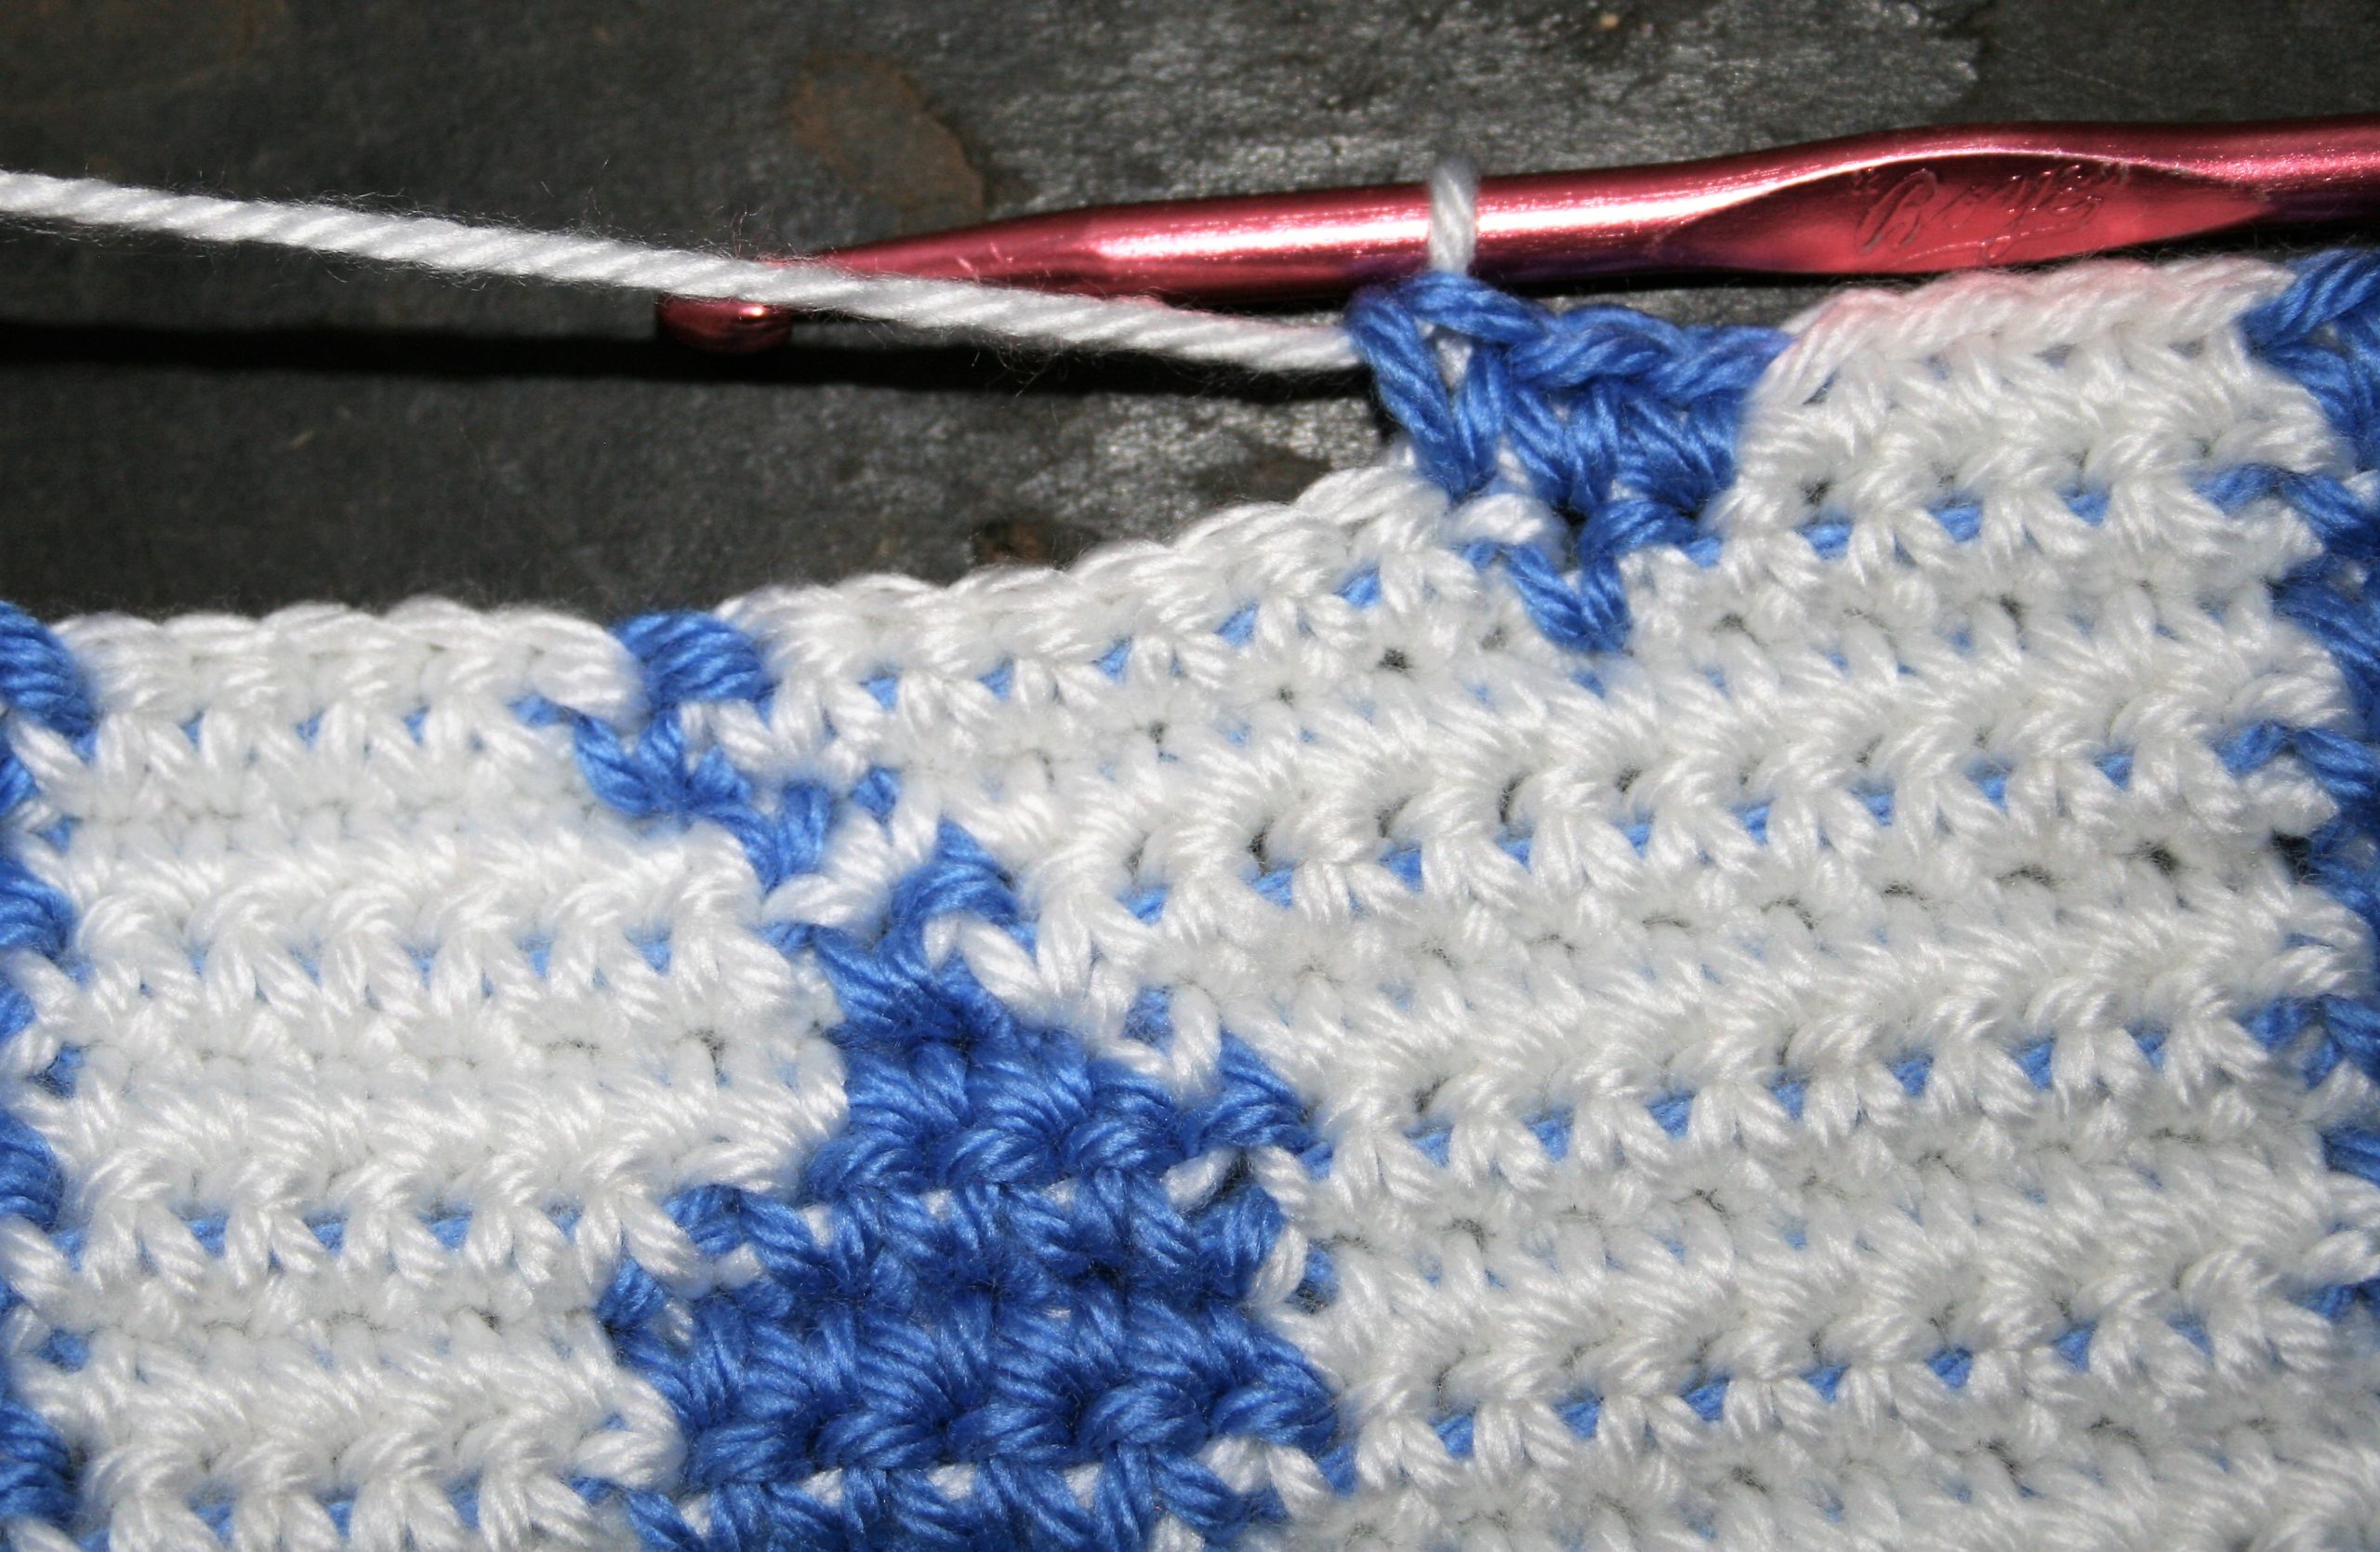
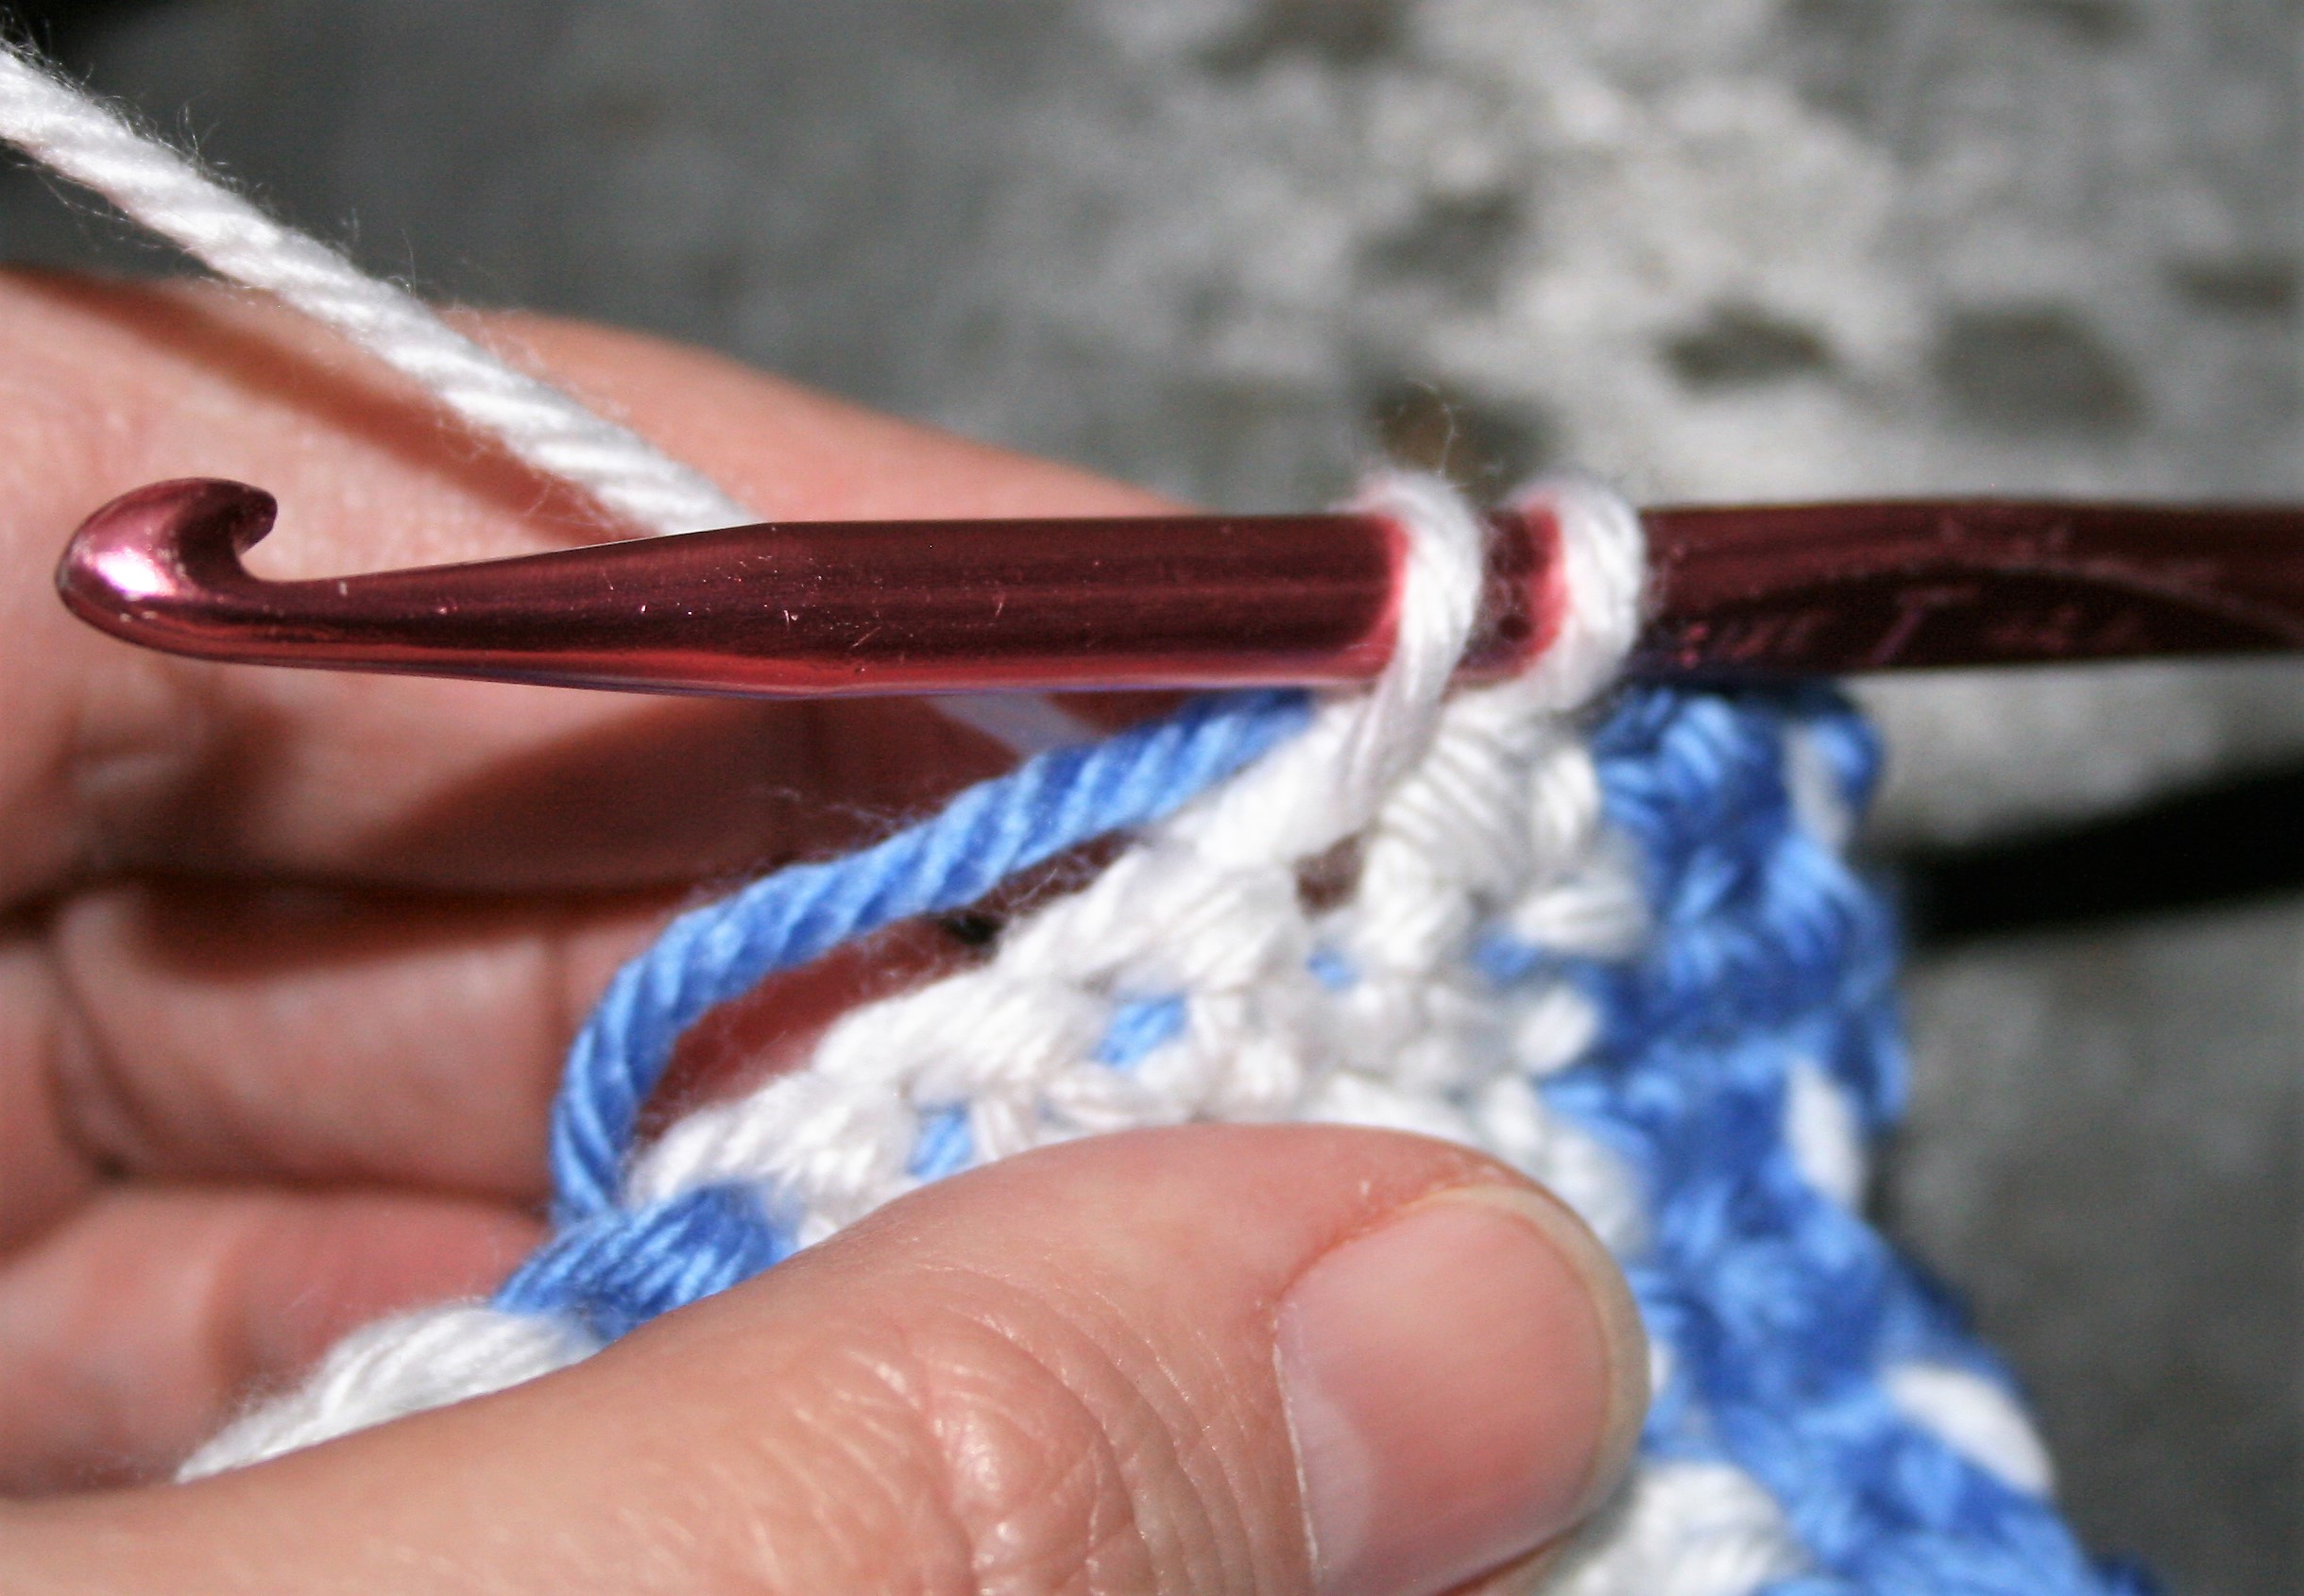
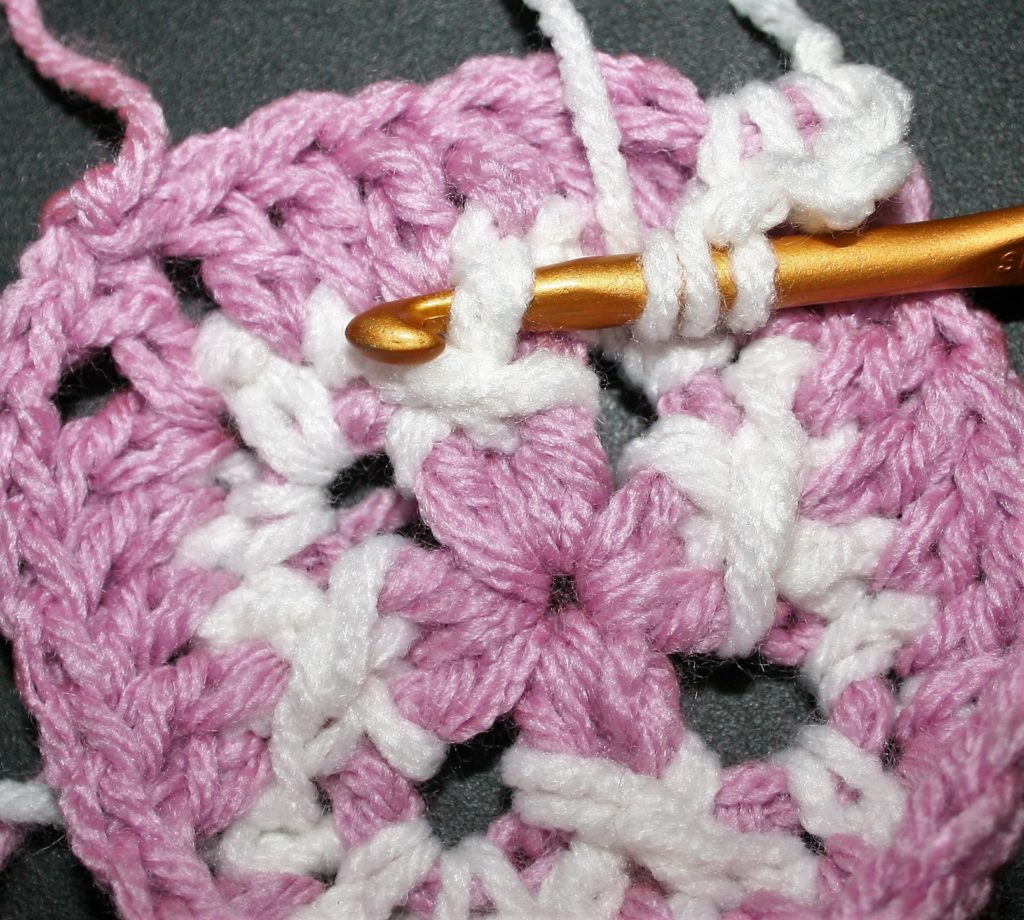
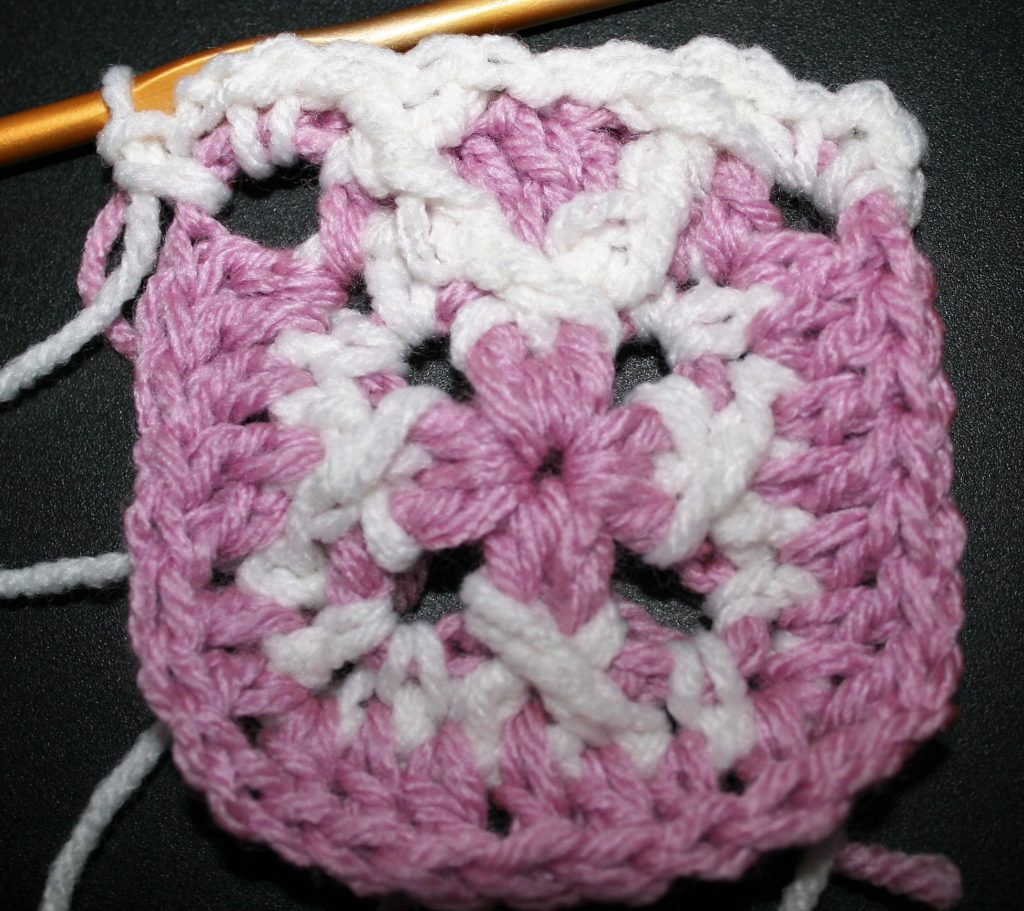
The Music Block gives you an opportunity to learn Tapestry Crochet. Tapestry Crochet is a technique of color work that has you crocheting over the unused color. This reduces finish work and creates a solid, somewhat dense, fabric.
Tapestry Crochet is worked entirely in single crochet with color changes.
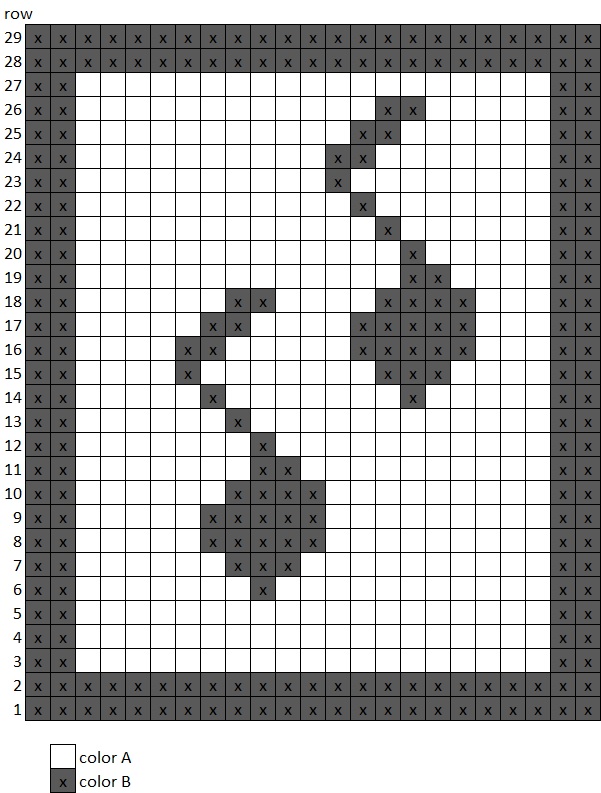
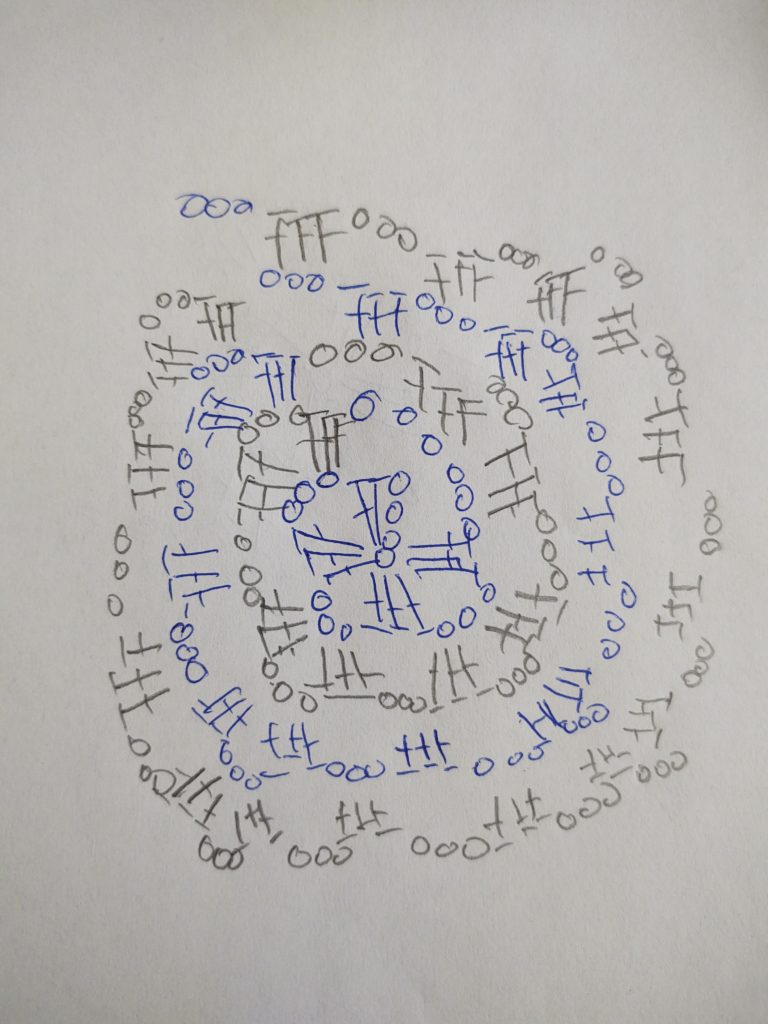
Worked entirely in Singe Crochet (Double Crochet if you are using UK terms). Worked with a chart, where each block is 1 stitch. Just remember to work back and forth in the chart, meaning read right to left for odd number rows and left to right for even number rows. (Needs tips for changing color…check here).
Crochet over the unused color, and carry it across. This reduces finish work while creating a charted design.
Enjoy this technique, and take some time to celebrate crochet this month.
Music Block
Gauge
Gauge: Square measures 7”x 9”
Materials
Medium weigh yarn, two colors (A), (B)
I/9/5.50 mm crochet hook
With Color B, chain 24, sc in 2nd ch from hook. Follow chart for design.
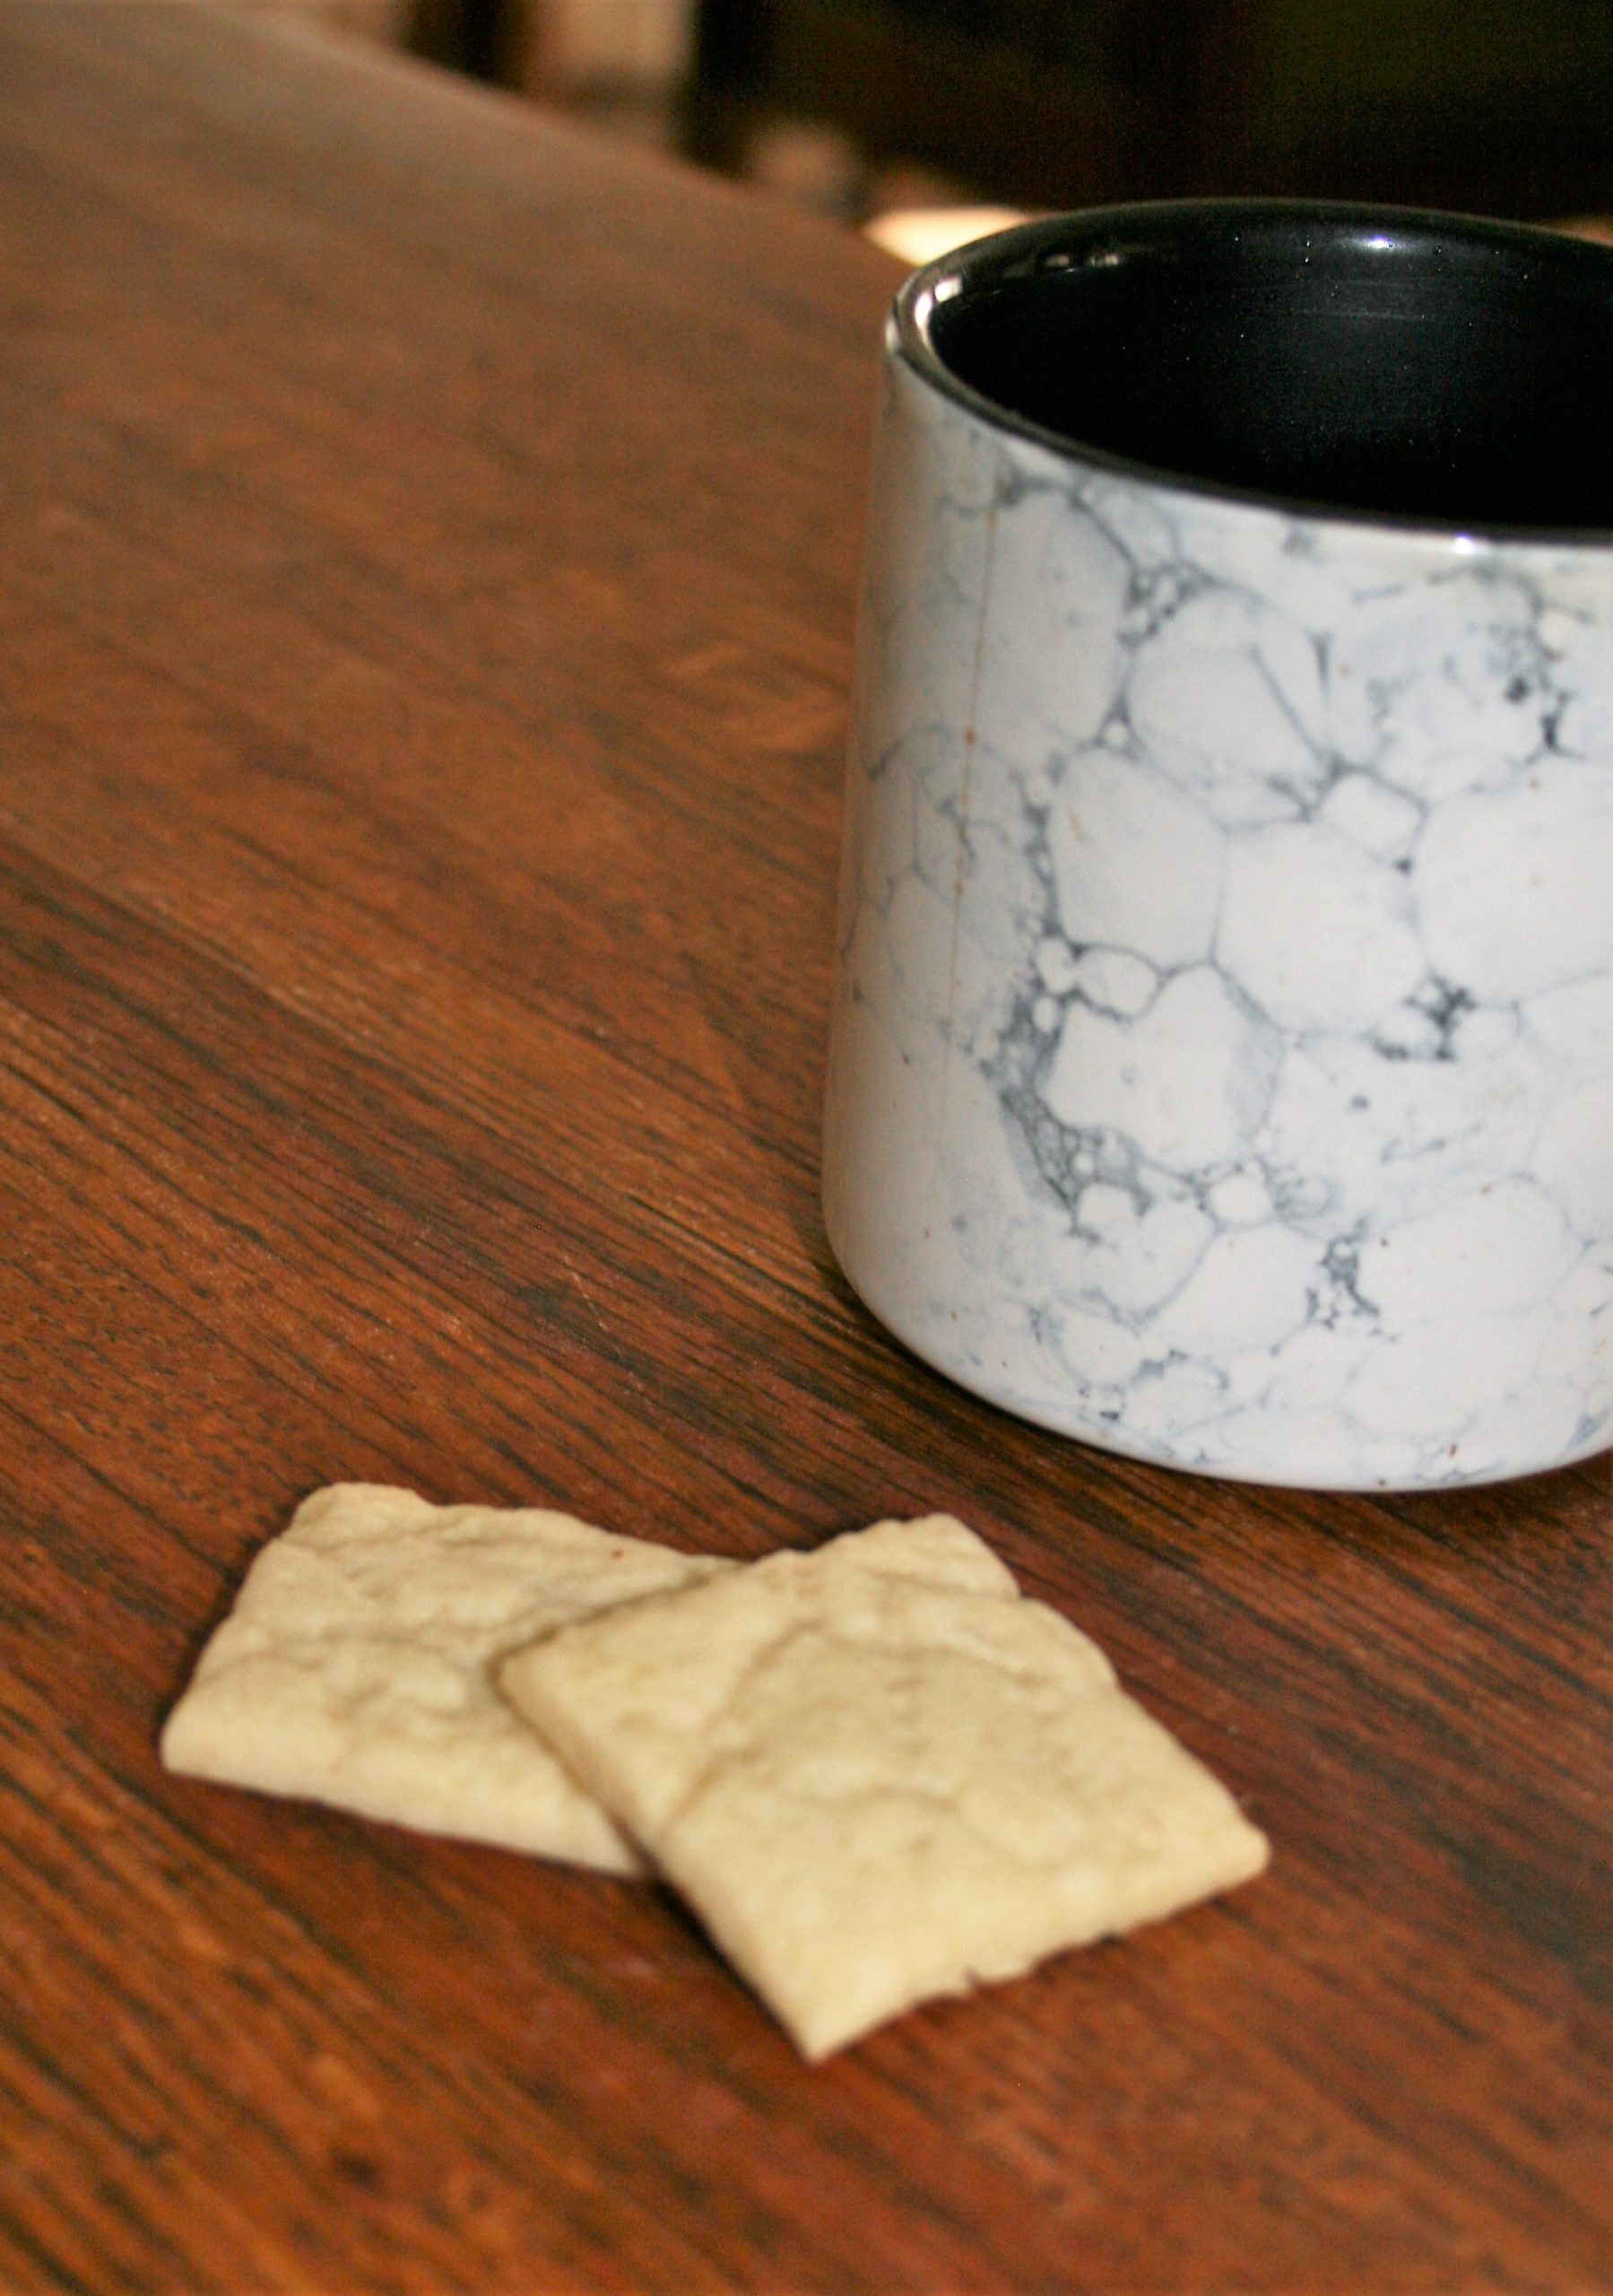
Playing in the kitchen can be fun and I have found ways to bring crochet into the mix. Crochet in the kitchen is not a new thing. I have crochet potholders and trivets, crochet dishtowels hanging from my stove door, some crochet dish cloths, and even crochet handle covers for cast iron pans. However, I have started embossing crochet in my baking.
I made a personal challenge to work my way through a Swedish book on baking this last year, and can say with tasty results. Starting my morning with a cup of hot tea or coffee and a couple of butter cookies have become part of the results.
Embossing Crochet Cookies
Embossing Crochet Butter Cookies
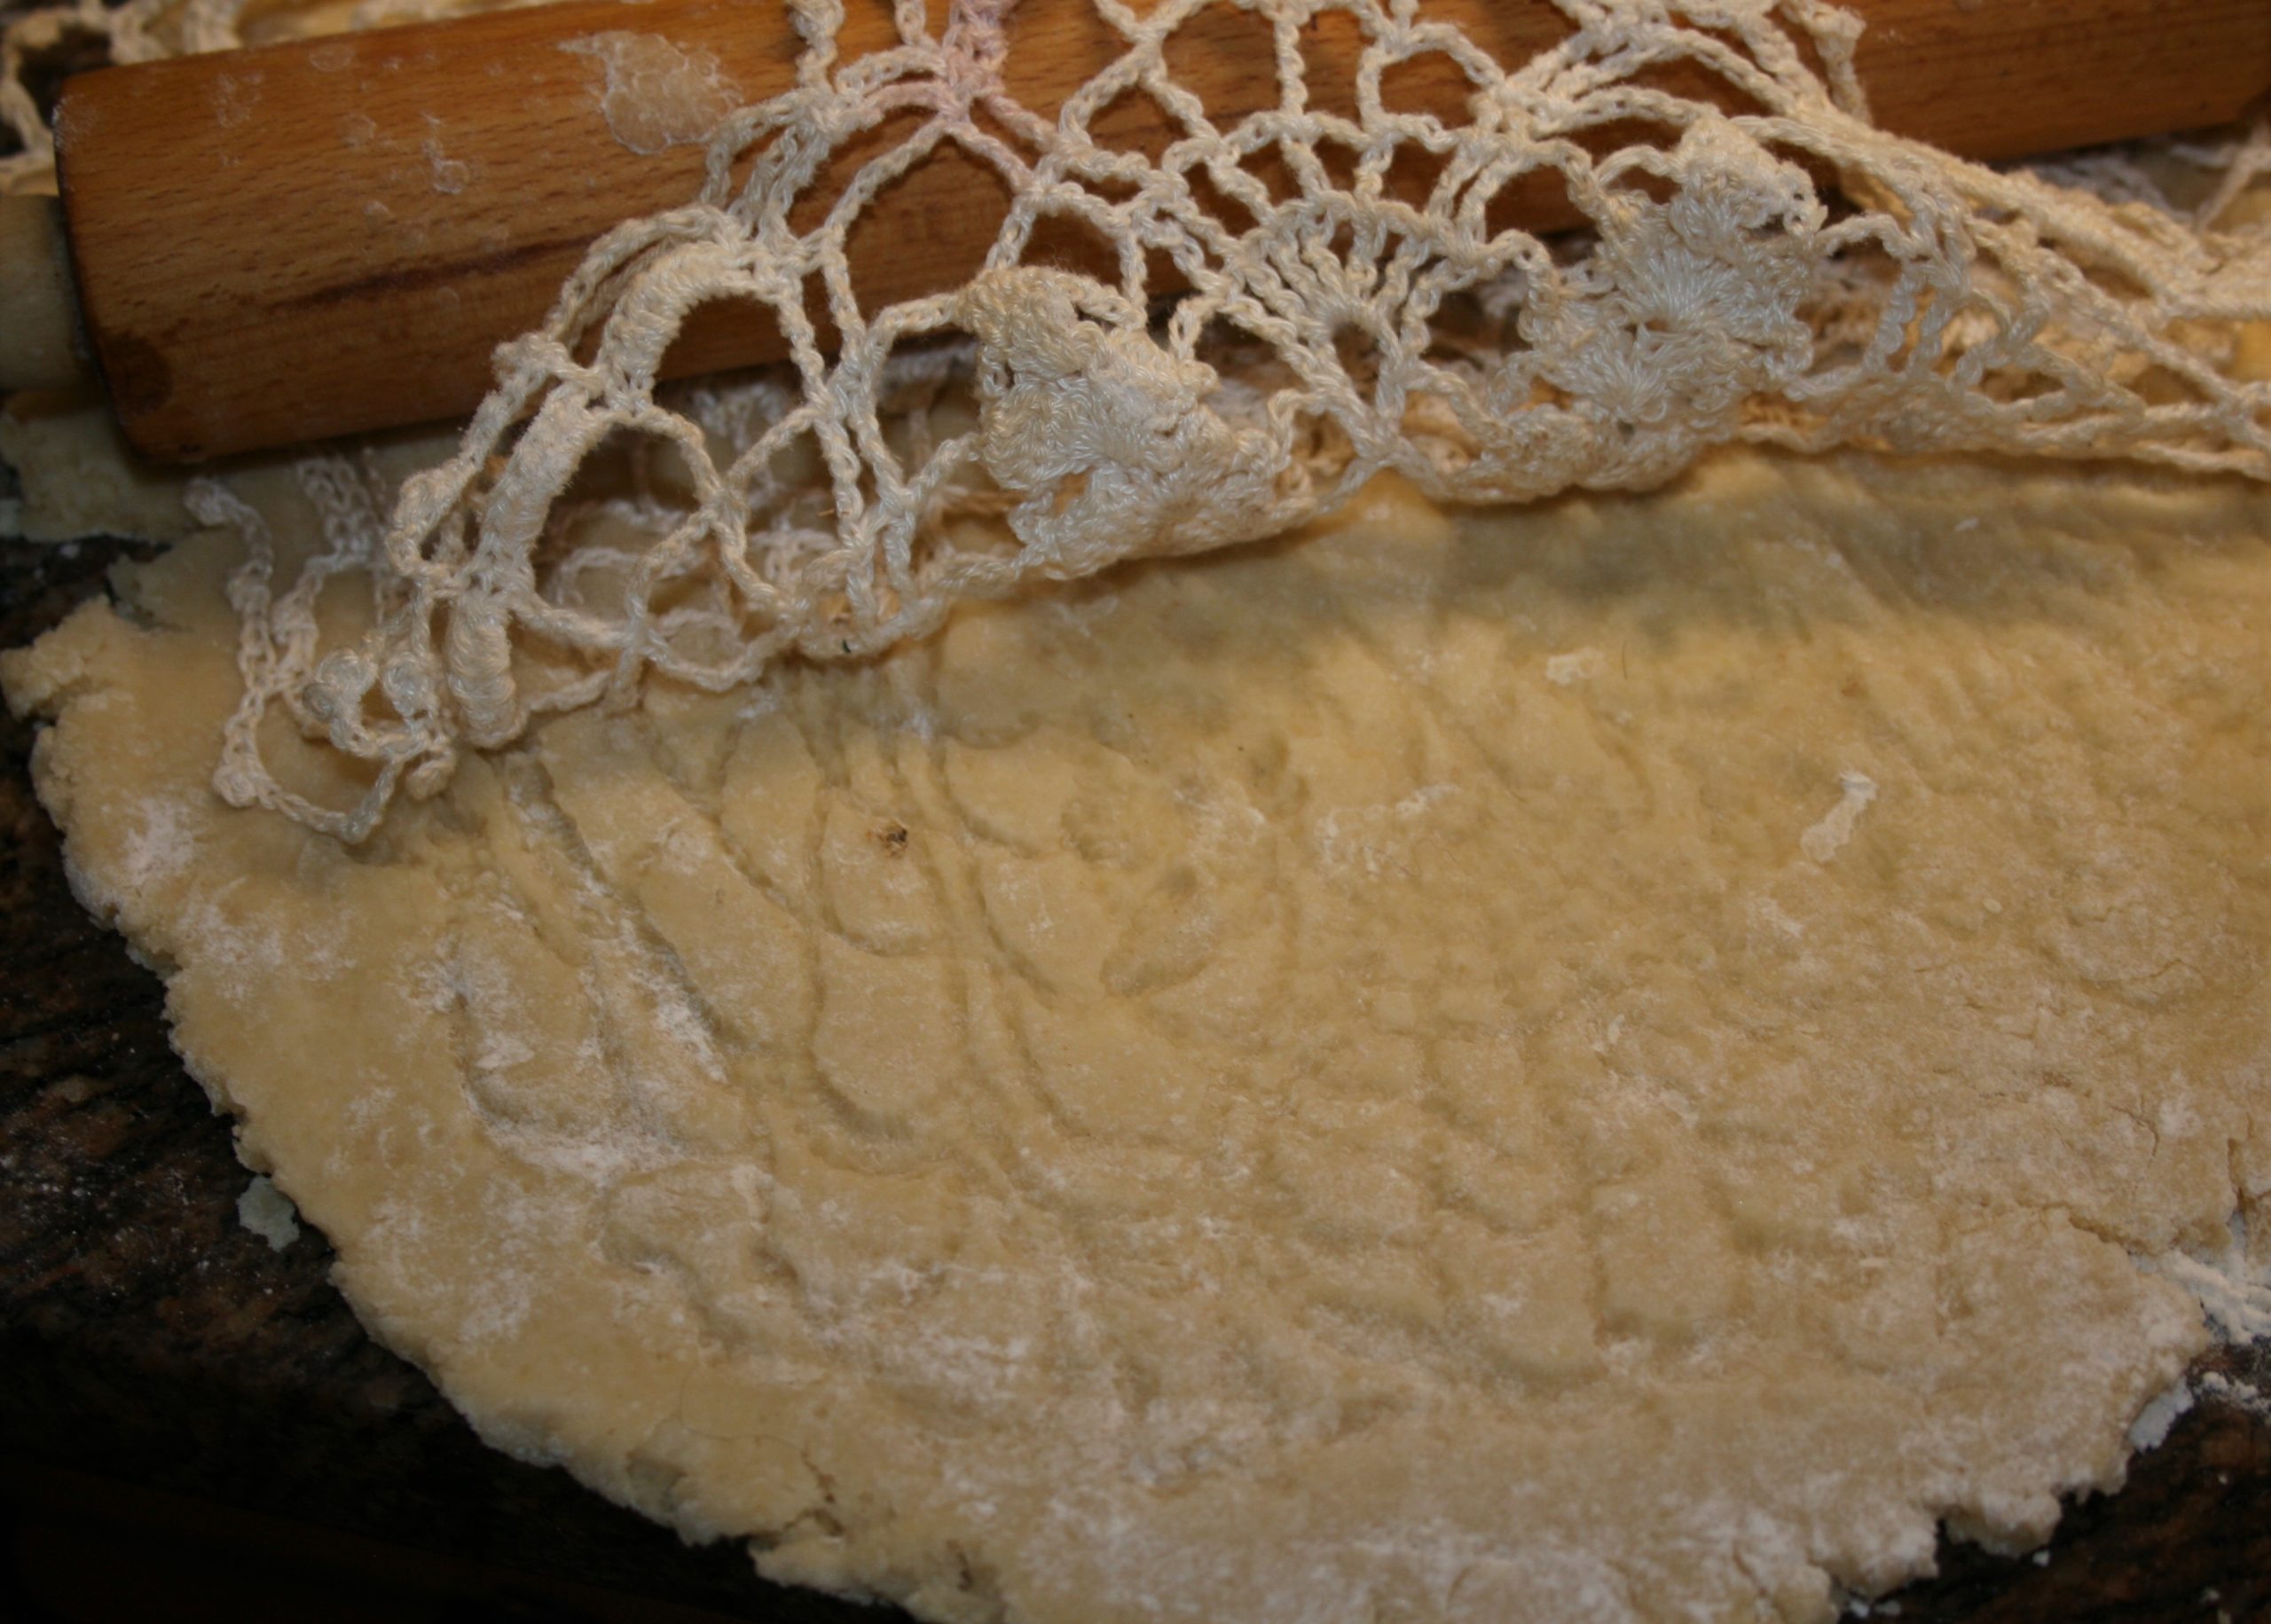
I have played with a couple of butter cookie recipes and found some quick, simple, short cuts that have made these my new go-to snacks. When I start rolling out my cookies, and they are ready to cut, I place a crochet doily over the top of the dough and work my rolling pin over it. This embosses the doily pattern into the fabric. I then take a pizza cutter and cut the dough in squares and bake.
I get to enjoy the doily design with my coffee in the morning. They look like I spent time and effort on them, and when really they are my simple pleasures.
Want to try them for yourself?
Emboss Crochet Butter Cookies
1 cup cold butter, cut into pieces
1 ½ cups powdered sugar
2 teaspoons vanilla
1 egg
3 ¾ cups flour
Preheat oven to 400°. Place all ingredients in food processor and turn on. Mix for about a minute, or until dough looks like sand, but when pressed sticks together. if it does not seem to come together well, add a little water about 1/2 teaspoon at a time, until it forms a dough.
Pour dough into a bowl or onto plastic wrap and form dough into a flat ball. Place in the refrigerator to chill, at least 10 minutes up to overnight.
Time to roll
Roll dough out to desired thickness (usually between ¼- ½ inches). Place clean doily over dough (you can also place a piece of plastic wrap between dough and doily, but keep it loose). Roll impression of doily into dough. Note: often you kitchen lighting does not show the texture very well, so get down to eye level to get a better look.
Rolling out embossing crochet cookies
Chilling helps embossing crochet
Cut dough into 2 inch squares (or desired shapes), and place on baking sheet (since the cookies do not spear, you can place many on the tray, close together). I usually get a few dozen squares. For best embossing, place cookies in refrigerator for 10 minutes to re-chill. Bake for 8-10 minutes. It may appear that the embossing is not as detailed, but let the cookies cool and the impression will become more visible.
You can use the same technique with any crochet pattern, on any rolled dough. However a cold dough helps keep the embossed image best. Image your next pie with a lace embossed top…it is definitely on my list to try.
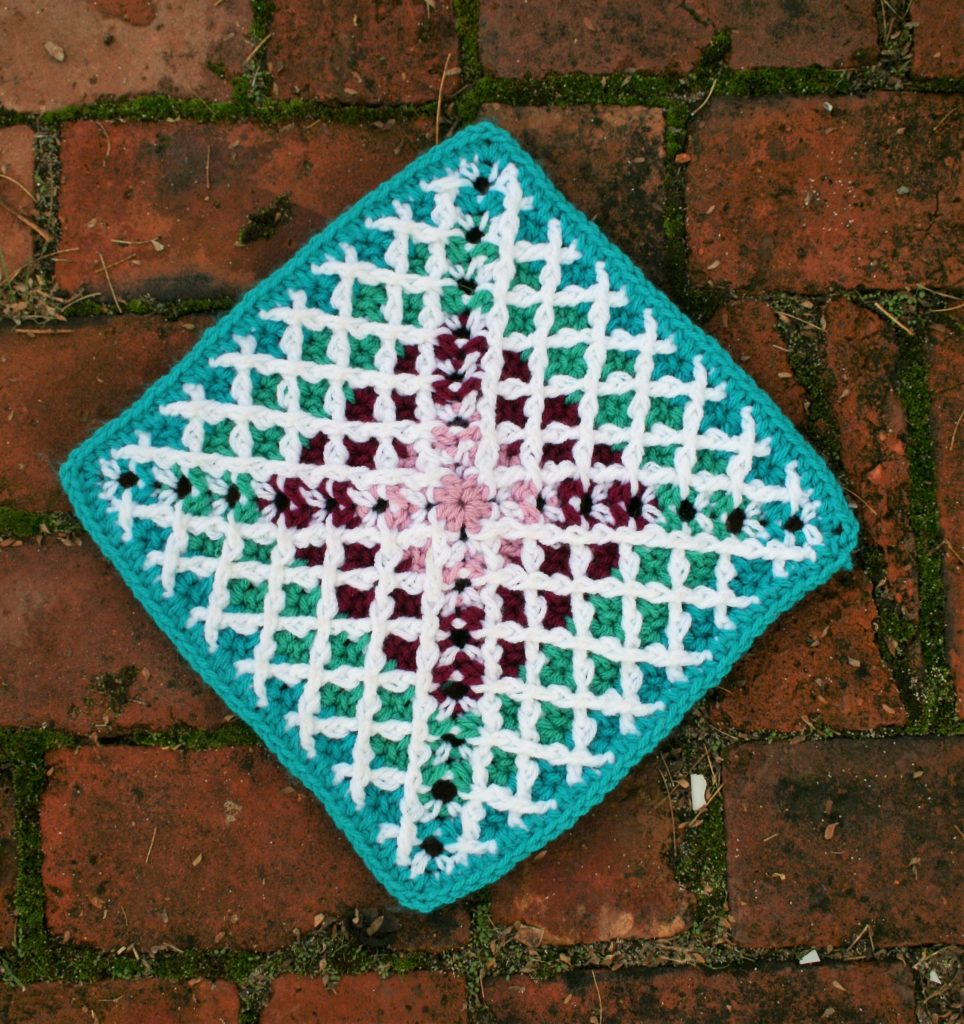
I feel really honored to be beginning the year by joining the Moogly CAL and I am sharing my Quilt Ladies Block! This is a great way to learn new skills and make an afghan over the year. Check out all the squares here.
This year my square was inspired by a couple of my students, “The Quilt Ladies”. Kim and Sandy, took up crochet a couple of years ago and have added it to their fiber arts tool box. Both avid quilters, they are active in their local quilt guild. With this background they bring their eye for color and detail to the skill of crochet.
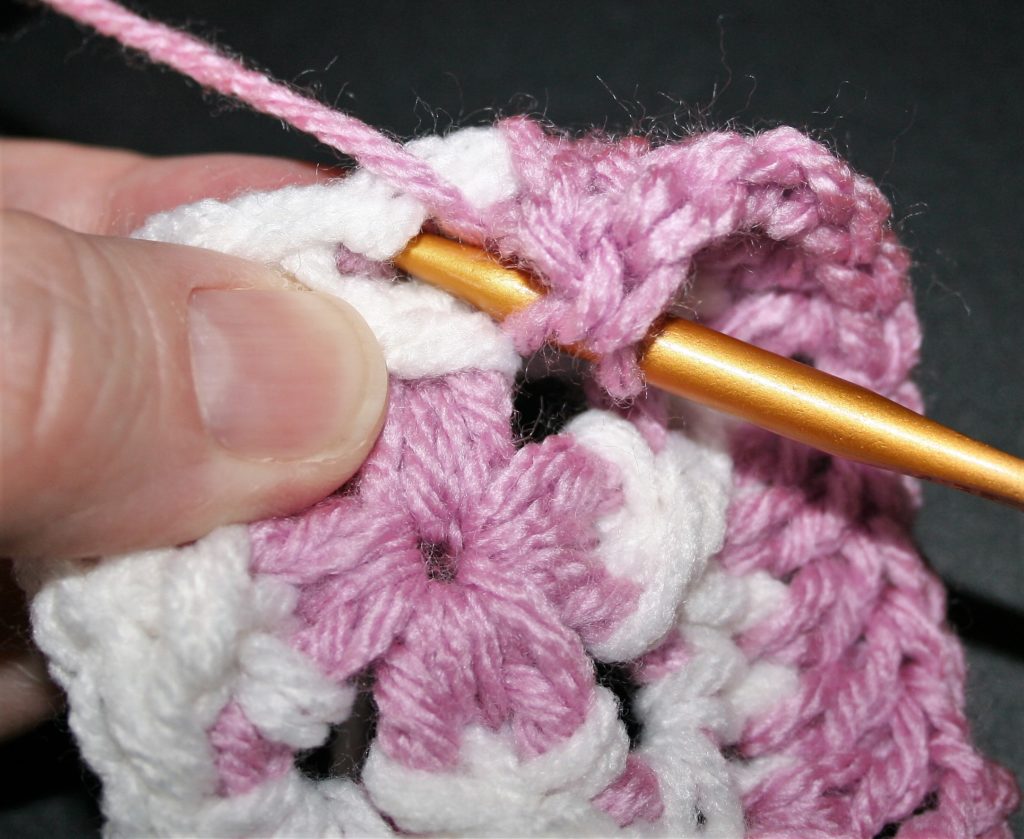
Quilt Ladies Block
The detail of crochet can really shine with these crossedpost stitches that are dramatically set off by a rainbow of colors behind really create a quilted effect, and memorable design.
Materials
Red Heart With Love medium weight 100% acrylic yarn
#1720 Blush(A),
#1001 White (B),
#1907 Boysenberry (C),
#1562 Jadeite (D),
#1304 Santorini (E)
Hook J/10/6.00mm
Gauge: 12”x 12” square (30.5 x 30.5cm)
Notes
All even number rows have crossed front post stitches.
All front post stitches that are worked in rows below current working row, are worked around other post stitches of the same color.
Slip stitches are worked between all post stitches.
To work over slip stitches in odd number rows, insert hook into same stitch location as slip stitch is worked. To keep even stitch height pull yarn loop up just slightly higher.
Count rows on the wrong side of work to aid in keeping track of location.
Weave in ends as you go.
Lets Get Started
Rnd 1: With A, ch 6, 3 dc in 6th ch from hook, [ch 2, 3 dc in same beg ch] 2 times, ch 2, 2 dc in same beg ch, sl st to join. Fasten off. -4 ch-2 sps (corners) -12dc
Quilt Ladies Block Row 1
Rnd 2: With B, join with a standing sc in any ch-2 sp, ch 2, sc in same sp, sk next 2 dc, fpdc around next st, sl st in st just before st worked, fpdc in 1st sk st, [(sc, ch 2, sc) in ch-2 sp, sk next 2 dc, fpdc around next st, sl st in st just before st worked, fpdc in 1st sk st] 3 times, sl st to join. Fasten off. – 4 crossed fptr/fpdc sts, 4 sl st, 8 sc
Row 2, skipping stitches to create the first leg of the crossRow 2, working in the first skipped stitch, creating the crossFinished Row 2
Notice we are back to the first color of the Quilt Ladies Block
Rnd 3: With A, join with standing dc in any ch-2 corner sp, ch 2, dc in same sp, dc in next 2 sts, working over sl st dc in next st, dc in next 2 sts, [(dc, ch 2, dc) in ch-2 sp, dc in next 2 sts, working over sl st dc in next st, dc in next 2 sts] 3 times, sl st to join. Fasten off. -28dc
Row 3, working over the slip stitchRow 3, pulling to the loop of the stitch that is working over the slip stitchFinished Row 3
Changing to the Main Color…
Rnd 4: With B, join with a standing sc in any ch-2 sp, ch 2, sc in same sp, sk next 2 dc, fptr around post st 2 rows below, sl st in st just before st worked, fpdc in 1st sk st, sl st in next unworked st, sk next 2 dc, fpdc around next st, sl st in st just before st worked, fptr around post st 2 rows below and behind current st,[(sc, ch 2, sc) in ch-2 sp, sk next 2 dc, fptr around post st 2 rows below, sl st in st just before st worked, fpdc in 1st sk st, sl st in next unworked st, sk next 2 dc, fpdc around next st, sl st in st just before st worked, fptr around post st 2 rows below and behind current st] 3 times, sl st to join. Fasten off. – 8 crossed fptr/fpdc sts, 12 sl st, 8 sc
Row 4 skipping stitches and working post stitchRow 4, the completion of 1 side of the squareFinished Row 4
We are working on the background
Rnd 5: With C, join with standing dc in any ch-2 corner sp, ch 2, dc in same sp, dc in next 2 sts, [working over sl st dc in next st, dc in next st,] 3 times, dc in next st , {(dc, ch 2, dc) in ch-2 sp, dc in next 2 sts, [working over sl st dc in next st] 3 times, dc in next st} 3 times, sl st to join. Fasten off. -44dc
Finished Row 5
NOTE…here is a slightly different way to explain how to skip stitches…but with the same concept
Rnd 6: With B, join with a standing sc in any ch-2 sp, ch 2, sc in same sp, sk next 2 dc, fptr around post st 2 rows below, sl st in 2nd skpd dc, fpdc in 1st sk st, sk 1 dc, sl st in next unworked st, sk next 2 dc, fptr around next post st 2 rows below, sk 1 dc, sl st in next dc, fptr around post st 2 rows below and behind current st, sk next dc, sl st in next unworked st, sk 2 sts, fpdc around last dc, sl st in st just before st worked, fptr around post 2 rows below and behind current st, [(sc, ch 2, sc) in ch-2 sp, sk next 2 dc, fptr around post st 2 rows below, sl st in 2nd skpd st, fpdc in 1st sk st, sk 1 dc, sl st in next unworked st, sk next 2 dc, fptr around next post st 2 rows below, sk 1 dc, sl st in next dc, fptr around post st 2 rows below and behind current st, sk next dc, sl st in next unworked st, sk 2 sts, fpdc around last dc, sl st in st just before st worked, fptr around post 2 rows below and behind current st,] 3 times, sl st to join. Fasten off. -4 crossed fptr sts, 8 crossed fptr/fpdc sts, 20 sl st, 8 sc
Finished Row 6
Working on the background again
Rnd 7: With C, join with standing dc in any ch-2 corner sp, ch 2, dc in same sp, dc in next 2 sts, [working over sl st dc in next st, dc in next st,] 5 times, dc in next st , {(dc, ch 2, dc) in ch-2 sp, dc in next 2 sts, [working over sl st dc in next st, dc in next st] 5 times, dc in next st} 3 times, sl st to join. Fasten off. -60dc
Finished Row 7
Back to the row of crossed stitches
Rnd 8: With B, join with a standing sc in any ch-2 sp, ch 2, sc in same sp, sk next 2 dc, fptr around post st 2 rows below, sl st in 2nd skpd dc, fpdc in 1st sk st, sk 1 dc, sl st in next unworked st, sk next 2 dc, [fptr around next post st 2 rows below, sk 1 dc, sl st in next dc, fptr around post st 2 rows below and behind current st, sk next dc, sl st in next unworked st, sk 2 sts] 2 times, fpdc around last dc, sl st in st just before st worked, fptr around post 2 rows below and behind current st, {(sc, ch 2, sc) in ch-2 sp, sk next 2 dc, fptr around post st 2 rows below, sl st in 2nd skpd st, fpdc in 1st sk st, sk 1 dc, sl st in next unworked st, sk next 2 dc, [fptr around next post st 2 rows below, sk 1 dc, sl st in next dc, fptr around post st 2 rows below and behind current st, sk next dc, sl st in next unworked st, sk 2 sts] 2 times, fpdc around last dc, sl st in st just before st worked, fptr around post 2 rows below and behind current st,} 3 times, sl st to join. Fasten off. -8 crossed fptr sts, 8 crossed fptr/fpdc sts, 28 sl st, 8 sc
Finished Row 8
A New Color
Rnd 9: With D, join with standing dc in any ch-2 corner sp, ch 2, dc in same sp, dc in next 2 sts, [working over sl st dc in next st, dc in next st,] 7 times, dc in next st , {(dc, ch 2, dc) in ch-2 sp, dc in next 2 sts, [working over sl st dc in next st, dc in next st] 7 times, dc in next st} 3 times, sl st to join. Fasten off. -76dc
Finished Row 9
We return to the same pattern of crossed stitches
Rnd 10: With B, join with a standing sc in any ch-2 sp, ch 2, sc in same sp, sk next 2 dc, fptr around post st 2 rows below, sl st in 2nd skpd dc, fpdc in 1st sk st, sk 1 dc, sl st in next unworked st, sk next 2 dc, [fptr around next post st 2 rows below, sk 1 dc, sl st in next dc, fptr around post st 2 rows below and behind current st, sk next dc, sl st in next unworked st, sk 2 sts] 3 times, fpdc around last dc, sl st in st just before st worked, fptr around post 2 rows below and behind current st, {(sc, ch 2, sc) in ch-2 sp, sk next 2 dc, fptr around post st 2 rows below, sl st in 2nd skpd st, fpdc in 1st sk st, sk 1 dc, sl st in next unworked st, sk next 2 dc, [fptr around next post st 2 rows below, sk 1 dc, sl st in next dc, fptr around post st 2 rows below and behind current st, sk next dc, sl st in next unworked st, sk 2 sts] 3 times, fpdc around last dc, sl st in st just before st worked, fptr around post 2 rows below and behind current st,} 3 times, sl st to join. Fasten off. -12 crossed fptr sts, 8 crossed fptr/fpdc sts, 36 sl st, 8 sc
Finished Row 10
Setting more background
Rnd 11: With D, join with standing dc in any ch-2 corner sp, ch 2, dc in same sp, dc in next 2 sts, [working over sl st dc in next st, dc in next st,] 9 times, dc in next st , {(dc, ch 2, dc) in ch-2 sp, dc in next 2 sts, [working over sl st dc in next st, dc in next st] 9 times, dc in next st} 3 times, sl st to join. Fasten off. -92dc
Finished Row 11
Are you seeing a pattern…
Row 12: With B, join with a standing sc in any ch-2 sp, ch 2, sc in same sp, sk next 2 dc, fptr around post st 2 rows below, sl st in 2nd skpd dc, fpdc in 1st sk st, sk 1 dc, sl st in next unworked st, sk next 2 dc, [fptr around next post st 2 rows below, sk 1 dc, sl st in next dc, fptr around post st 2 rows below and behind current st, sk next dc, sl st in next unworked st, sk 2 sts] 4 times, fpdc around last dc, sl st in st just before st worked, fptr around post 2 rows below and behind current st, {(sc, ch 2, sc) in ch-2 sp, sk next 2 dc, fptr around post st 2 rows below, sl st in 2nd skpd st, fpdc in 1st sk st, sk 1 dc, sl st in next unworked st, sk next 2 dc, [fptr around next post st 2 rows below, sk 1 dc, sl st in next dc, fptr around post st 2 rows below and behind current st, sk next dc, sl st in next unworked st, sk 2 sts] 4 times, fpdc around last dc, sl st in st just before st worked, fptr around post 2 rows below and behind current st,} 3 times, sl st to join. Fasten off. -16 crossed fptr sts, 8 crossed fptr/fpdc sts, 44 sl st, 8 sc
Finished Row 12
Another new color
Row 13: With E, join with standing dc in any ch-2 corner sp, ch 2, dc in same sp, dc in next 2 sts, [working over sl st dc in next st, dc in next st,] 11 times, dc in next st , {(dc, ch 2, dc) in ch-2 sp, dc in next 2 sts, [working over sl st dc in next st, dc in next st] 11 times, dc in next st} 3 times, sl st to join. Fasten off. –108 dc
Finished Row 13
More main color crossed stitches
Row 14: With B, join with a standing sc in any ch-2 sp, ch 2, sc in same sp, sk next 2 dc, fptr around post st 2 rows below, sl st in 2nd skpd dc, fpdc in 1st sk st, sk 1 dc, sl st in next unworked st, sk next 2 dc, [fptr around next post st 2 rows below, sk 1 dc, sl st in next dc, fptr around post st 2 rows below and behind current st, sk next dc, sl st in next unworked st, sk 2 sts] 5 times, fpdc around last dc, sl st in st just before st worked, fptr around post 2 rows below and behind current st, {(sc, ch 2, sc) in ch-2 sp, sk next 2 dc, fptr around post st 2 rows below, sl st in 2nd skpd st, fpdc in 1st sk st, sk 1 dc, sl st in next unworked st, sk next 2 dc, [fptr around next post st 2 rows below, sk 1 dc, sl st in next dc, fptr around post st 2 rows below and behind current st, sk next dc, sl st in next unworked st, sk 2 sts] 5 times, fpdc around last dc, sl st in st just before st worked, fptr around post 2 rows below and behind current st,} 3 times, sl st to join. Fasten off. -20 crossed fptr sts, 8 crossed fptr/fpdc sts, 52 sl st, 8 sc
Finished Row 14
We finish up…
Row 15: With E, join with standing hdc in any ch-2 corner sp, ch 2, hdc in same sp, hdc in next 2 sts, [working over sl st hdc in next st, hdc in next st,] 13 times, hdc in next st , {(hdc, ch 2, hdc) in ch-2 sp, hdc in next 2 sts, [working over sl st hdc in next st, hdc in next st] 13 times, hdc in next st} 3 times, sl st to join. Fasten off. -124 hdc
There are days I need to get into a rhythm with my crochet and the continuous granny square helps me do that.
It does not require counting. It does not require joining, it just keeps going in a spiral. This is prefect for creating scrap squares, of entire scrap blankets.
What I like most is that I do not have to think about the motion of my hands. Anytime I reach a corner, I put in a corner, any time I find a side, I work a side. It really is that simple.
Where I found this technique
I learned about this square judging a “Fastest Hook” competition at a CGOA conference. The continuous granny square was worked by all participants, as it really does lend itself to speed.
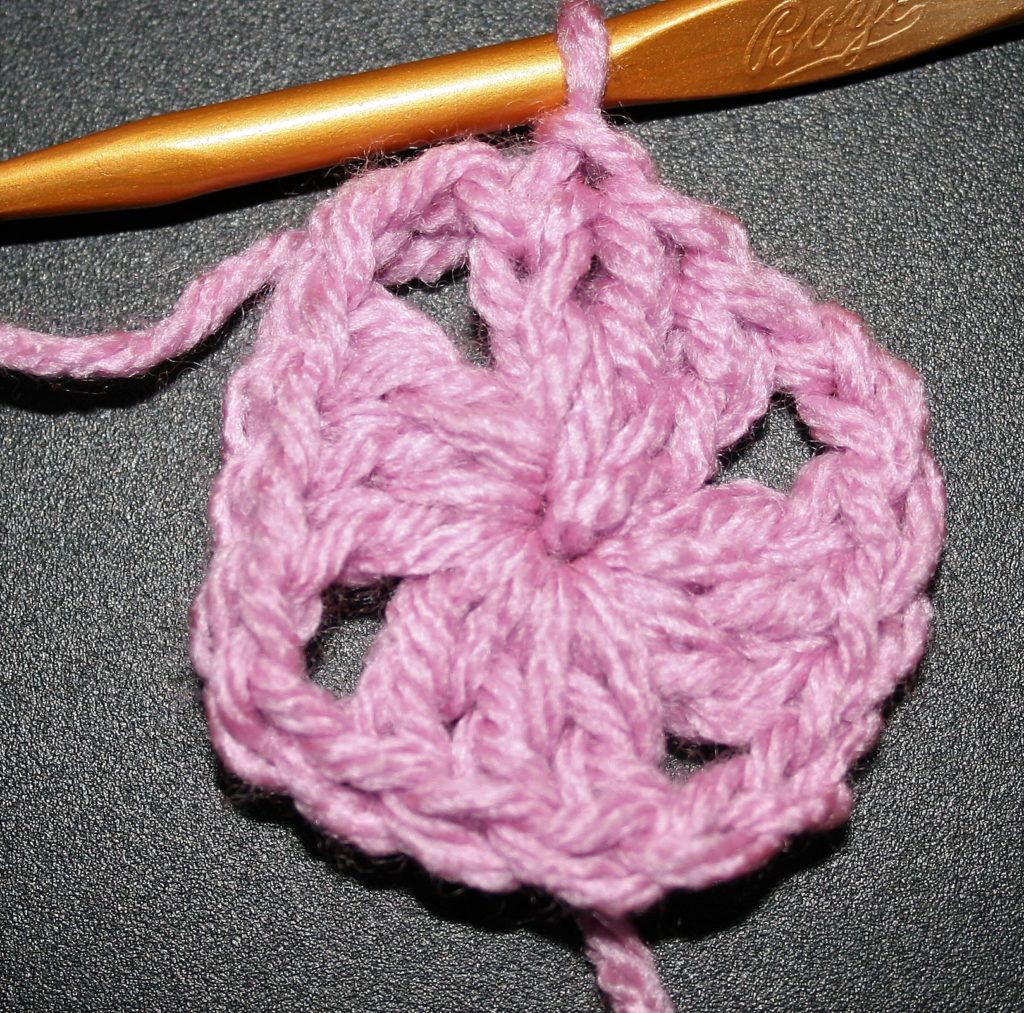
A Continuous Granny Square
To make it all you have to do is start the beginning of a circle just like you always would. The first round of a granny squares as 4 sides made up of 3dc each, and 4 corners. The last corner is worked differently creating the spiral.
Lets get started
Round 1: Ch 4, 2 dc in 4th ch from hook, [ch 3, 3 dc in same ch] 3 times, ch 6. DO NOT JOIN ROUND
The four side of Round 1 Chain 6 and skip the join, work into the next corner
Round 2: Skip over the next 3 dc, and [(3dc, ch 3, 3dc) in next ch-3 sp (corner made), ch 3] rep 3 times, (3dc, ch 3, 3dc) in ch-6 sp, ch 3. DO NOT JOIN ROUND
Worked with scrap yarn…worked a corner into the ch-6 sp, to finish Round 2.
To work all subsequent rounds, work a corner (3dc, ch 3, 3dc) in a corner, work 3 dc a side in ch-3 sp, and make sure that you ch 3 between all blocks. It is that easy.
For a visual chart reference….
To help ensure that you end with an actual square, I mark the ch-6 sp, as this is the same corner of the square that I would end at to have even sides.
At finishing, I will work the beginning tail up the side of a dc at the ch-6 sp and make a connection between the 2 un-joined sides in Round 1. This ties it all together and makes it look like traditional granny squares.
As we enter a New Year, I always find myself reflecting on the previous 12 months. This time I found some interesting understandings that I had overlooked; disconnect between my head and my hands.
With the constantly changing dynamics of 2020 I needed to keep my hands busy. I needed to keep a rhythm and flow of yarn in my hand, yet I had difficulty designing. My mind did not want to count stitches. It did not want to think of stitch patterns or colorways. My mind did not want to plan, my hands just wanted to move.
What I realized is something that has always been part of me, that I am most creative when I am calm. This was something that was constantly in peril in the last several months. I have been mentally juggling various situations in various days. Handling the changes of focus that have been tossed my way daily has made its effect, as most of the designs that I released in my pattern line have been designs that I had designed earlier.
However, I have been finding a new way to focus artistically. I have been rediscovering things that inspired me as a child. I stumbled across various little trinkets that had held my attention when I was younger. A couple of mismatched barrettes that I always thought were so pretty. A picture on a playing card, just a couple of kittens, but the monochromatic feel always captivated me. Even some fabric that my mom had purchased to make me a sundress. The dress was never made, but I always smiled when seeing the little rows of yellow roses.
This has helped me feel grounded. I still may not feel like my designing muscles are ready to fully flex, but at least I feel like there is a way to calm my mind for an artistic focus…so maybe I can find a happy medium between my head and my hands.