There are times when crochet shares a perspective that I was
not aware existed. I was invited to join an on-line conference call of crochet enthusiasts
recently, and as I was sitting back and listening to the discussions, I was
struck by a topic I had never considered. The heritage of a pattern, and how it
connects us to others.
This particular topic was around a pattern for a pot holder.
Some Stories of Connection
I listened to a story of how a learned family pattern has
continued through generations. How even after the legacy of the pattern has
passed the skill is picked up by another and still being created and shared
throughout the family. Connecting multiple
generations and family tree branches, as so many had memories of this one pot
holder pattern that was created by the family matriarch.
I heard another regarding a very similar pot holder pattern
and how it was the captivating project that encouraged them to further their
own crochet skills so as to create the pattern themselves.
Still more was the eagerness of others to learn this pattern
to make the same connections with family and each other.
My Take Aways
I was in awe of how one simple pattern was connecting all of
these people, and how they shared that it was a connection throughout those
that they love.
Everyone may not crochet, but the legacy of a simple crochet
pattern has connected these families. That to me is mesmerizing, as I have no
connection to those in my family that crocheted before me. I may have some
hooks that belonged to my great-grandmother, but I never met her, I have never
seen any of her handiwork. There are no family patterns in my family that holds
these vivid memories for me, but it a wonderful to know that these exist of
others, and I feel honored to have heard their stories.
If you want to create attempt this legacy potholder, below is a similar pattern to those that were engaging the memories of others. I have used this pattern for several years to help new crocheters practice their skills.
Free Pattern
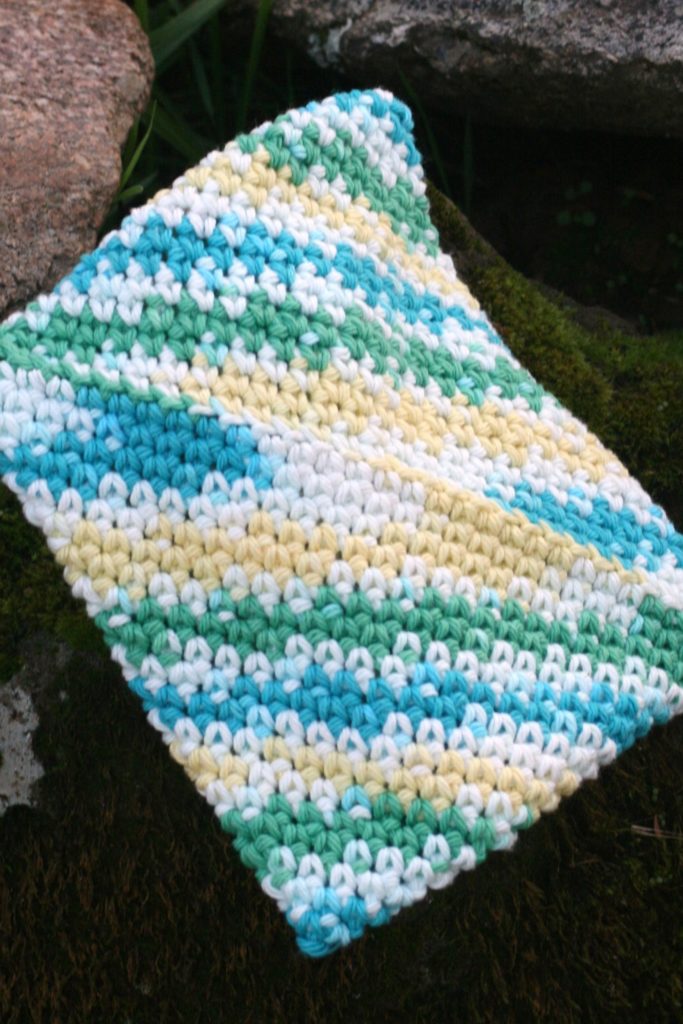
Diagonal Corners Pot Holder
Diagonal Corners Pot Holder
Materials List
Size J/10/6.0mm hook
Approximately 90yd of medium weight yarn, sample used: Lily Sugar’n Cream medium weight 100% USA Grown Cotton yarn (2oz/56.7g/95yrd/86m), 1 skein color# 102002 Mod Ombre
Removable Stitch Marker
Tapestry Needle
Details
Finished measurements: 7”x 6.5”
Gauge: is not critical for this project
Getting Started
Rnd1: Ch 30, 3sc in 2nd ch from hook, sc in next 27 ch, 3 sc in last ch, working in back loops of beg ch, sc in next 27 ch.
Rnd 2: Without joining, work sc in next 2 sts, insert stitch marker in last st created, sc in each st around to marker.
Rnds 3-18: Sc in each st around.
Finishing
Leaving a long tail, cut yarn and pull through loop on hook. (Finished off.) Fold the edges of round 18 together to allow pot holder to lay flat. Thread tapestry needle through long tail and weave through both sides of Round 18, sewing seam together. Weave ends in.
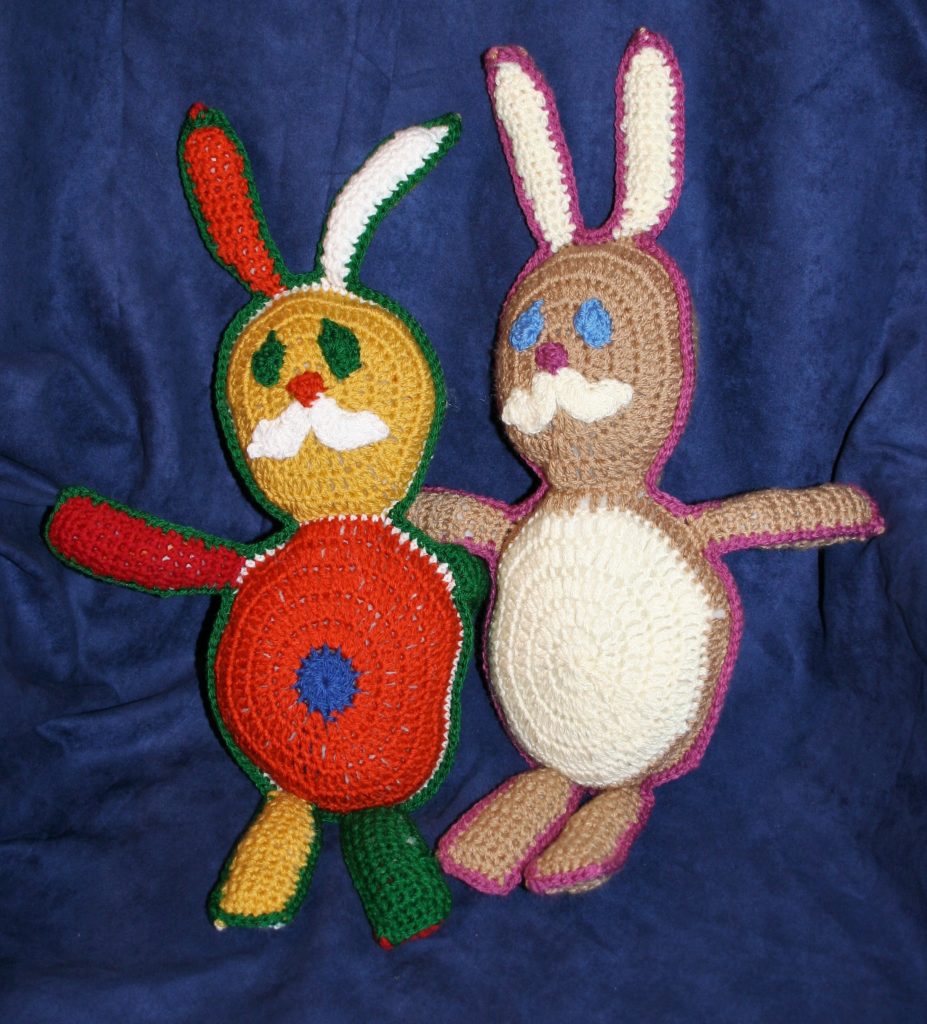
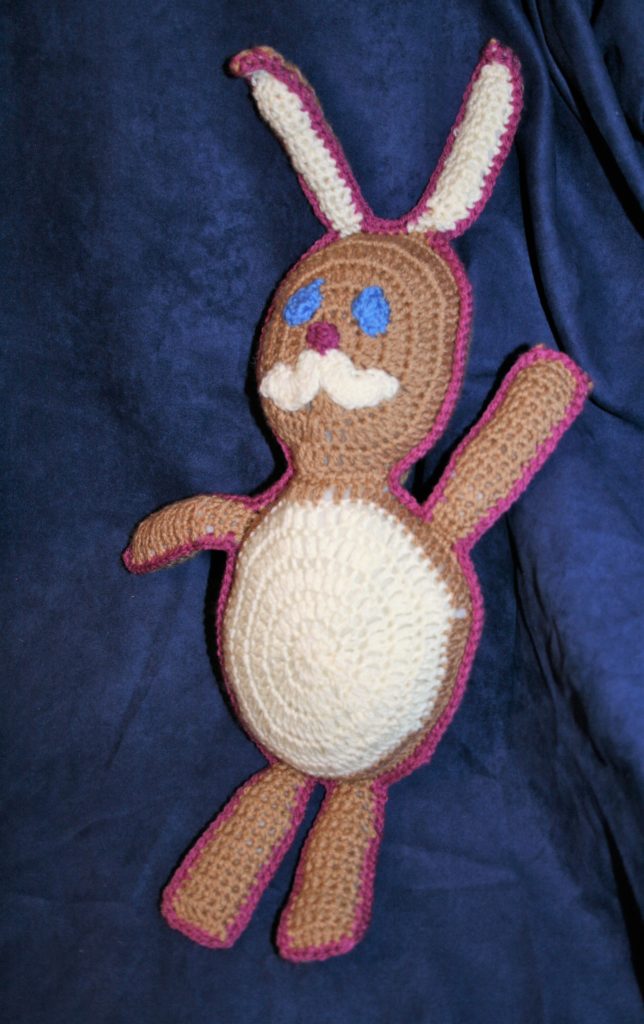
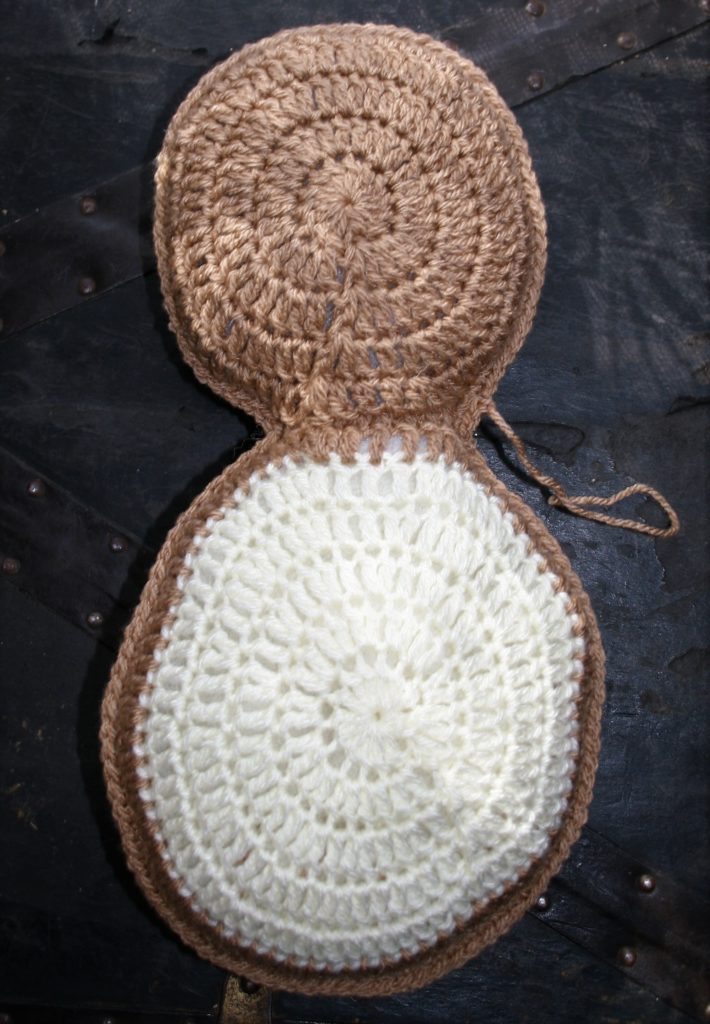
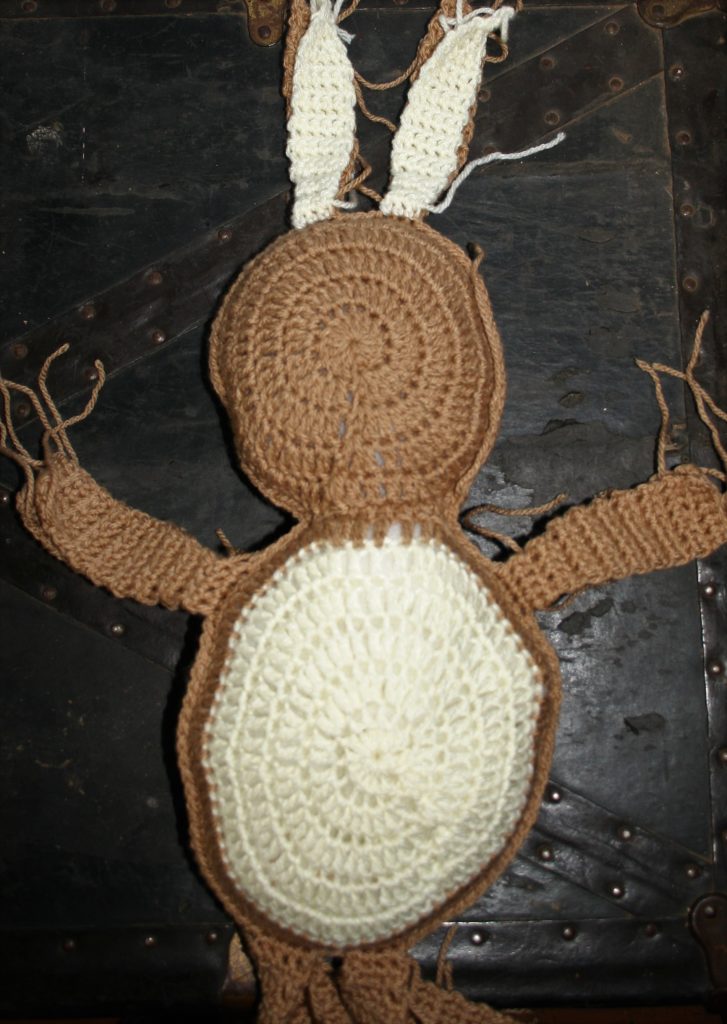
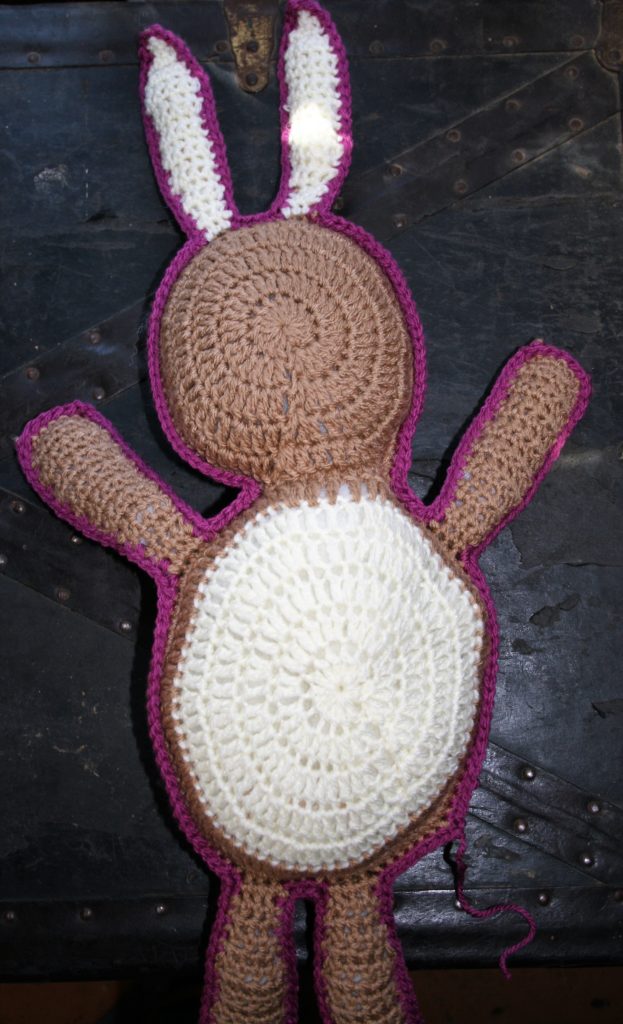
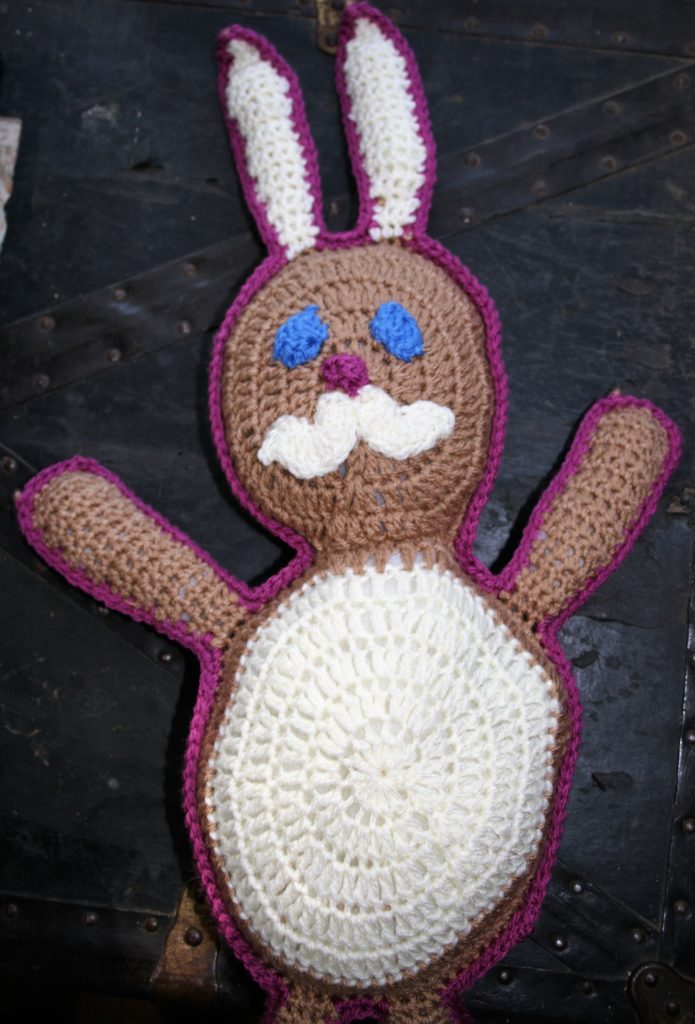
I have always had a soft spot for Rabbits, and as such I have always loved this time of year as it brings out Easter Bunnies everywhere. I have created a simple free pattern for a toy bunny, that might be just perfect for a little one in your life. This is an amigurumi for the beginner, as it has minimal shaping, I like the rustic charm.
Jack the Scrap Rabbit and Jack the Rabbit
This free pattern is part of the 2020 Softie CAL! There are many great designs to keep you inspired, check all of them out here. Also, don’t miss the giveaways.
Materials
Lion Brand Basic Stitch Premium 100% acrylic medium weight yarn (3.5 oz/100g/219yd/200m) colors: MC-#126 Goldmine, CC1-#98 Cream, CC2-#142 Boysenberry, CC3- #109 Coastal (OR, make a Scrap Jack, by using any medium weight yearn on hand)
Poly-Fils Crafters Choice Dry Polyester Packing Fiber Fill
G/6/4.25mm crochet hook
Note…Save your time weaving in ends. Instead of weaving in ends, simply push the ends to the wrong side of the fabric, when seaming and stuffing ensure that the ends are with the stuffing.
Round 2: Ch 3, dc
in same st, 2 dc in each st around, sl st to join. -28dc
Round 3: Ch 3, dc
in same st, dc in next st, [2 dc in next st, dc in next st] around, sl st to
join. -42 dc
Round 4: Ch 3, dc
in same st, dc in next 2 sts, [2 dc in next st, dc in next 2 sts] around, sl st
to join. -56 dc
Round 5: Ch 3, dc
in same st, dc in next 3 sts, [2 dc in next st, dc in next 3 sts] around, sl st
to join. Fasten off. -70 dc
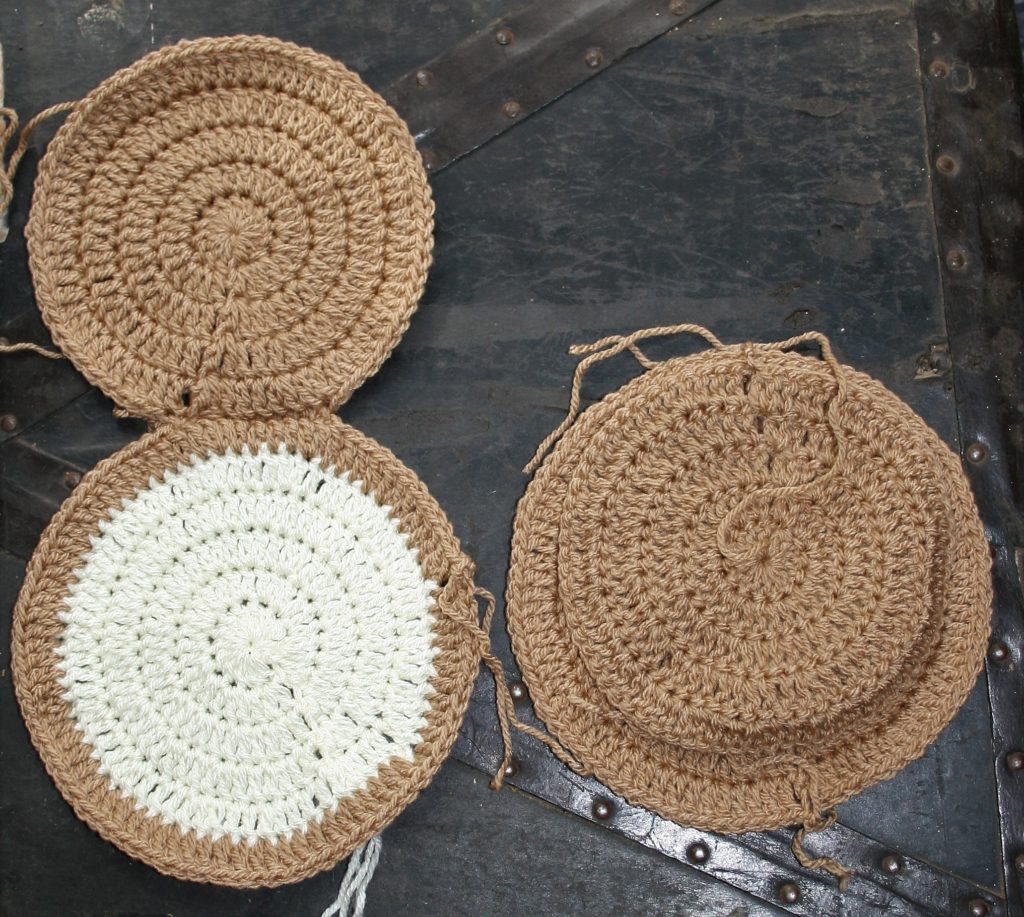
Back (Make 1)
Round 1: With MC,
Magic Loop, ch 3, 13 dc in loop, pull loop closed, sl st to top of beg ch. -14
dc
Round 2: Ch 3, dc
in same st, 2 dc in each st around, sl st to join. -28dc
Round 3: Ch 3, dc
in same st, dc in next st, [2 dc in next st, dc in next st] around, sl st to
join. -42 dc
Round 4: Ch 3, dc
in same st, dc in next 2 sts, [2 dc in next st, dc in next 2 sts] around, sl st
to join. -56 dc
Round 5: Ch 3, dc
in same st, dc in next 3 sts, [2 dc in next st, dc in next 3 sts] around, sl st
to join. -70 dc
Round 6: Ch 3, dc
in same st, dc in next 4 sts, [2 dc in next st, dc in next 4 sts] around, sl st
to join. Fasten Off. -84 dc
Belly (Make 1)
Round 1: With CC1,
Magic Loop, ch 3, 13 dc in loop, pull loop closed, sl st to top of beg ch. -14
dc
Round 2: Ch 3, dc
in same st, 2 dc in each st around, sl st to join. -28dc
Round 3: Ch 3, dc
in same st, dc in next st, [2 dc in next st, dc in next st] around, sl st to
join. -42 dc
Round 4: Ch 3, dc
in same st, dc in next 2 sts, [2 dc in next st, dc in next 2 sts] around, sl st
to join. -56 dc
Round 5: Ch 3, dc
in same st, dc in next 3 sts, [2 dc in next st, dc in next 3 sts] around, sl st
to join, change to MC. -70 dc
Round 6: Ch 3, dc
in same st, dc in next 4 sts, [2 dc in next st, dc in next 4 sts] around, sl st
to join. Fasten Off. -84 dc
Two heads, a Belly and a Back
Joining Head to Body
With Right sides facing each other, stack 1 Head on the
Back, working through stitches of both fabrics, sl st in 10 stitches. Repeat
with last Head and Belly.
Join a head to a body, with rights sides facing each other when joining.
With Wrong Sides facing each other, stack the 2 sides on top
of each other, working through stitches of both fabrics, sc around the entire
outer edge of sides, filling with poly-fil before completely finishing. (Tip:
Begin joining near neck to ensure that the neck of both sides matchup)
Putting the wrong sides facing each other of head/body seam the body together and stuff it as you go.
Arms/Legs
Working in the joining round of Head and Body, find your
personal placement for 2 legs and 2 arms. You will work a front side and back
side of each, and these will be seamed together in the final steps.
Front Side
Row 1: With MC, working
in front loop, sc in 4 sts, turn. -4 sc
Row 2 & 3: Ch
1, sc in each st across, turn. -4 sc
Row 4: Ch 1, 2 sc
in first st, sc in each st across, turn. -5 sc
Row 5: Ch 1, sc
in each st across, turn. -5 sc
Row 6: Ch 1, 2 sc
in first st, sc in each st across, turn. -6 sc
Row 7-18: Ch 1,
sc in each st across, turn. Fasten off at the end of Row 18.
Back Side
Row 1: With MC, working
in back loop, sc in 4 sts, turn. -4 sc
Row 2 & 3: Ch
1, sc in each st across, turn. -4 sc
Row 4: Ch 1, 2 sc
in first st, sc in each st across, turn. -5 sc
Row 5: Ch 1, sc
in each st across, turn. -5 sc
Row 6: Ch 1, 2 sc
in first st, sc in each st across, turn. -6 sc
Row 7-18: Ch 1,
sc in each st across, turn. Fasten off at the end of Row 18.
Ears
Working in the joining round of Head find your personal placement for 2 ears. You will work a front side and back side of each, and these will be seamed together in the final steps.
Special Stitches
Single Crochet Two Together (sc3tog): Insert hook into indicated stitch, yo, pull through a loop, insert hook into next stitch, yo, pull through a loop, yo, pull through all 3 loops on hook.
Single Crochet Three Together (sc3tog): Insert hook into indicated stitch, yo, pull through a loop, [insert hook into next stitch, yo, pull through a loop] twice, yo, pull through all 4 loops on hook.
Front Side
Row 1: With CC1, working
in front loop, sc in 3 sts, turn. -3 sc
Row 2 & 3: Ch
1, sc in each st across, turn. -3 sc
Row 4: Ch 1, 2 sc
in first st, sc in each st across, turn. -4 sc
Row 5: Ch 1, sc
in each st across, turn. -4 sc
Row 6: Ch 1, 2 sc
in first st, sc in each st across, turn. -5 sc
Row 7-15: Ch 1,
sc in each st across, turn. -5 sc
Row 16: Ch 1, sc2tog, sc in next st, sc2tog, turn. – 2 sc2tog, 1 sc
Row 17: Ch 1, sc
in each st across, turn. -3 sc
Row 18: Ch 1,
sc3tog, turn. -1 sc3tog
Row 19: Ch 1, sc
in only st, fasten off.
Back Side
Row 1: With MC, working
in back loop, sc in 3 sts, turn. -3 sc
Row 2 & 3: Ch
1, sc in each st across, turn. -3 sc
Row 4: Ch 1, 2 sc
in first st, sc in each st across, turn. -4 sc
Row 5: Ch 1, sc
in each st across, turn. -4 sc
Row 6: Ch 1, 2 sc
in first st, sc in each st across, turn. -5 sc
Row 7-15: Ch 1,
sc in each st across, turn. -5 sc
Row 16: Ch 1,
sc2tog, sc in next st, sc2tog, turn. – 2 sc2tog, 1 sc
Row 17: Ch 1, sc
in each st across, turn. -3 sc
Row 18: Ch 1,
sc3tog, turn. -1 sc3tog
Row 19: Ch 1, sc
in only st, fasten off.
Working two side of each arm/leg/ear, join to the seam of the body. One side in a front loop, one side in a back loop.
Seaming All Arms/Legs/Ears
With CC2, join to any edge seam of body or head, sc in each
st across to next arm/leg/ear, working through both fabrics, evenly sc in ends
of rows and stitches, filling with poly-fil before completing seaming, continue
all the way around body, sl st to join. Fasten off.
Working all around the edge of the body, seam and stuff the arms/legs/ears
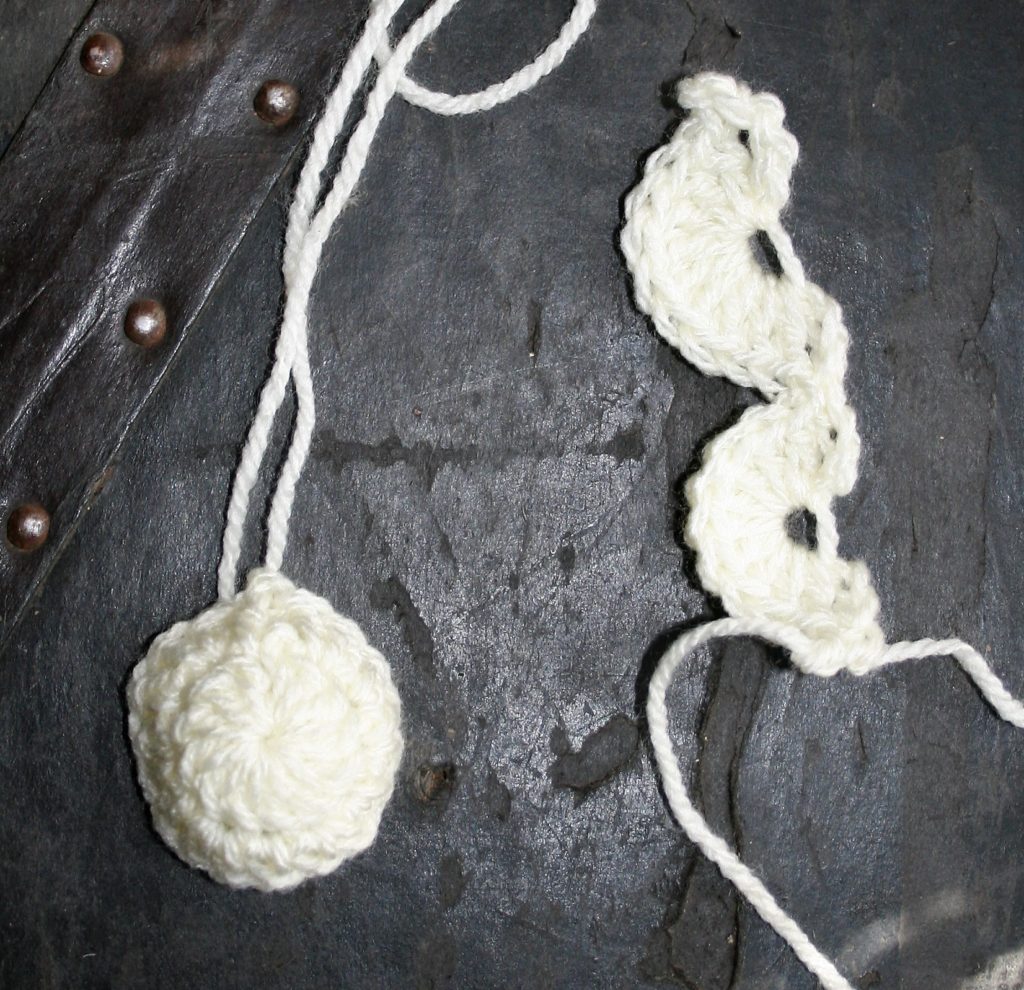
Upper Lip (Mustache)
With CC1 Ch 18, sc in 2nd ch from hook, sk next 3
chs, 9 dc in next ch, sk 3 chs, sl st in next ch, sk 3 chs, 9 dc in next ch, sk
next 3 chs, sc in last ch. Fasten off. With Shells facing downward, whip stitch
lip to face.
Tail
Round 1: With
CC1, Magic loop, ch 3, 8 dc in loop, pull loop closed, sl st to join.
Round 2: Ch 3, dc
in same st, dc in next st, [2 dc in next st, dc in next st] around, sl st to
join. Fasten off. Whip stitch tail to back of body, filling with poly-fil
before completing seaming.
Tail and Upper LIp
Nose
With CC2, ch 3, 2 dc in 3rd ch from hook, fasten
off. Whip stitch at sl st of lip.
Eyes (Make 2)
With CC3, ch 3, 5 dc in 3rd ch from hook, fasten off. Whip stitch to face.
To help you celebrate
National Crochet Month, I am sharing a technique to help advance your crochet
skills, and including a free pattern. Today I am sharing how to work Short
Rows, in both traditional and Tunisian Crochet.
First, I would like to thank Crochetville for including me in they blog tour for
this month long celebration. Everyday you are introduced to a new designer, or
hobbyist or teacher, to help inspire a new desire of crochet within you. Don’t
miss a day, check out the participants here.
There are some terms that can be a bit intimidating the
fiber arts, short rows can be one of them. However, they really are quite
straight forward.
What Makes it Special
Learning how to work short rows in crochet will help expand
crochet skills by adding subtle shaping in garments and the ability to create
dramatic effects in just about any work you wish.
A short row is exactly as it sounds, you work your row
short. Meaning you do not finish the row.
Sometimes this is worked by tapering the stitch height, by
working shorter and shorter stitches until they are near a slip stitch. The
work is turned, and possibly started by tapering the stich height upward, it is
completed.
Working As A Dart
In the case of using short rows as is seen in sewing as if a
dart, or a point in fabric, you work un-worked stitches. The next row works to
the point where two rows below the row was worked short, then it continues to
the remained of the stitches not worked three rows below.
Making A Wedge…
In the case of making a triangular shape, a multiple of
short rows are worked, so that there are fewer stiches in each row. I often use
this approach in creating shawls, essentially creating triangular wedges that I
then build atop one another.
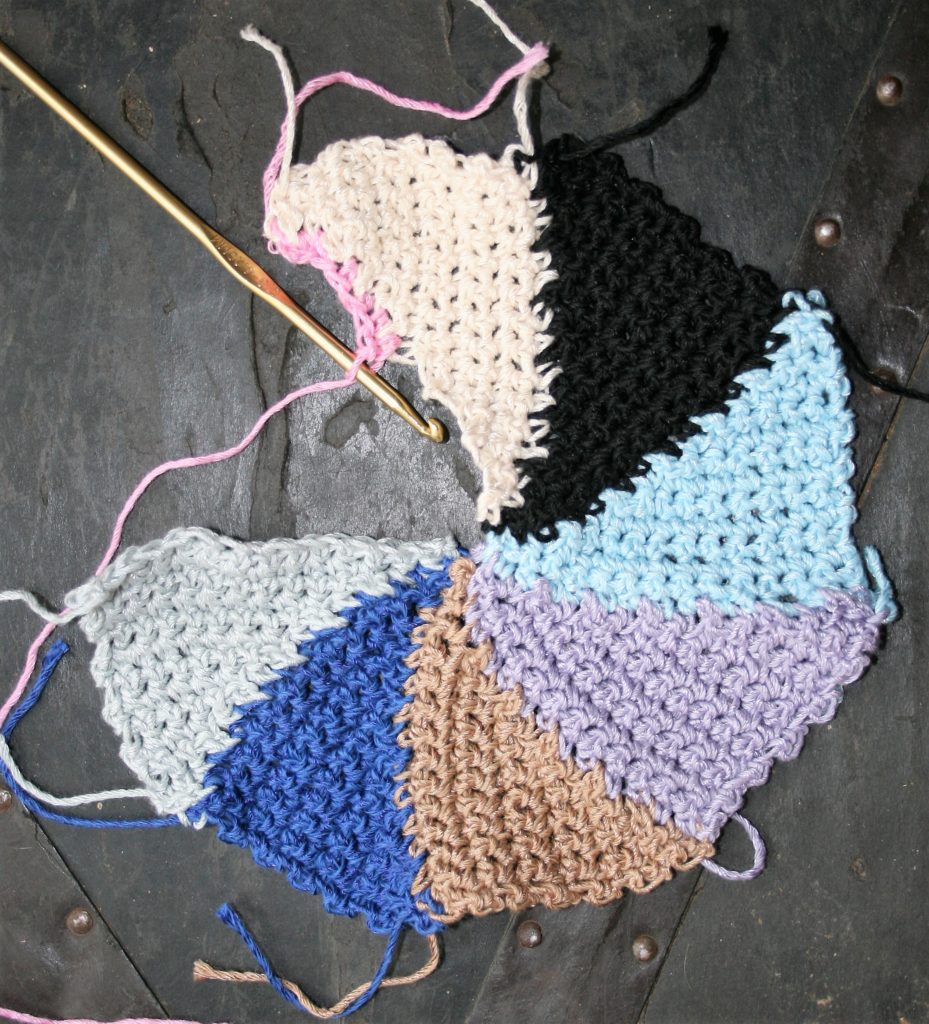
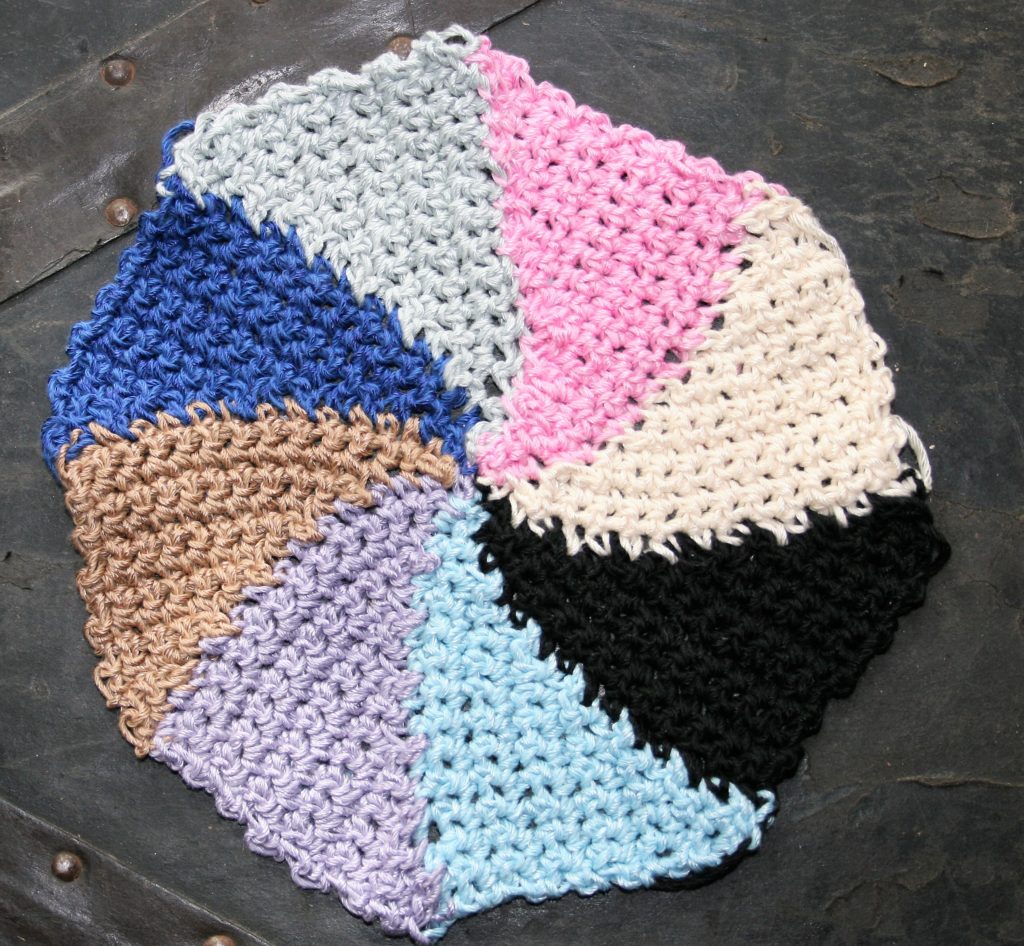
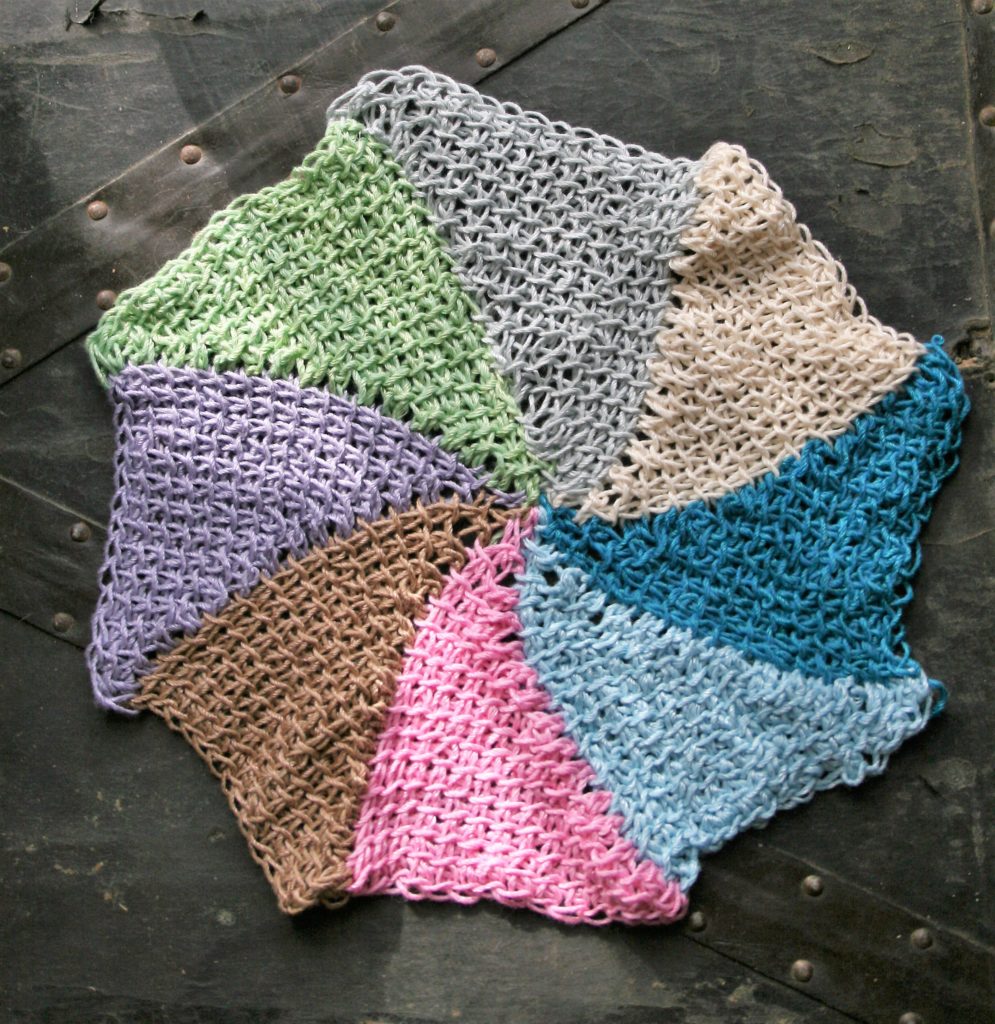
It is this last approach that I also use to create
washcloths and potholders. I create “wedges” of triangles that work on one
another to eventually create a circle.
Starting Your Circle
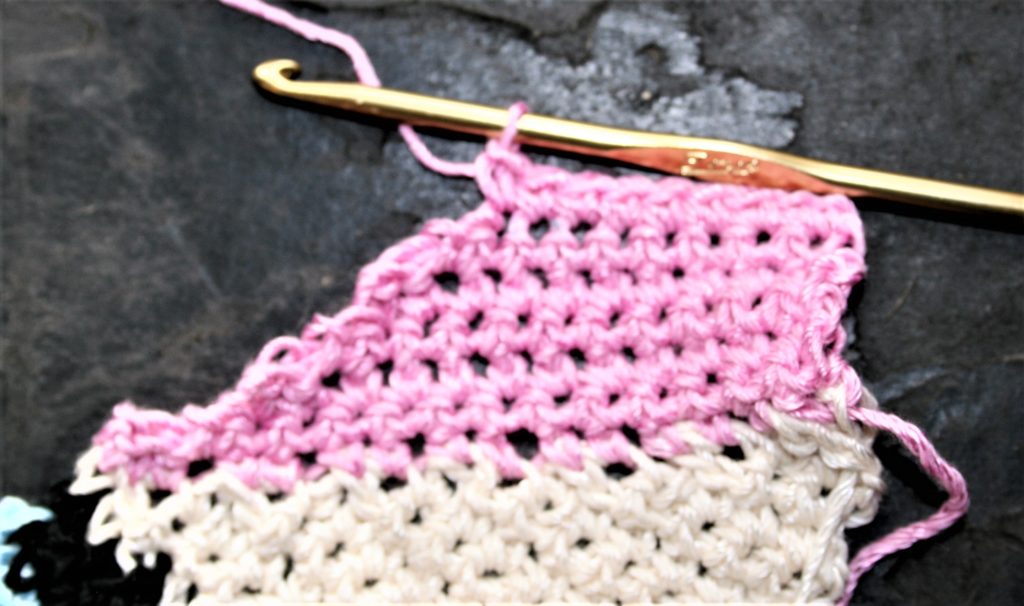
Using any yarn, with a comparable size hook, these patterns are great for scrap yarns. You can adjust the size by adjusting the number of beginning chains as the foundation. Just remember that this is only half the size of the finished product, and you will remove one stitch per row on the same edge of the fabric. It can be used utilizing either traditional crochet or Tunisian, and I share a quick pattern for both below.
Short Row Washcloth/Potholder
Short Row Crochet Washcloth/Potholder- Worked in Wedges
First Wedge
Row 1: Ch 16, sc in 2nd ch from hook, sc in each ch across, turn. -15 sc
Row 2: Sl st in same st, sl st in next st, ch 1, sc in same st, sc in each st across, turn. -14 sc
Row 3: Ch 1, sc in same st, sc in next 12 sts, leaving last st unworked, turn. -13sc
Row 4: Sl st in same st, sl st in next st, ch 1, sc in same st, sc in each st across, turn. -12 sc
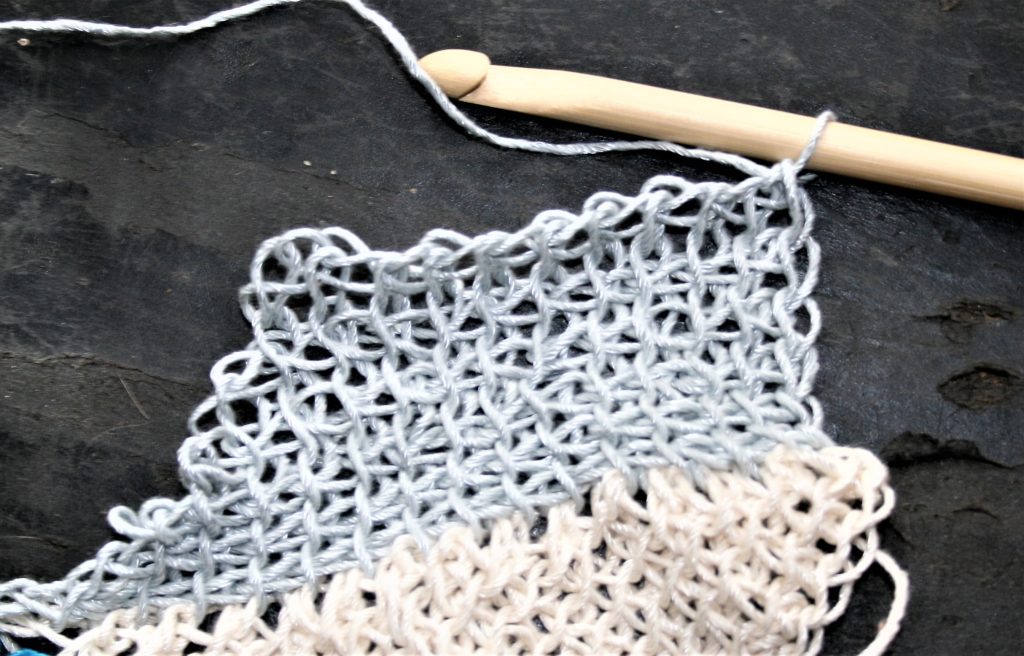
You Should Start Seeing the “Stair Stepping”
Row 5: Ch 1, sc in same st, sc in next 10 sts, leaving last st unworked, turn. -11sc
Row 6: Sl st in same st, sl st in next st, ch 1, sc in same st, sc in each st across, turn. -10 sc
Don’t work the last stitch, and slip stitch in the first stitch of the next row…removing one stitch in each row on the same edge of the fabric.
Row 7: Ch 1, sc in same st, sc in next 8 sts, leaving last st unworked, turn. -9sc
Row 8: Sl st in same st, sl st in next st, ch 1, sc in same st, sc in each st across, turn. -8 sc
Over Halfway on the First Wedge….
Row 9: Ch 1, sc in same st, sc in next 6 sts, leaving last st unworked, turn. -7sc
Row 10: Sl st in same st, sl st in next st, ch 1, sc in same st, sc in each st across, turn. -6 sc
Row 11: Ch 1, sc in same st, sc in next 4 sts, leaving last st unworked, turn. -5sc
Row 12: Sl st in same st, sl st in next st, ch 1, sc in same st, sc in each st across, turn. -4 sc
Almost There…
Row 13: Ch 1, sc in same st, sc in next 2 sts, leaving last st unworked, turn. -3sc
Row 14: Sl st in same st, sl st in next st, ch 1, sc in same st, sc in each st across, turn. -2 sc
Row 15: Ch 1, sc in same st, turn. -1 sc
Row 16: Sl st in same st, turn.
Second Wedge
Row 17: Ch 1, sc in same st, sc in the edge stitch of Rows 15-1 (essentially either the stitch skipped in a row, or the slip stitch after the row is turned), turn. -15 sc
Row 18-32: Rep Rows 2 through 16 of wedge 1.
Wedges 3-8
Repeat Second Wedge.
Seam Wedge 1 to Wedge 8.
Tunisian Short Row Washcloth/Potholder
Short Row Tunisian Crochet Washcloth/Potholder
These same principals apply to Tunisian crochet as well.
First Wedge
Row 1: Ch 15, pick up loops in each ch across. RP. -15 sts
Row 2: Tss in next 13 sts, leaving last st unworked. RP. -14 tss
Row 3: Tss in next 12 sts, leaving last st unworked. RP. -13 tss
Row 4: Tss in next 11 sts, leaving last st unworked. RP. -12 tss
Still not working the last stitch…
Row 5: Tss in next 10 sts, leaving last st unworked. RP. -11 tss
Row 6: Tss in next 9 sts, leaving last st unworked. RP. -10 tss
Don’t work the last stitch of each row of Tunisian crochet, then begin the regular Return Pass. Thus removing 1 stitch from each row on the same edge of the fabric.
Row 7: Tss in next 8 sts, leaving last st unworked. RP. -9 tss
Row 8: Tss in next 7 sts, leaving last st unworked. RP. -8 tss
Are you seeing the angle?
Row 9: Tss in next 6 sts, leaving last st unworked. RP. -7 tss
Row 10: Tss in next 5 sts, leaving last st unworked. RP. -6 tss
Row 11: Tss in next 4 sts, leaving last st unworked. RP. -5 tss
Row 12: Tss in next 3 sts, leaving last st unworked. RP. -4 tss
Almost finished the first wedge…
Row 13: Tss in next 2 sts, leaving last st unworked. RP. -3 tss
Row 14: Tss in next 1 st, leaving last st unworked. RP. -2 tss
Row 15: Tss in same st, leaving last st unworked. RP. -1 tss
Second Wedge
Row 16: Pick up loops in each unworked stitch of rows below. RP.-15tss
Help me help local communities by creating blocks for Warm Up America,
by making a block for yourself and one for a community project with this free
pattern. I will be creating a new block every few weeks and sharing it with
you, I just ask that make one for donation.
Warm Up America is a nationwide organization that
encourages local donations, but will also except donations to be sent to their
office so that blocks can be assembled and then blankets can be donated through
the United States.
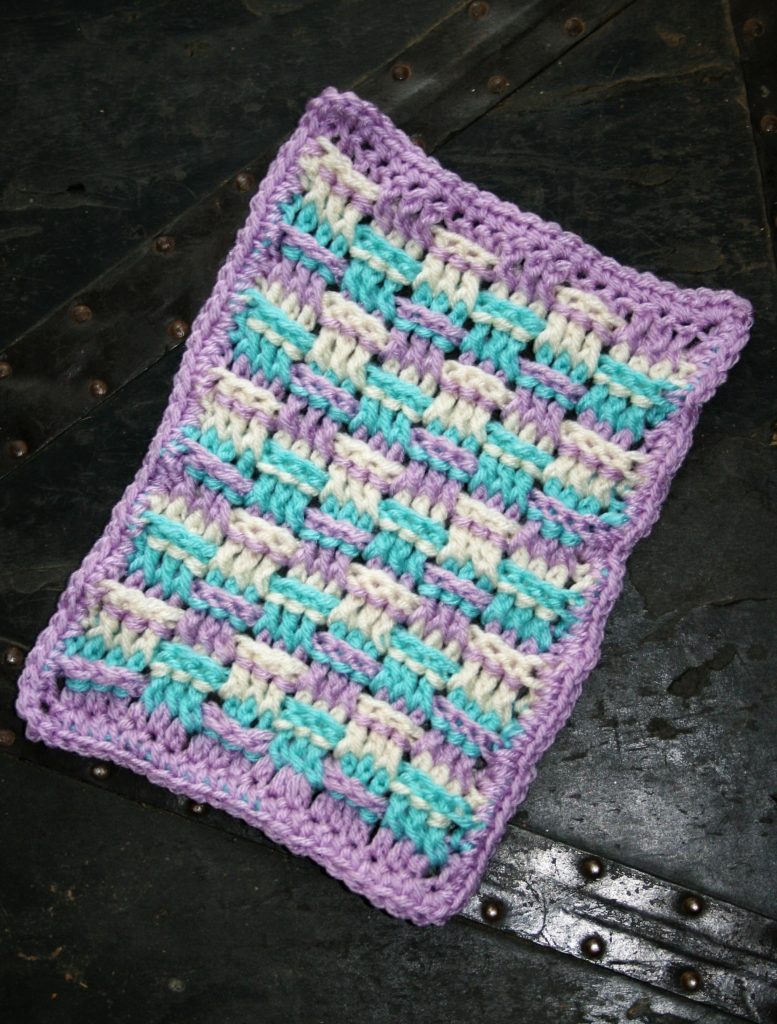
Quick Weave Block
Even if you do not want to participate with Warm Up America, please consider creating blocks, or
blankets for your local community. There are various places in every community
that accept donations.
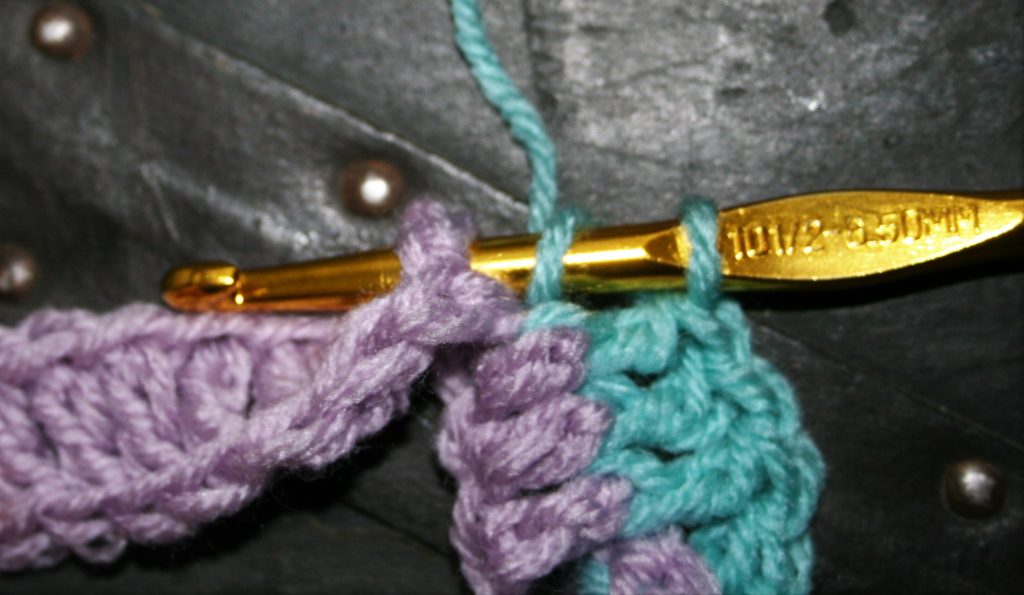
The Basket Weave Stitch
Utilizing stitch
placement is all that makes this pattern appear. It is essentially only a
double crochet stitch, however it is worked around the body or post of the
stitch a row below. There are two different stitches, the back post and the
front post.
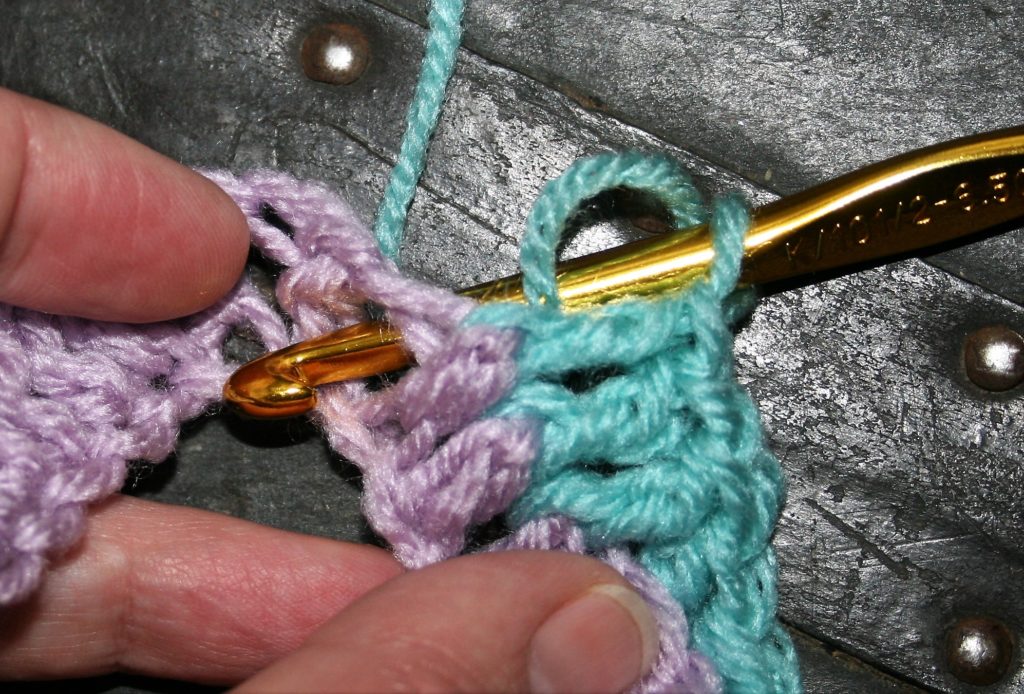
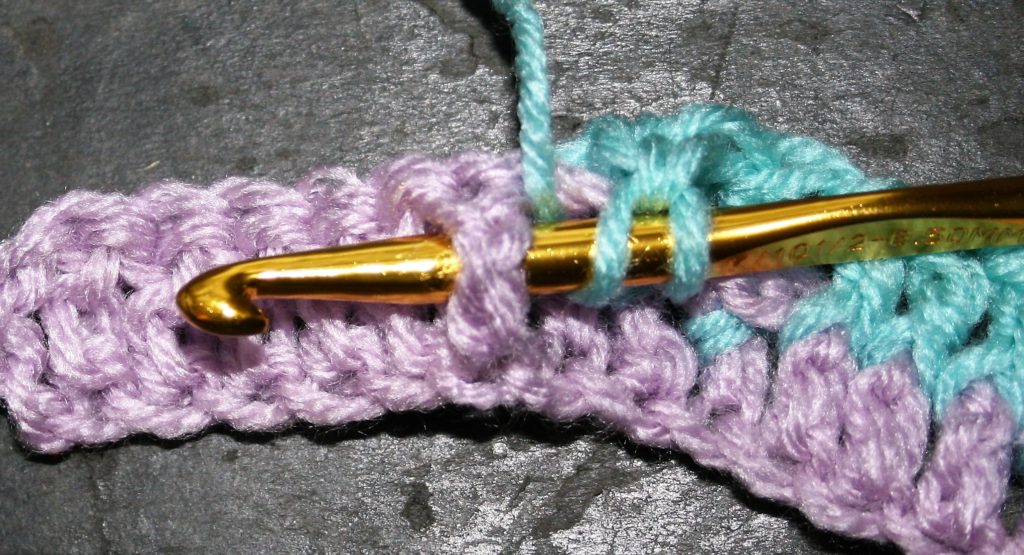
The back post pushes
the post away from the fabric facing. This is done by inserting the hook from
the back side of the fabric to the front, between the “post” or “body” of the
next stitch to be worked. Then push the hook from the front to the back of the
fabric on the other side of the “post” or “body”. I have found this easier to
view by shifting the fabric a bit and looking down at the top of the stitches,
as I can see the body being pushed backward.
Insert the Hook from the back of the fabricPush the hook to the back again. This image is looking down from the top of the fabric, note how the post is pushed to the back of the fabric.
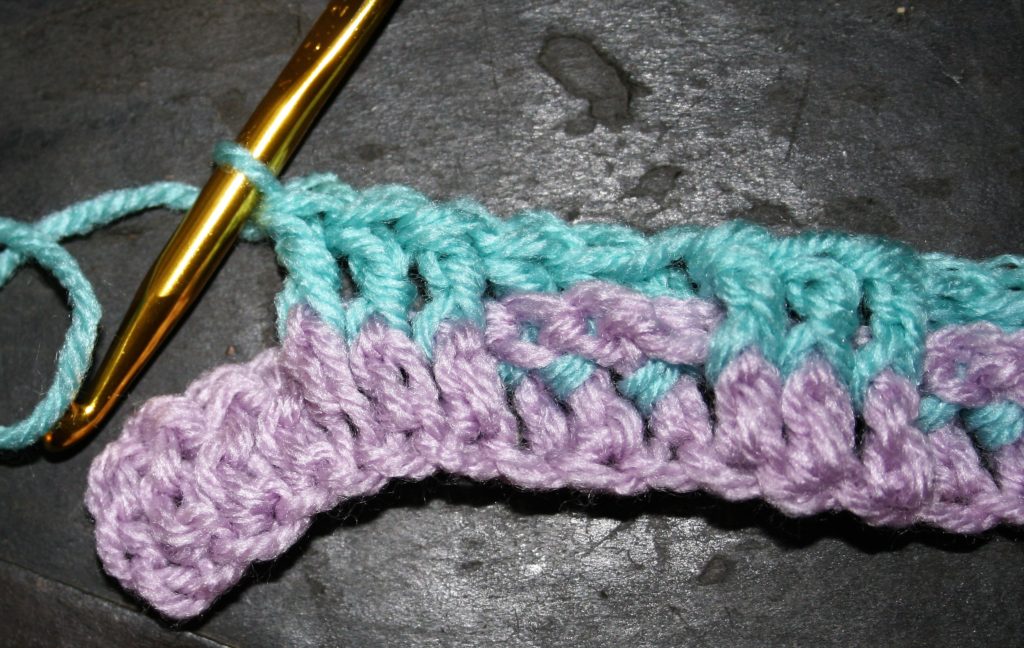
Front Post Location
The front post is
often easier to work, and pushes the post toward the front of the fabric. This
is done by inserting the hook from the front to the back of the fabric between
the “post” or “body” of the next stitch to be worked. Then re-insert the back
of the fabric to the front of the fabric on the other side of the “post” or “body”.
Hook location for the Front post
Gauge: 7”x9” rectangle
Materials
Medium weight yarn, in
3 colors MC (main color), CC1, CC2
K/10 ½/ 6.5mm hook
Notes
Back Post Double Crochet (bpdc): Yo, insert hook from back to front and then to back again around post of stitch, yo, pull up a loop, [yo, pull through 2 loops] twice.
Front Post Double Crochet (fpdc): Yo, insert hook from front to back and then to front again around post of stitch, yo, pull up a loop, [yo, pull through 2 loops] twice.
Front post double crochets are easily seen, the back post double crochets show a stripe of color in the row below and look like it is behind the row below.
Block Pattern
With MC Ch 22
Row 1: Dc in 4th ch from hook, dc in each ch across, change
to CC1, turn. – 20 dc
Row 2: Ch 3 (counts as dc now and throughout), [fpdc
in next 3 sts, bpdc in next 3 sts] 3 times, dc in last st, change to CC2, turn.
– 2 dc, 9 fpdc, 9 bpdc
Row 3: Ch 3 (counts as dc now and throughout), [bpdc
in next 3 sts, fpdc in next 3 sts] 3 times, dc in last st, change to MC, turn.
– 2 dc, 9 fpdc, 9 bpdc
The Beginning of the Repeat
Row 4: Ch 3 (counts as dc now and throughout), [fpdc
in next 3 sts, bpdc in next 3 sts] 3 times, dc in last st, change to CC1, turn.
– 2 dc, 9 fpdc, 9 bpdc
Row 5: Ch 3 (counts as dc now and throughout), [bpdc
in next 3 sts, fpdc in next 3 sts] 3 times, dc in last st, change to CC2, turn.
– 2 dc, 9 fpdc, 9 bpdc
Row 6: Ch 3 (counts as dc now and throughout), [fpdc
in next 3 sts, bpdc in next 3 sts] 3 times, dc in last st, change to MC, turn.
– 2 dc, 9 fpdc, 9 bpdc
Row 7: Ch 3 (counts as dc now and throughout), [bpdc
in next 3 sts, fpdc in next 3 sts] 3 times, dc in last st, change to CC1, turn.
– 2 dc, 9 fpdc, 9 bpdc
Row 8: Ch 3 (counts as dc now and throughout), [fpdc
in next 3 sts, bpdc in next 3 sts] 3 times, dc in last st, change to CC2, turn.
– 2 dc, 9 fpdc, 9 bpdc
Row 9: Ch 3 (counts as dc now and throughout), [bpdc
in next 3 sts, fpdc in next 3 sts] 3 times, dc in last st, change to MC, turn.
– 2 dc, 9 fpdc, 9 bpdc
Just Finished the Pattern Repeat
Rows 10-16: Rep Rows 4-9 once.
Edge
Rnd 1: Ch 1, sc in sc in same st, sc in each st
across until 1 st remains, 3 sc in last st, working over row ends evenly sc
across to beg ch, 3 sc in last st, working in unused loops of beg ch, sc in
each chain across, 3 sc in last st, working over row end evenly sc across, 2 sc
in last st, sl st to beg sc, fasten off.
To help you celebrate National Crochet Month, I am sharing a technique to help advance your crochet skills, and including a free pattern. Today I am sharing how to work Tunisian Crochet in the Round.
First, I would like to thank Crochetville for including me in they blog tour for this month long celebration. Everyday you are introduced to a new designer, or hobbyist or teacher, to help inspire a new desire of crochet within you. Don’t miss a day, check out the participants here.
What Makes this Special
Tunisian crochet is an interesting technique that produces a
fabric that can look woven, or even knitted. It is worked with in a two-step
process. The first step is to load up the hook with loops (Forward Pass), like
casting on in knitting, the second step is working all the loops off until only
one remains (Return Pass).
Here is One Option
This back and for of the two-steps, actually can make it a
bit challenging to work the fabric in the round, so often it is worked flat and
then seamed. However, there are a couple of different approaches to working in
the round. One is to work with a double ended crochet hook, so you can load
from one end and work off the loops with the other. This process works the
piece in a spiral and two strands of yarn, it looks nice, but finding double
ended hooks is not exactly an easy task.
The Option I like
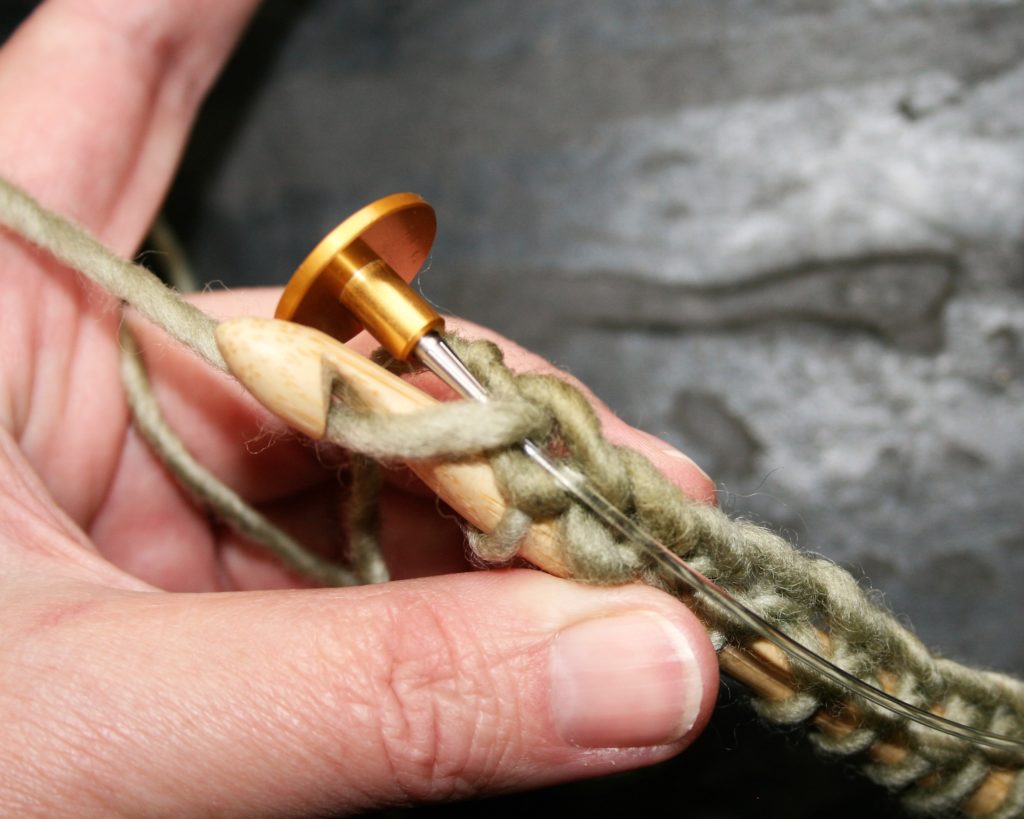
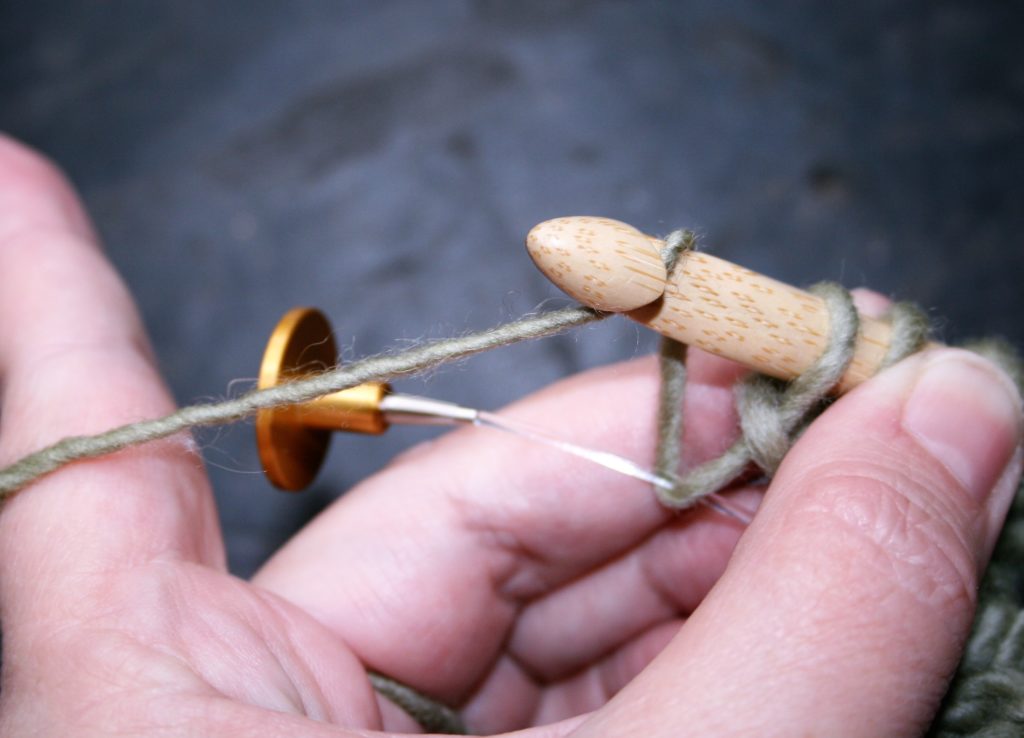
The method I employ more is one that I discovered from Jennifer Hanson, the Stitch Diva. It is a Tunisian Loop Return Pass. It involves using a cabled Tunisian hook, and adding joining loops to the fabric while working the Return Pass. I have tweaked it a bit from what Jennifer has in her video, as it works for me. So let me share my tweaked version.
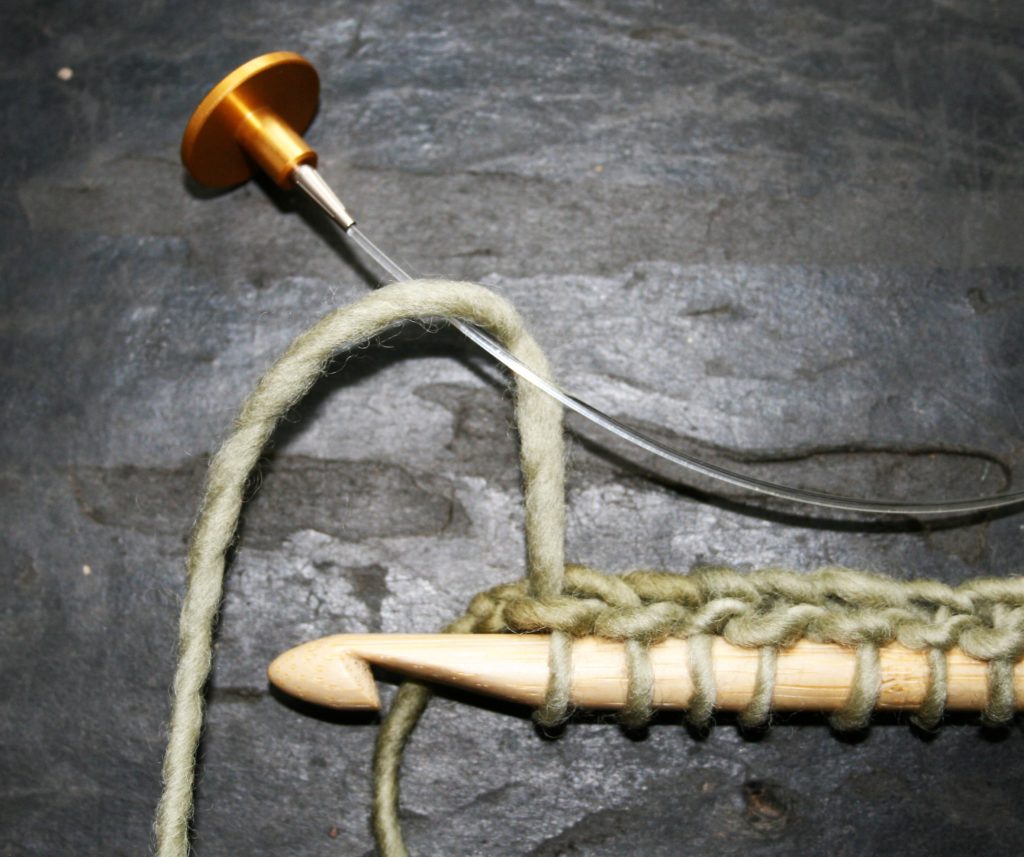
How to Make it Work
After you have completed the Forward Pass of a Round, fold the
cable of the hook so that the end is next to the hook, the next step for a return
pass is to now yarn over and pull through a loop, you will still do this step
but you wrap the yarn around the cable as you are yarning over. Basically I
have the cable laying adjacent to the hook so that when I yarn over, the yarn
is coming over the cable as well, and then I pull through 1 loop.
Include the cable in the yarn over.Yarn over and pull through 1 loop on hook.
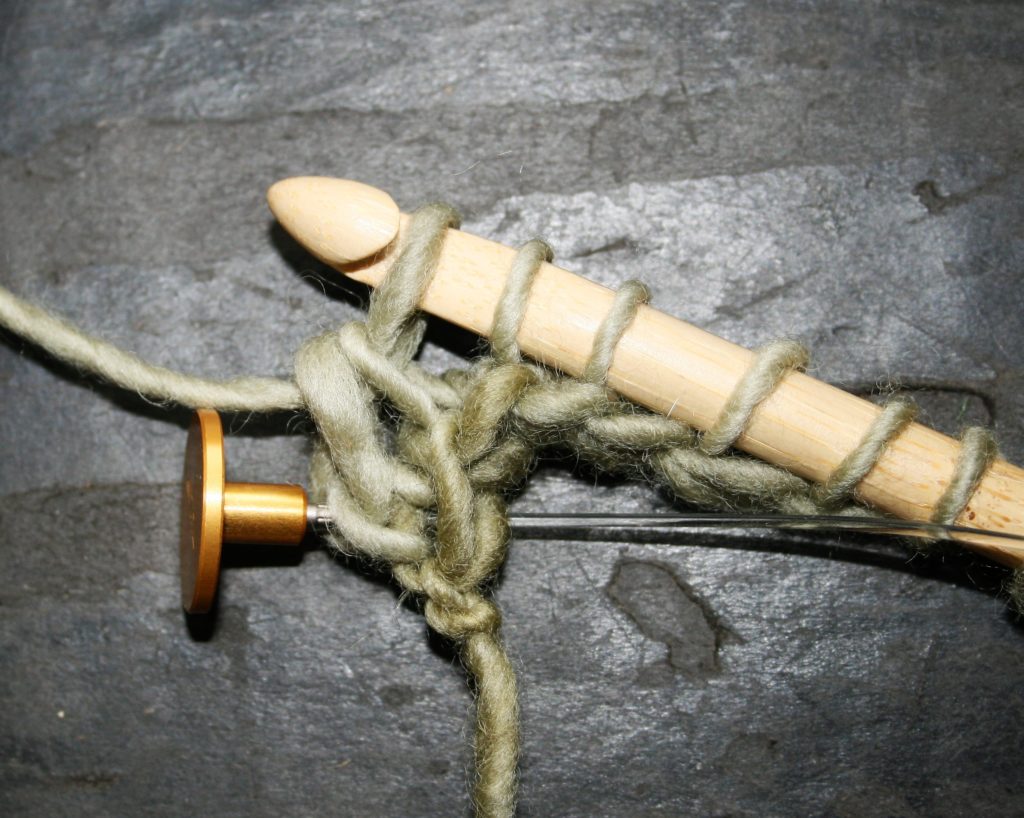
Keeping the cable laying adjacent to the hook still, I now yarn over and pull through 2 loops. At this point I have just added 2 loops to the end of the cable.
Yarn over the cable and hook again, then pull through 2 loops on the hook. After working the 2 added joining loops to the cable, now work the standard process for a Return Pass of Yo, pull through 2 loops, across until 2 loops from the forward pass, and the 2 added joining loops remain.
Finishing the Join
I now continue the Return Pass, by yarning over and pulling through 2 loops without working over the cable until 2 loop from the Forward Pass and the 2 added loops remain, (this will be 4 loops on the hook). Yarn over and pull through the last 4 loops.
2 loops of the Return Pass, and the 2 added joining loopsPush the added joining loops up the cable and onto the hook. Yarn over and pull through all loops. First Round is joined.
Work all subsequent round this way, and the fabric with be
joined.
Yarn over cable and hook before beginning the Return Pass of every round.
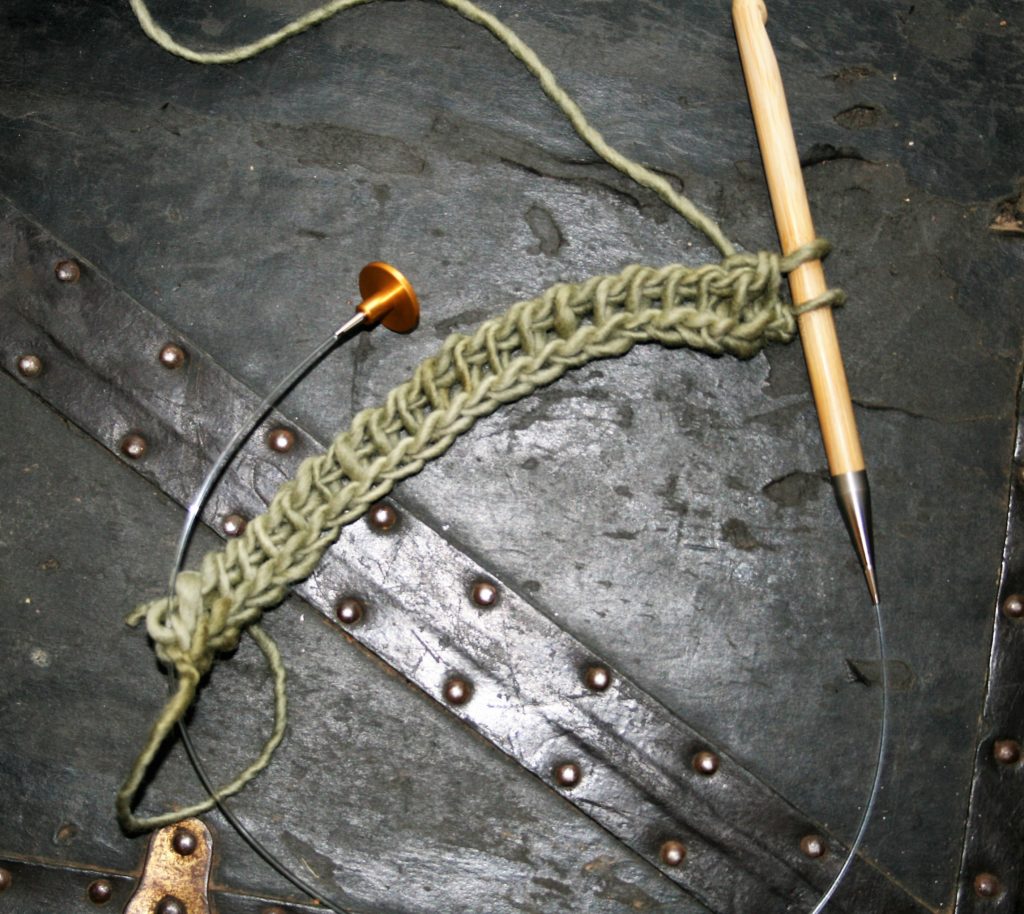
In some of the Tunisian stitches there may be some gapping at the join. I have found this with the Tunisian Full Stitch for example, but overall it is satisfactory to me. In addition as the fabric is joined in the Return Pass, during the very first Round the beginning chain is not joined, so when I weave in the ends, I use this opportunity to close this gap.
The look of the seam after a few rounds.
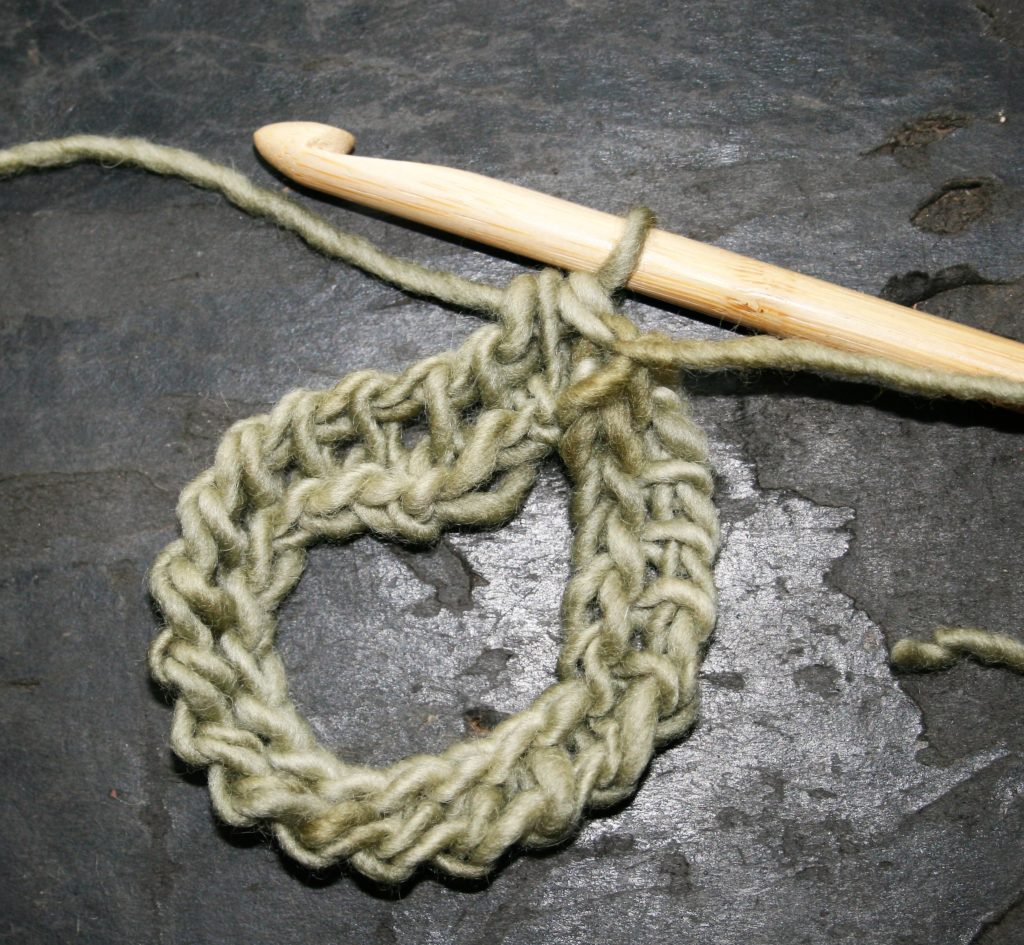
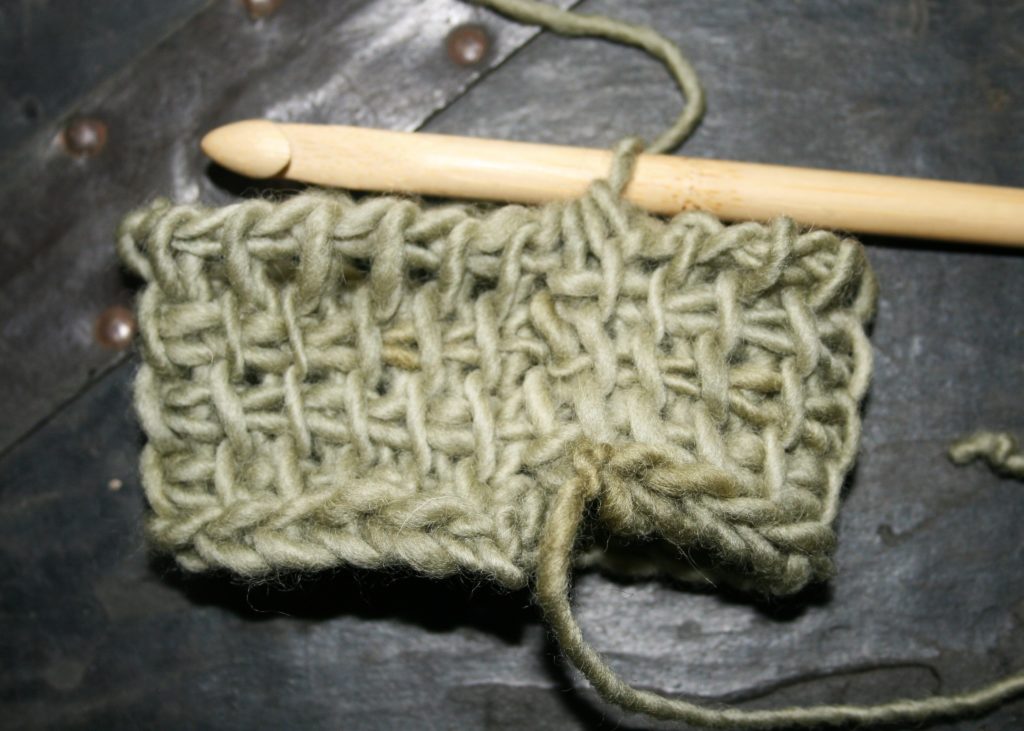
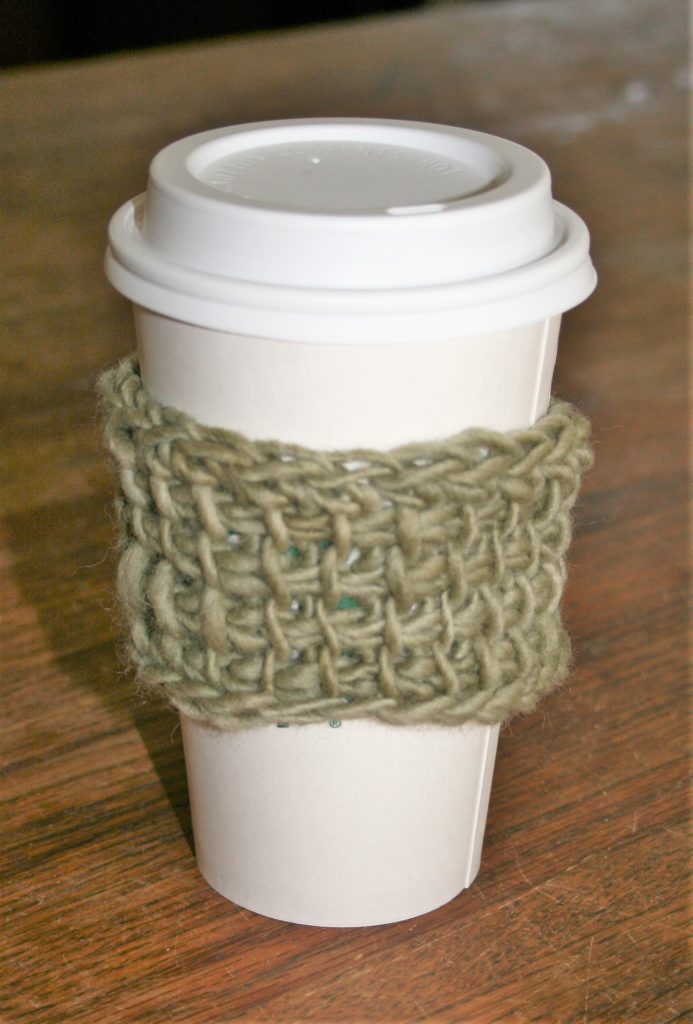
Tunisian Cup Cozy Pattern
Tunisian Cup Cozy
Materials
Any medium weight yarn
M/N (9 mm) Tunisian cabled crochet hook
Special Stitches
Tunisian
Loop Return Pass (TLRP)–
*Bring end of cable to working end of hook, bring working yarn to bottom
of hook and in front of cable, loop working yarn under cable to top of hook,**
YO, pull through a loop; Rep from * to ** once, YO, pull through 2 loops (2
loops added at end of row); (Yo, pull through 2 loops) until 4 loops remain on
hook, YO, pull through 4 loops.
Tunisian Simple Stitch (Tss)—Working from right to left, hold working yarn behind work, insert hook under next vertical bar, yarn over and draw up a loop.
Getting Started
Rnd 1: Ch 23, load hook by inserting hook in next ch, YO, pull up a loop across. TLRP. -23 sts
Rnd 2 & 3: Tss in each stitch. TLRP.
Rnd 4: Sc in each st across. Fasten off. Weave in ends.